

Introduction
Oracle Zero Downtime Migration (ZDM) is a free-to-use software solution that allows you to automate your Oracle database migrations to Oracle Cloud, Multicloud, and engineered systems on-premises.
In this blog post, we will install the ZDM software to be ready to use in the next blog posts that will show each of the migration methods. The aim of these posts is to get you started with a minimal working configuration, as simple as possible. Check the documentation for a complete installation guide.
Preparation
It is recommended to have a dedicated host for the ZDM software installation. The host where the ZDM software is installed is referred to as the ZDM Service Host. The following prerequisites must be met on that host:
- Oracle Linux 8, Oracle Linux 9, or Red Hat Enterprise Linux 8.
- 100 GB of free storage space.
- No Oracle Grid Infrastructure running on it.
- Possible to connect to the source and target database (servers).
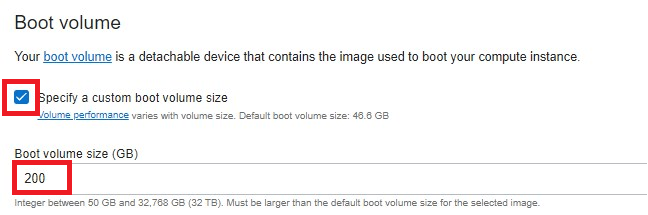
For this blog post, we will use a Compute VM on OCI for the ZDM Service Host. In the web console, click the navigation menu on the upper left side and select Compute > Instances. Click on Create Instance. I’ll choose the name “zdmhost” and Oracle Linux 8. Click on “Specify a custom boot volume size” and put 200 GB as the boot volume size. With that we will have the required 100 GB of free space:
Fill out the remaining needed information and click Create. After a few minutes, you’ll be able to log in to the compute instance.
ZDM Installation
Log in to the ZDM host via ssh.
Step 1: Check available space on the file system:
[opc@zdmhost ~]$ sudo su -
[root@zdmhost ~]# df -h /
Filesystem      Size  Used Avail Use% Mounted on
/dev/sda3       192G  4.1G  188G   3% /
We have 188G already available.
If you expand the boot volume of an Oracle Cloud Infrastructure (OCI) Linux-based instance, you can then use the oci-growfs utility to expand the root partition of the instance. This lets you fully use the newly expanded boot volume.
#as root user
/usr/libexec/oci-growfs -y
Step 2: Create a new group, user, and the needed directories. As root user:
[root@zdmhost ~]# groupadd zdm
[root@zdmhost ~]# useradd -g zdm zdmuser
[root@zdmhost ~]# mkdir /home/zdmuser/zdminstall
[root@zdmhost ~]# mkdir /home/zdmuser/zdmhome
[root@zdmhost ~]# mkdir /home/zdmuser/zdmbase
[root@zdmhost ~]# chown -R zdmuser:zdm /home/zdmuser/
Step 3: Install the required software packages. As root user:
[root@zdmhost ~]# yum install unzip libaio oraclelinux-developer-release-el8 libnsl ncurses-compat-libs glibc-devel expect -y
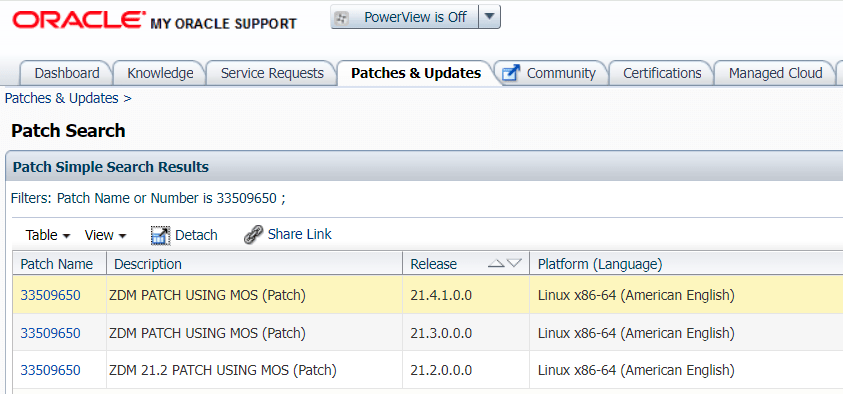
Step 4: Download the latest ZDM main release version from the Oracle ZDM product page (version 26.1). For any following patching (e.g., 26.2), check My Oracle Support (MOS) by searching for patch number 33509650 in the “Patches & Updates” tab:

As shown, for 21.5 the main release is the latest version (no patches on MOS for 21.5):
Copy the zip file to the ZDM host into the /home/zdmuser/zdminstall/ directory. Change the owner of the zip file to zdmuser. As root user:
[root@zdmhost ~]# chown zdmuser:zdm /home/zdmuser/zdminstall/V1045330-01.zip
Step 5: Install the ZDM software. As zdmuser:
Add the ZDMHOME and ZDMBASE to the zdmuser .bash_profile. As zdmuser:
[zdmuser@zdmhost ~]$ vi .bash_profile
#add
export ZDMHOME=/home/zdmuser/zdmhome
export ZDMBASE=/home/zdmuser/zdmbase

#Source the .bash_profile file to set the variables
[zdmuser@zdmhost ~]$ . .bash_profile
Unzip the ZDM software. As zdmuser:
[zdmuser@zdmhost ~]$ cd /home/zdmuser/zdminstall/
[zdmuser@zdmhost zdminstall]$ unzip V1045330-01.zip
Start the installation by running the ZDM installation script. As zdmuser:
[zdmuser@zdmhost zdminstall]$ /home/zdmuser/zdminstall/zdm26.1/zdminstall.sh setup oraclehome=$ZDMHOME oraclebase=$ZDMBASE ziploc=/home/zdmuser/zdminstall/zdm26.1/zdm_home.zip
...
ZDM service setup finished successfully...
Step 6: Start ZDM and check the status. As zdmuser:
[zdmuser@zdmhost ~]$ $ZDMHOME/bin/zdmservice start
...
Server started successfully.

[zdmuser@zdmhost ~]$ $ZDMHOME/bin/zdmservice status
---------------------------------------
        Service Status
---------------------------------------
 Running:       true
...
Step 7: Verify the installed version:
[zdmuser@zdmhost ~]$ $ZDMHOME/bin/zdmcli -build
full version: "26.1.0"
patch version: ""
label date: 260410.1
ZDM kit build date: Apr 11 2026 17:13:53 UTC
CPAT build version: 26.3.0
Post Tasks
Task 1: Create an SSH key pair for zdmuser. This will be used later on to log in to the sources (and target) database server via SSH. In Oracle Linux 8, the default is OPENSSH. ZDM requires the key to be in RSA format. As zdmuser:
[zdmuser@zdmhost ~]$ ssh-keygen -m PEM -t rsa
#keep the defaults and click ENTER
Check the key format:
[zdmuser@zdmhost ~]$ head -n1 .ssh/id_rsa
-----BEGIN RSA PRIVATE KEY-----
#to change the format:
[zdmuser@zdmhost ~]$ ssh-keygen -p -m PEM -f .ssh/id_rsa
Task 2: Create an API Signing Key. This will be used to authenticate OCI CLI against the Cloud Control Plane. As zdmuser:
[zdmuser@zdmhost ~]$ mkdir ~/.oci
[zdmuser@zdmhost ~]$ openssl genrsa -out ~/.oci/oci_api_key.pem 2048
[zdmuser@zdmhost ~]$ chmod go-rwx ~/.oci/oci_api_key.pem
[zdmuser@zdmhost ~]$ openssl rsa -pubout -in ~/.oci/oci_api_key.pem -out ~/.oci/oci_api_key_public.pem
#Copy the contents of the public key to the clipboard using pbcopy
[zdmuser@zdmhost ~]$ cat ~/.oci/oci_api_key_public.pem
Upload the PEM public key in the Console. From your user’s page, click on Tokens and keys and Add API key. Select Paste a public key, paste the output from the previous command, and click Add.
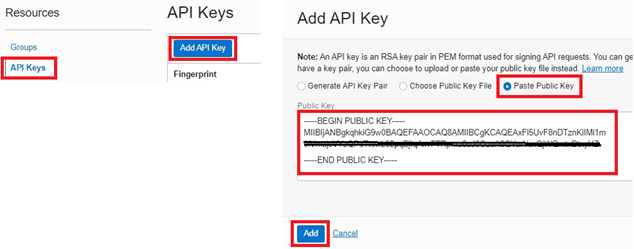
The key’s fingerprint will be displayed, for example, 9f:3b:55:c1:bd:a4:3e:de:d7:e1:a1:12:eb:93:ba:3a. You’ll need this later on for the ZDM response file parameter OCIAUTHENTICATIONDETAILS_USERPRINCIPAL_FINGERPRINT.
Task 3 (optional): Install OCI CLI. As zdmuser:
[root@zdmhost ~]$ dnf -y install oraclelinux-developer-release-el8
[root@zdmhost ~]$ dnf install python36-oci-cli

[zdmuser@zdmhost ~]$ oci setup config
Do you want to generate a new API Signing RSA key pair? [Y/n]: n
#use the once created in Task 2
Enter the location of your API Signing private key file: /home/zdmuser/.oci/oci_api_key.pem
Task 4 (optional): Check the CLI configuration, e.g., by creating an Object Storage bucket. As zdmuser:
[zdmuser@zdmhost ~]$ export COMPARTMENT_OCID=ocid1.compartment.oc1...
[zdmuser@zdmhost ~]$ oci os bucket create --compartment-id $COMPARTMENT_OCID --name zdmbucket
{
  "data": {
  ...
}
Task 5: Make sure port 1521 is open on your source and target database servers. As user root:
[root@onpremdb ~]# firewall-cmd --permanent --add-port=1521/tcp
success
[root@onpremdb ~]# firewall-cmd --reload
success
Log Files
ZDM creates log files on the source and target hosts (physical migrations) in the directory
$ORACLE_BASE/zdm/zdm_<db_name>_<job_id>/zdm/log/
Conclusion
ZDM version 26.1 provides additional capabilities for database migrations. Make sure to always use the latest release. The automation enables you to test your migration multiple times as needed, and when you are ready, ensure that you are executing the same steps and reduce human error.
Further Reading
- Oracle Zero Downtime Migration
- Doc: Move to Oracle Cloud Using Zero Downtime Migration
- Part 1/5: Zero Downtime Migration (ZDM) – Introduction & Installation (this blog post)
- Part 2/5: Zero Downtime Migration (ZDM) – Logical Online Migration using Oracle GoldenGate
- Part 3/5: Zero Downtime Migration (ZDM) – Logical Offline Migration using Data Pump
- Part 4/5: Zero Downtime Migration (ZDM) – Physical Online Migration using Data Guard
- Part 5/5: Zero Downtime Migration (ZDM) – Physical Offline Migration using RMAN
- Use an Existing RMAN Backup with Zero Downtime Migration
- AWS RDS for Oracle to Autonomous Database using Zero Downtime Migration
- Zero Downtime Migration (ZDM) – Logical Offline Migration to Co-Managed Database Services
- Zero Downtime Migration (ZDM) – Logical Online Migration to VM DB Systems
