

Introduction
From the very first version, Oracle Zero Downtime Migration (ZDM) supports physical online, and offline migrations using RMAN and Data Guard. However, every migration job was creating a new RMAN backup from the source database to be used to create the target database.
Starting with ZDM version 21.2, you can skip the full backup phase in the migration workflow and use an already existing backup instead. This feature makes your database migrations faster and more efficient, especially for large databases.
- All types of backup devices are supported: DISK, SBT_TAPE, and ZDLRA. Oracle Object Storage is also supported as it is configured as an SBT_TAPE device for RMAN.
- Only level 0 backups with
incremental_level=0are valid to be used with this feature. - You must assign a backup TAG to your RMAN level 0 backup.
- ZDM skips the full backup (level 0) but performs an incremental level 1 backup.
In this blog post, we will walk through the steps needed to run a ZDM migration job using an existing backup.
The Environment
- Source: Oracle Database running on a compute VM on Oracle Cloud to emulate an on-premises database with IP 10.0.2.183.
- Target: Database Cloud Service VM DB System on Oracle Cloud with IP 10.0.2.162.
- Object Storage bucket to Store RMAN backups named onpremdb_backup.
ZDM requires you to configure a placeholder database target environment before beginning the migration process. ZDM uses the provisioned target as a template and recreates the target during the course of migration.
- Create the database with the same DB_NAME as the source database.
- The SYS password must be the same on the source and target database.
- Provision the target database from the cloud console without enabling automatic backups.
- The target database version should be the same as the source database version. If the target database is at a higher patch level than the source database, then ZDM runs datapatch as part of the migration.
- The COMPATIBLE database initialization parameter must be the same on the source and target database.
- ZDM release 21c supports only Grid Infrastructure-based database services as targets.
Preparation
Step 0: Take a level 0 backup of your on-premises database
As I don’t have an existing backup for my environment, I’ll create one first and store it into Object Storage. to accomplish this, I’ll install the Oracle Database Cloud Backup Module on the source host. Download the opc_installer.zip file and unzip it into a user-defined directory, e.g. /home/oracle:
[oracle@source ~] unzip opc_installer.zip
[oracle@source ~] cd /home/oracle/opc_installer/opc_installer/
[oracle@source ~] mkdir /home/oracle/lib
[oracle@source ~] java -jar opc_install.jar -opcId 'sinan.petrus.toma@oracle.com' -opcPass 'GoC-yt:YF18BkeoCe3' -container onpremdb_backup -walletDir ~/hsbtwallet/ -libDir ~/lib/ -configfile ~/config -host https://swiftobjectstorage.eu-frankfurt-1.oraclecloud.com/v1/oraseemeadesandbox

Oracle Database Cloud Backup Module wallet created in directory /home/oracle/hsbtwallet.
Oracle Database Cloud Backup Module initialization file /home/oracle/config created.
Downloading Oracle Database Cloud Backup Module Software Library from file opc_linux64.zip.
Download complete.
Create a backup:
[oracle@source ~]$ rman target /
RMAN> CONFIGURE CHANNEL DEVICE TYPE 'SBT_TAPE' PARMS 'SBT_LIBRARY=/home/oracle/lib/libopc.so, RMAN> SBT_PARMS=(OPC_PFILE=/home/oracle/config)';
RMAN> CONFIGURE DEFAULT DEVICE TYPE TO SBT_TAPE;
RMAN> CONFIGURE BACKUP OPTIMIZATION ON;
RMAN> CONFIGURE CONTROLFILE AUTOBACKUP ON;
RMAN> CONFIGURE CONTROLFILE AUTOBACKUP FORMAT FOR DEVICE TYPE SBT_TAPE TO '%F';
RMAN> CONFIGURE ENCRYPTION FOR DATABASE ON;

RMAN> RUN {
ALLOCATE CHANNEL c1 DEVICE TYPE SBT FORMAT '%d_%I_%T-%s_%p' PARMS 'SBT_LIBRARY=/home/oracle/lib/libopc.so, SBT_PARMS=(OPC_PFILE=/home/oracle/config)';
ALTER SYSTEM ARCHIVE LOG CURRENT;
BACKUP AS COMPRESSED BACKUPSET FORCE INCREMENTAL LEVEL 1 FOR RECOVER OF TAG 'ONPREMBCK2' DATABASE FORMAT '%d_%I_%T-%s_%p_DBF' SECTION SIZE 4G;
}
The first execution will create a level 0 backup.
channel c1: starting compressed incremental level 0 datafile backup set
Any further execution of the same command will create a differential incremental backup.
channel c1: starting compressed incremental level 1 datafile backup set
Step 1: Prepare the source database host
Copy the SSH public key for zdmuser from the ZDM host to the .ssh/authorized_keys file on the source database host for the user you want to use for login, in this case, opc:
#on ZDM host as zdmuser
[zdmuser@zdmhost ~]$ cat .ssh/id_rsa.pub
#on the source database host as user opc
[opc@source ~]$ vi .ssh/authorized_keys
#insert the public key and save the changes
Add the target database server hostname and IP information into the /etc/hosts file. As root user:
[root@source ~]# vi /etc/hosts
#add the following entries
10.0.2.162  target.pubsubnetlb.vcnfra.oraclevcn.com  target
10.0.2.162  target-scan.pubsubnetlb.vcnfra.oraclevcn.com  target-scan
Step 2: Prepare the target database host
Copy the SSH public key for zdmuser from the ZDM host to the .ssh/authorized_keys file on the target database host for the user you want to use for login, in this case, opc:
#on ZDM host as zdmuser
[zdmuser@zdmhost ~]$ cat .ssh/id_rsa.pub
#on the target database host as user opc
[opc@target ~]$ vi .ssh/authorized_keys
#insert the public key and save the changes
Add the source database server hostname and IP information into the /etc/hosts file. As root user:
[root@target ~]# vi /etc/hosts
#add the following entries
10.0.2.183  source
Step 3: Prepare the ZDM host
Add the source and target servers hostname and IP information into the /etc/hosts file. As root user:
[root@zdmhost ~]# vi /etc/hosts
#add the following entries
10.0.2.183  source
10.0.2.162  target.pubsubnetlb.vcnfra.oraclevcn.com  target
Test the connectivity to the source and target database servers:
[zdmuser@zdmhost ~]$ ssh -i /home/zdmuser/.ssh/id_rsa opc@source
Last login: Sun Apr 11 14:11:40 2021 from 130.61.21.179
[opc@source ~]$

[zdmuser@zdmhost ~]$ ssh -i /home/zdmuser/.ssh/id_rsa opc@target
Last login: Mon Apr 12 08:43:39 2021 from 185.108.11.223
[opc@target ~]$
Verify that TTY is disabled for the SSH privileged user. If TTY is disabled, the following command returns the date from the remote host without any errors:
[zdmuser@zdmhost ~]$ ssh -i /home/zdmuser/.ssh/id_rsa opc@source "/usr/bin/sudo /bin/sh -c date"
Mon Sep  6 10:20:17 UTC 2021

[zdmuser@zdmhost ~]$ ssh -i /home/zdmuser/.ssh/id_rsa opc@target "/usr/bin/sudo /bin/sh -c date"
Mon Sep  6 10:20:20 UTC 2021
Step 4: Create the physical migration response file
You’ll find a template at $ZDMHOME/rhp/zdm/template/zdm_template.rsp on the ZDM host that contains a brief description of the parameters and their possible values. Here we will create a new response file with the minimum parameters required. As zdmuser:
[zdmuser@zdmhost ~]$ vi /home/zdmuser/physical_offline.rsp

MIGRATION_METHOD=OFFLINE_PHYSICAL
ZDM_USE_EXISTING_BACKUP=TRUE
ZDM_BACKUP_TAG=ONPREMBCK2
HOST=https://swiftobjectstorage.eu-frankfurt-1.oraclecloud.com/v1/oraseemeadesandbox
OPC_CONTAINER=onpremdb_backup
TGT_DB_UNIQUE_NAME=ORCL_fra13w
PLATFORM_TYPE=VMDB
The essential parameters here are ZDM_USE_EXISTING_BACKUP=TRUE to tell ZDM to skip the full backup phase and use an existing backup created with the backup Tag ZDM_BACKUP_TAG=ONPREMBCK2.
If the ZDM_BACKUP_TAG value is provided and ZDM_USE_EXISTING_BACKUP is set to FALSE, then ZDM will create a full backup with the provided tag.
Evaluation
Step 5: Evaluate the configuration
On the ZDM host as zdmuser:
[zdmuser@zdmhost ~]$ $ZDMHOME/bin/zdmcli migrate database \
-rsp /home/zdmuser/physical_offline.rsp \
-sourcedb ORCL_fra1j7 \
-sourcenode source \
-srcauth zdmauth \
-srcarg1 user:opc \
-srcarg2 identity_file:/home/zdmuser/.ssh/id_rsa \
-srcarg3 sudo_location:/usr/bin/sudo \
-targetnode target \
-tgtauth zdmauth \
-tgtarg1 user:opc \
-tgtarg2 identity_file:/home/zdmuser/.ssh/id_rsa \
-tgtarg3 sudo_location:/usr/bin/sudo \
-targethome /u01/app/oracle/product/19.0.0.0/dbhome_1 \
-backupuser "sinan.petrus.toma@oracle.com" \
-evall

Enter source database ORCL_fra1j7 SYS password:
Enter user "sinan.petrus.toma@oracle.com" password:
zdmhost2: 2021-09-06T10:32:05.410Z : Processing response file ...
Operation "zdmcli migrate database" scheduled with the job ID "46".
Check the job status. On the ZDM host as zdmuser:
[zdmuser@zdmhost ~]$ while :; do $ZDMHOME/bin/zdmcli query job -jobid 46; sleep 10; done

Current status: EXECUTING
Current Phase: "ZDM_VALIDATE_SRC"
Result file path: "/home/zdmuser/zdmbase/chkbase/scheduled/job-46-2021-09-06-10:32:09.log"

ZDM_GET_SRC_INFO ........... PRECHECK_PASSED
ZDM_GET_TGT_INFO ........... PRECHECK_PASSED
ZDM_PRECHECKS_SRC .......... PRECHECK_PASSED
ZDM_PRECHECKS_TGT .......... PRECHECK_PASSED
ZDM_SETUP_SRC .............. PRECHECK_PASSED
ZDM_SETUP_TGT .............. PRECHECK_PASSED
ZDM_PREUSERACTIONS ......... PRECHECK_PASSED
ZDM_PREUSERACTIONS_TGT ..... PRECHECK_PASSED
ZDM_OBC_INST_SRC ........... PRECHECK_PASSED
ZDM_OBC_INST_TGT ........... PRECHECK_PASSED
ZDM_VALIDATE_SRC ........... STARTED
ZDM_VALIDATE_TGT ........... PENDING
ZDM_POSTUSERACTIONS ........ PENDING
ZDM_POSTUSERACTIONS_TGT .... PENDING
ZDM_CLEANUP_SRC ............ PENDING
ZDM_CLEANUP_TGT ............ PENDING
Migration
Step 6: Initiate the migration.
Execute the same command for evaluation, but this time without the -eval parameter.
On the ZDM host as zdmuser:
[zdmuser@zdmhost ~]$ $ZDMHOME/bin/zdmcli migrate database \
-rsp /home/zdmuser/physical_offline.rsp \
-sourcedb ORCL_fra1j7 \
-sourcenode source \
-srcauth zdmauth \
-srcarg1 user:opc \
-srcarg2 identity_file:/home/zdmuser/.ssh/id_rsa \
-srcarg3 sudo_location:/usr/bin/sudo \
-targetnode target \
-tgtauth zdmauth \
-tgtarg1 user:opc \
-tgtarg2 identity_file:/home/zdmuser/.ssh/id_rsa \
-tgtarg3 sudo_location:/usr/bin/sudo \
-targethome /u01/app/oracle/product/19.0.0.0/dbhome_1 \
-backupuser "sinan.petrus.toma@oracle.com"

Enter source database ORCL_fra1j7 SYS password:
Enter user "sinan.petrus.toma@oracle.com" password:
zdmhost2: 2021-09-06T10:40:20.608Z : Processing response file ...
Operation "zdmcli migrate database" scheduled with the job ID "47".
Check the job status. On the ZDM host as zdmuser:
[zdmuser@zdmhost ~]$ while :; do $ZDMHOME/bin/zdmcli query job -jobid 47; sleep 10; done

Current status: EXECUTING
Current Phase: "ZDM_OSS_RESTORE_TGT"
Result file path: "/home/zdmuser/zdmbase/chkbase/scheduled/job-47-2021-09-06-10:40:39.log"

ZDM_GET_SRC_INFO ............... COMPLETED
ZDM_GET_TGT_INFO ............... COMPLETED
ZDM_PRECHECKS_SRC .............. COMPLETED
ZDM_PRECHECKS_TGT .............. COMPLETED
ZDM_SETUP_SRC .................. COMPLETED
ZDM_SETUP_TGT .................. COMPLETED
ZDM_PREUSERACTIONS ............. COMPLETED
ZDM_PREUSERACTIONS_TGT ......... COMPLETED
ZDM_OBC_INST_SRC ............... COMPLETED
ZDM_OBC_INST_TGT ............... COMPLETED
ZDM_VALIDATE_SRC ............... COMPLETED
ZDM_VALIDATE_TGT ............... COMPLETED
ZDM_BACKUP_INCREMENTAL_SRC ..... COMPLETED
ZDM_DISCOVER_SRC ............... COMPLETED
ZDM_COPYFILES .................. COMPLETED
ZDM_PREPARE_TGT ................ COMPLETED
ZDM_SETUP_TDE_TGT .............. COMPLETED
ZDM_OSS_RESTORE_TGT ............ STARTED
ZDM_BACKUP_DIFFERENTIAL_SRC .... PENDING
ZDM_COPYFILES_DIFFERENTIAL ..... PENDING
ZDM_OSS_RECOVER_TGT ............ PENDING
ZDM_FINALIZE_TGT ............... PENDING
ZDM_POST_DATABASE_OPEN_TGT ..... PENDING
ZDM_DATAPATCH_TGT .............. PENDING
ZDM_POST_MIGRATE_TGT ........... PENDING
ZDM_POSTUSERACTIONS ............ PENDING
ZDM_POSTUSERACTIONS_TGT ........ PENDING
ZDM_CLEANUP_SRC ................ PENDING
ZDM_CLEANUP_TGT ................ PENDING
Pay attention to the phase ZDM_OSS_RESTORE_TGT executing without taking any full backup beforehand. The step ZDM_BACKUP_FULL_SRC you are familiar with in previous versions is skipped in this migration job. Instead, only phase ZDM_BACKUP_INCREMENTAL_SRC to create an incremental backup was executed.

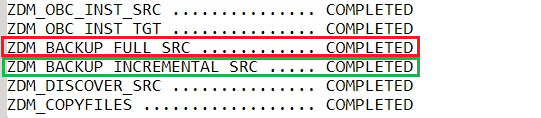
The following is a screenshot of the migration workflow using the previous ZDM version as described in this blog post:
Conclusion
ZDM automates the whole migration process for you, taking a backup of the source database, restore it into the target system, and in case of online physical migrations, keeping source and target databases in sync by using Data Guard. With the new ZDM version 21.2, you can skip the step to take a full backup and use an existing backup instead to make your migration faster and more efficient. You should consider using this feature especially for migrating large databases.
ZDM offers a wide range of options that you might need for more flexibility and control. Have a look at the documentation for the complete list of available parameters.
Further Reading
- Oracle Zero Downtime Migration
- Part 1/5: Zero Downtime Migration (ZDM) – Introduction & Installation
- Part 2/5: Zero Downtime Migration (ZDM) – Logical Online Migration using Oracle GoldenGate
- Part 3/5: Zero Downtime Migration (ZDM) – Logical Offline Migration using Data Pump
- Part 4/5: Zero Downtime Migration (ZDM) – Physical Online Migration using Data Guard
- Part 5/5: Zero Downtime Migration (ZDM) – Physical Offline Migration using RMAN
- Use an Existing RMAN Backup with Zero Downtime Migration (this blog post)
- AWS RDS for Oracle to Autonomous Database using Zero Downtime Migration
- Zero Downtime Migration (ZDM) – Logical Offline Migration to Co-Managed Database Services
- Zero Downtime Migration (ZDM) – Logical Online Migration to VM DB Systems
