

Introduction
Zero Downtime Migration (ZDM) provides great automation capabilities to migrate your Oracle Database to Oracle Cloud. After supporting Linux-based platforms, the new version 21.2 also supports cross-platform and even cross-cloud migrations.
This blog post provides step-by-step instructions on how to migrate your AWS RDS for Oracle to Oracle Autonomous Database on Oracle Cloud using the ZDM Logical Offline workflow.
It’s also possible to use the Logical Online workflow with Oracle GoldenGate for minimal downtime as described in the documentation.
The Environment
- ZDM version 21.2 installed on a compute VM on Oracle Cloud.
- Oracle Autonomous Database on Shared Infrastructure on Oracle Cloud.
- AWS RDS for Oracle database.
Download and Install ZDM version 21.2
Download ZDM software version 21.2 from the product page and install it on a Linux host as described in this blog post.
Prepare your AWS RDS Oracle database
Step 1: Enable SSL/TLS in the RDS Oracle instance
Follow the AWS documentation to enable secure connections to your RDS Oracle database using SSL/TLS. I have created a new option group, added the Oracle SSL option to it, and associated the option group with the RDS Oracle instance. As Autonomous Database on Shared Infrastructure only supports ports 1521 to 1525 for database links, I will use port 1523 here.
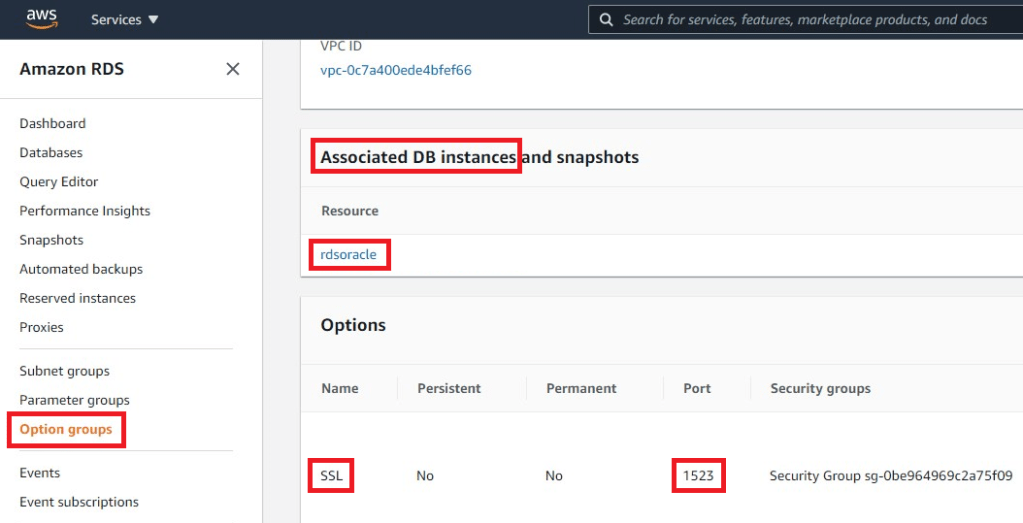
Step 2: Set the Streams Pool size to 2GB in your RDS Oracle instance
In the parameter group associated with your RDS Oracle instance, set the streams_pool_size to at least 2GB (2147483648 bytes).

Step 3: Create SSL/TLS wallet for secure client connections
Follow the AWS documentation for updating applications to use SSL/TLS certificates. I have downloaded the certificate bundle in .pem format for the US East (Ohio) in my case.

Now I need to create a wallet using the orapki utility and add this certificate to it. This wallet will then be used by ZDM to connect to the RDS Oracle instance.
The orapki utility is part of the ZDM software and is located in $ZDMHOME/bin/ on the ZDM host.
# create wallet
[zdmuser@zdmhost2 ~]$ $ZDMHOME/bin/orapki wallet create -wallet /home/zdmuser/ssl_wallet -auto_login_only
Oracle PKI Tool Release 21.0.0.0.0 - Production
Version 21.0.0.0.0
Copyright (c) 2004, 2020, Oracle and/or its affiliates. All rights reserved.
Operation is successfully completed.

# add certificate
[zdmuser@zdmhost2 ~]$ $ZDMHOME/bin/orapki wallet add -wallet /home/zdmuser/ssl_wallet -trusted_cert -cert /home/zdmuser/us-east-2-bundle.pem -auto_login_only
Oracle PKI Tool Release 21.0.0.0.0 - Production
Version 21.0.0.0.0
Copyright (c) 2004, 2020, Oracle and/or its affiliates. All rights reserved.
Operation is successfully completed.

# display information
[zdmuser@zdmhost2 ~]$ $ZDMHOME/bin/orapki wallet display -wallet /home/zdmuser/ssl_wallet
Oracle PKI Tool Release 21.0.0.0.0 - Production
Version 21.0.0.0.0
Copyright (c) 2004, 2020, Oracle and/or its affiliates. All rights reserved.
Requested Certificates:
User Certificates:
Trusted Certificates:
Subject: CN=Amazon RDS Root 2019 CA,OU=Amazon RDS,O=Amazon Web Services\, Inc.,ST=Washington,L=Seattle,C=US

# list files
[zdmuser@zdmhost2 ~]$ ls -l /home/zdmuser/ssl_wallet
total 4
-rw-------. 1 zdmuser zdm 1333 Sep  1 12:56 cwallet.sso
-rw-------. 1 zdmuser zdm    0 Sep  1 12:55 cwallet.sso.lck
Step 4: Store the SSL/TLS wallet into OCI Object Storage bucket
Upload the cwallet.sso file created in the previous step into an OCI Object Storage bucket. Autonomous Database will use this wallet to create the connection via database link to the AWS RDS database.

Step 5: Find out your RDS Oracle database connection information
You’ll find the instance endpoint (DNS name) on the Connectivity & Security tab.
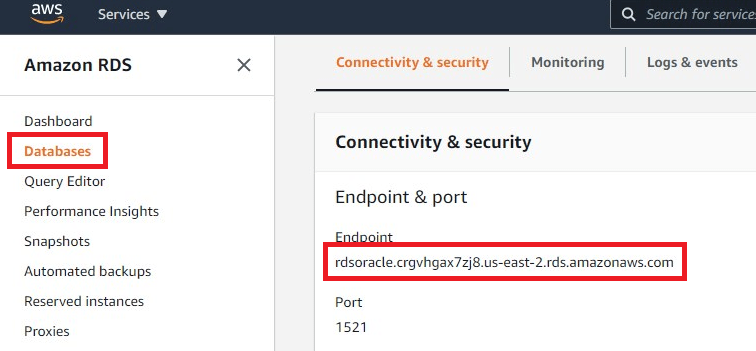
Instead of port 1521, we will use port 1523 as described in step 1 for the SSL/TLS connection.
Find the database service name and the admin user name on the Configuration tab.

Prepare the ZDM Host
Step 6: Crate the ZDM response file
Create a new response file on the ZDM host. Here is an example with the minimum parameters required. As zdmuser:
[zdmuser@zdmhost2 ~]$ vi /home/zdmuser/rds_logical_offline.rsp
# migration method
MIGRATION_METHOD=OFFLINE_LOGICAL
DATA_TRANSFER_MEDIUM=DBLINK
# AWS RDS Oracle
SOURCEDATABASE_ENVIRONMENT_NAME=AMAZON
SOURCEDATABASE_ENVIRONMENT_DBTYPE=RDS_ORACLE
SOURCEDATABASE_ADMINUSERNAME=admin
SOURCEDATABASE_CONNECTIONDETAILS_HOST=rdsoracle.crgvhgax7zj8.us-east-2.rds.amazonaws.com
SOURCEDATABASE_CONNECTIONDETAILS_SERVICENAME=ORCL
SOURCEDATABASE_CONNECTIONDETAILS_PORT=1523
SOURCEDATABASE_CONNECTIONDETAILS_TLSDETAILS_DISTINGUISHEDNAME=C=US,ST=Washington,L=Seattle,O=Amazon.com,OU=RDS,CN=rdsoracle.crgvhgax7zj8.us-east-2.rds.amazonaws.com
SOURCEDATABASE_CONNECTIONDETAILS_TLSDETAILS_CREDENTIALSLOCATION=/home/zdmuser/ssl_wallet
# data pump
DATAPUMPSETTINGS_JOBMODE=SCHEMA
DATAPUMPSETTINGS_METADATAREMAPS-1=type:REMAP_TABLESPACE,oldValue:USERS,newValue:DATA
INCLUDEOBJECTS-1=owner:HR
# db link
DATAPUMPSETTINGS_DATABASELINKDETAILS_NAME=dblink_to_rds
DATAPUMPSETTINGS_DATABASELINKDETAILS_WALLETBUCKET_BUCKETNAME=zdmbucket
DATAPUMPSETTINGS_DATABASELINKDETAILS_WALLETBUCKET_NAMESPACENAME=oraseemeadesandbox
# target db
TARGETDATABASE_OCID=ocid1.autonomousdatabase.oc1.eu-frankfurt-1...
TARGETDATABASE_ADMINUSERNAME=ADMIN
# oci cli
OCIAUTHENTICATIONDETAILS_USERPRINCIPAL_USERID=ocid1.user.oc1...
OCIAUTHENTICATIONDETAILS_USERPRINCIPAL_TENANTID=ocid1.tenancy.oc1...
OCIAUTHENTICATIONDETAILS_USERPRINCIPAL_FINGERPRINT=9f:3b:55:...
OCIAUTHENTICATIONDETAILS_USERPRINCIPAL_PRIVATEKEYFILE=/home/zdmuser/.oci/oci_api_key.pem
OCIAUTHENTICATIONDETAILS_REGIONID=eu-frankfurt-1
For simplicity, I used a database link for data transfer. It is also possible to use the AWS S3 bucket instead. In this case, you will need the following parameters:
# instead of DATATRANSFERMEDIUM=DBLINK
DATATRANSFERMEDIUM=AMAZONS3
# additionally
DUMPTRANSFERDETAILS_S3BUCKET_NAME=
DUMPTRANSFERDETAILS_S3BUCKET_REGION=
DUMPTRANSFERDETAILS_S3BUCKET_ACCESSKEY=
DATAPUMPSETTINGS_EXPORTDIRECTORYOBJECT_NAME=
Evaluate and Start the Migration
Step 7: Evaluate the migration
On the ZDM host, as zdmuser:
[zdmuser@zdmhost2 ~]$ $ZDMHOME/bin/zdmcli migrate database \
-rsp /home/zdmuser/rds_logical_offline.rsp \
-eval

Enter source database administrative user "admin" password: <-- RDS Oracle password
Enter target database administrative user "ADMIN" password: <-- Autonomous Database password
Operation "zdmcli migrate database" scheduled with the job ID "20".
Check the job status. On the ZDM host, as zdmuser:
[zdmuser@zdmhost2 ~]$ while :; do $ZDMHOME/bin/zdmcli query job -jobid 20; sleep 10; done

Current status: EXECUTING
Result file path: "/home/zdmuser/zdmbase/chkbase/scheduled/job-21-2021-09-01-10:49:44.log"
...
ZDM_VALIDATE_SRC ...................... COMPLETED
ZDM_VALIDATE_TGT ...................... STARTED
ZDM_VALIDATE_DATAPUMP_SETTINGS_SRC .... PENDING
ZDM_VALIDATE_DATAPUMP_SETTINGS_TGT .... PENDING
ZDM_PREPARE_DATAPUMP_SRC .............. PENDING
Step 8: Start the migraion
Execute the same command for evaluation, but this time without the -eval parameter. On the ZDM host, as zdmuser:
[zdmuser@zdmhost2 ~]$ $ZDMHOME/bin/zdmcli migrate database \
-rsp /home/zdmuser/rds_logical_offline.rsp

Enter source database administrative user "admin" password: <-- RDS Oracle password
Enter target database administrative user "ADMIN" password: <-- Autonomous Database password
Operation "zdmcli migrate database" scheduled with the job ID "22".
Check the job status. On the ZDM host, as zdmuser:
[zdmuser@zdmhost2 ~]$ while :; do $ZDMHOME/bin/zdmcli query job -jobid 22; sleep 10; done

Current status: EXECUTING
Result file path: "/home/zdmuser/zdmbase/chkbase/scheduled/job-22-2021-09-01-10:53:14.log"
...
ZDM_VALIDATE_SRC ...................... COMPLETED
ZDM_VALIDATE_TGT ...................... STARTED
ZDM_VALIDATE_DATAPUMP_SETTINGS_SRC .... PENDING
ZDM_VALIDATE_DATAPUMP_SETTINGS_TGT .... PENDING
ZDM_PREPARE_DATAPUMP_SRC .............. PENDING
ZDM_PREPARE_DATAPUMP_TGT .............. PENDING
ZDM_DATAPUMP_IMPORT_TGT ............... PENDING
ZDM_POST_DATAPUMP_SRC ................. PENDING
ZDM_POST_DATAPUMP_TGT ................. PENDING
ZDM_POST_ACTIONS ...................... PENDING
Conclusion
After investing some work in the setup, all steps are done for you in one click. ZDM offers a wide range of options that you might need for more flexibility and control. Have a look at the documentation for the complete list of available parameters.
Further Reading
- Oracle Zero Downtime Migration 21.2
- ZDM blog series by Daniel Overby Hansen
- Part 1/5: Zero Downtime Migration (ZDM) – Introduction & Installation
- Part 2/5: Zero Downtime Migration (ZDM) – Logical Online Migration using Oracle GoldenGate
- Part 3/5: Zero Downtime Migration (ZDM) – Logical Offline Migration using Data Pump
- Part 4/5: Zero Downtime Migration (ZDM) – Physical Online Migration using Data Guard
- Part 5/5: Zero Downtime Migration (ZDM) – Physical Offline Migration using RMAN
- Use an Existing RMAN Backup with Zero Downtime Migration
- AWS RDS for Oracle to Autonomous Database using Zero Downtime Migration (this blog post)
- Zero Downtime Migration (ZDM) – Logical Offline Migration to Co-Managed Database Services
- Zero Downtime Migration (ZDM) – Logical Online Migration to VM DB Systems
