
Introduction
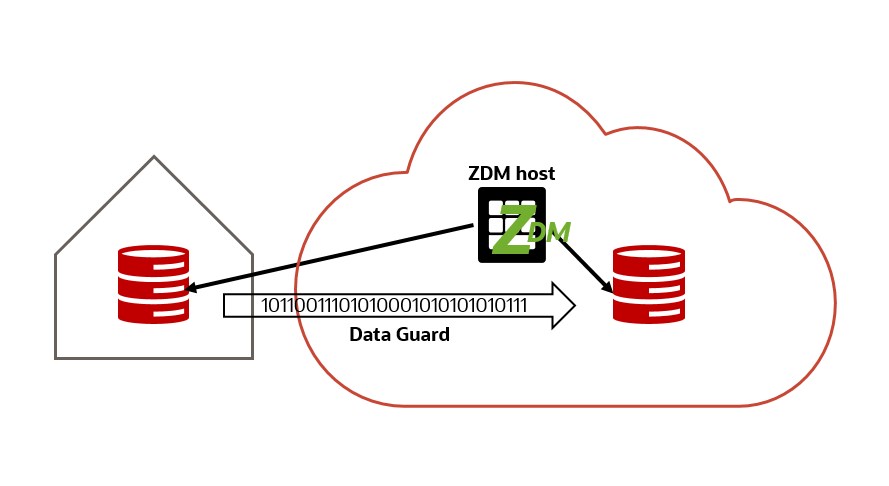
ZDM uses Oracle Data Guard to perform an online physical migration. This means: it backs up the source database, instantiates a standby database from this backup to the target environment, configures Data Guard to synchronize the source and target databases, and finally switches over to the target database. ZDM allows you to pause the process at any stage and continue later at will. You can pause before switching over and keep the environment as is to build a hybrid disaster recovery environment.
This blog post provides a step by step instructions on how to accordingly configure ZDM using Data Guard with the minimal parameters required.
The Environment
We will use:
- The ZDM host as described in Part 1.
- Oracle database version 19.10 installed on a VM with IP 10.0.2.183 and hostname source as the source database.
- VM DB System on Oracle Cloud with IP 10.0.2.162, hostname target, and database version 19.10 as the target database.
ZDM requires you to configure a placeholder database target environment before beginning the migration process. ZDM uses the provisioned target as a template and recreates the target during the course of migration:
- For Exadata Database Service on Dedicated Infrastructure or Exadata Database Service on Cloud@Customer, the source and target must have the same DB_NAME. For Base Database Service databases, the target can have the same or different DB_NAME as the source.
- DB_UNIQUE_NAME must be different on the source and target database.
- The SYS password must be the same on the source and target database.
- Provision the target database from the cloud console without enabling automatic backups.
- The target database version should be the same as the source database version. If the target database is at a higher patch level than the source database, then ZDM runs datapatch as part of the migration.
- The target must have a time zone file version that is the same or higher than the source database.
- The source and target database must use the same character set.
- The source and target database must use a server parameter file (SPFILE).
- The COMPATIBLE database initialization parameter must be the same on the source and target database.
- The source and target database must have the same encryption algorithm in sqlnet.ora.
- The TDE wallet folder must exist on the source and wallet status must be OPEN.
- ZDM release 21.4 supports only Grid Infrastructure-based database services as targets.
The placeholder target database is overwritten during migration, but it retains the overall configuration.
Migration
Step 1: Prepare the source database host.
Copy the SSH public key for zdmuser from the ZDM host (created in Part 1, post-task 1) to the .ssh/authorized_keys file on the source database host for the user you want to use for login, in this case, opc:
#on ZDM host as zdmuser
[zdmuser@zdmhost ~]$ cat .ssh/id_rsa.pub
#on the source database host as user opc
[opc@source ~]$ vi .ssh/authorized_keys
#insert the public key and save the changes
Add the target database server hostname and IP information into the /etc/hosts file. If the target is an Oracle RAC environment, then add all cluster nodes and the SCAN (one of the SCAN IPs – srvctl config scan).
As root user:
[root@source ~]# vi /etc/hosts
#add the following entries
10.0.2.162 target
10.0.2.163 target2
10.0.2.155 target-scan.pubsubnetlb.vcnfra.oraclevcn.com
Step 2: Prepare the source database.
As SYS user:
-- To protect against unlogged direct writes in the primary database that cannot be propagated to the standby database, turn on FORCE LOGGING at the primary database:
SQL> select force_logging from v$database;
FORCE_LOGGING
---------------------------------------
NO
SQL> alter database force logging;
SQL> select force_logging from v$database;
FORCE_LOGGING
---------------------------------------
YES

-- Enable ARCHIVELOG mode for the database:
SQL> select log_mode from v$database;
LOG_MODE
------------
ARCHIVELOG

-- For Oracle Database 12c Release 2 and later, it is mandatory to configure TDE before migration begins
-- follow the steps in: https://database-heartbeat.com/2020/12/31/enable-tde-auto-login-wallet-and-secure-external-password-store-seps/
SQL> select wrl_type, status from v$encryption_wallet;
WRL_TYPE             STATUS
-------------------- ------------------------------
FILE                 OPEN

-- Set RMAN CONFIGURE CONTROLFILE AUTOBACKUP to ON
RMAN> CONFIGURE CONTROLFILE AUTOBACKUP ON;
Step 3: Prepare the target database host.
Copy the SSH public key for zdmuser from the ZDM host (created in Part 1, post-task 1) to the .ssh/authorized_keys file on the target database host for the user you want to use for login, in this case, opc. If the target is an Oracle RAC environment, then add the entries to all cluster nodes.
#on ZDM host as zdmuser
[zdmuser@zdmhost ~]$ cat .ssh/id_rsa.pub
#on the target database host as user opc
[opc@target ~]$ vi .ssh/authorized_keys
[opc@target2 ~]$ vi .ssh/authorized_keys
#insert the public key and save the changes
Add the source database server hostname and IP information into the /etc/hosts file. If the target is an Oracle RAC environment, then add the entries to all cluster nodes. As root user:
[root@target ~]# vi /etc/hosts
[root@target2 ~]# vi /etc/hosts
#add the following entries
10.0.2.183 source
Step 4: Prepare the ZDM host.
Add the source and target servers’ hostname and IP information into the /etc/hosts file. If the target is an Oracle RAC environment, then add all cluster nodes. As root user:
[root@zdmhost ~]# vi /etc/hosts
#add the following entries
10.0.2.183 source
10.0.2.162 target
10.0.2.163 target2
Test the connectivity to the source and target database servers:
[zdmuser@zdmhost ~]$ ssh -i /home/zdmuser/.ssh/id_rsa opc@source
Last login: Sun Apr 11 14:11:40 2021 from 130.61.21.179
[opc@source ~]$

[zdmuser@zdmhost ~]$ ssh -i /home/zdmuser/.ssh/id_rsa opc@target
Last login: Mon Apr 12 08:43:39 2021 from 185.108.11.223
[opc@target ~]$
Verify that TTY is disabled for the SSH-privileged user. If TTY is disabled, the following command returns the date from the remote host without any errors:
[zdmuser@zdmhost ~]$ ssh -i /home/zdmuser/.ssh/id_rsa opc@source "/usr/bin/sudo /bin/sh -c date"
Mon Apr 12 08:48:59 GMT 2021

[zdmuser@zdmhost ~]$ ssh -i /home/zdmuser/.ssh/id_rsa opc@target "/usr/bin/sudo /bin/sh -c date"
Mon Apr 12 08:49:43 UTC 2021
Step 5: Set SQL*Net connectivity between source and target database servers.
Check the network connectivity from source to target and vice versa:
#from source host
[oracle@source ~]$ tnsping target:1521
Used HOSTNAME adapter to resolve the alias
Attempting to contact (DESCRIPTION=(CONNECT_DATA=(SERVICE_NAME=))(ADDRESS=(PROTOCOL=tcp)(HOST=10.0.2.162)(PORT=1521)))
OK (10 msec)

#from target host
[oracle@target ~]$ tnsping source:1521
Used HOSTNAME adapter to resolve the alias
Attempting to contact (DESCRIPTION=(CONNECT_DATA=(SERVICE_NAME=))(ADDRESS=(PROTOCOL=tcp)(HOST=10.0.2.183)(PORT=1521)))
OK (10 msec)
Step 6: Preparing the Physical Migration Response File.
You’ll find a template at $ZDMHOME/rhp/zdm/template/zdm_template.rsp on the ZDM host that contains a brief description of the parameters and their possible values. Here we will create a new response file with the minimal parameters required. As zdmuser:
[zdmuser@zdmhost ~]$ vi /home/zdmuser/physical_online.rsp

MIGRATION_METHOD=ONLINE_PHYSICAL
DATA_TRANSFER_MEDIUM=OSS
HOST=https://swiftobjectstorage.eu-frankfurt-1.oraclecloud.com/v1/oraseemeadesandbox
OPC_CONTAINER=zdmbucket
TGT_DB_UNIQUE_NAME=CDB001_fra26k
PLATFORM_TYPE=VMDB
Step 7: Evaluate the configuration.
On the ZDM host as zdmuser:
[zdmuser@zdmhost ~]$ $ZDMHOME/bin/zdmcli migrate database \
-rsp /home/zdmuser/physical_online.rsp \
-sourcesid CDB001 \
-sourcenode source \
-srcauth zdmauth \
-srcarg1 user:opc \
-srcarg2 identity_file:/home/zdmuser/.ssh/id_rsa \
-srcarg3 sudo_location:/usr/bin/sudo \
-targetnode target \
-tgtauth zdmauth \
-tgtarg1 user:opc \
-tgtarg2 identity_file:/home/zdmuser/.ssh/id_rsa \
-tgtarg3 sudo_location:/usr/bin/sudo \
-targethome /u01/app/oracle/product/19.0.0.0/dbhome_1 \
-backupuser "oracleidentitycloudservice/sinan.petrus.toma@oracle.com" \
-eval

Enter source database CDB001 SYS password:
Enter user "oracleidentitycloudservice/sinan.petrus.toma@oracle.com" password: <-- this is the Authentication Token of the OCI user
zdmhost: 2021-04-14T08:59:53.865Z : Processing response file ...
Operation "zdmcli migrate database" scheduled with the job ID "52".
If the source database is using ASM for storage management, then use -sourcedb <db_unique_name> instead of -sourcesid <SID> in the zdmcli command.
Check the job status. On the ZDM host as zdmuser:
[zdmuser@zdmhost ~]$ while :; do $ZDMHOME/bin/zdmcli query job -jobid 52; sleep 10; done

Job ID: 52
User: zdmuser
Client: zdmhost
Job Type: "EVAL"
...
Current status: SUCCEEDED
Current Phase: "ZDM_SETUP_TGT"
Result file path: "/home/zdmuser/zdmbase/chkbase/scheduled/job-52-2021-04-14-09:00:18.log"
...
ZDM_GET_SRC_INFO ........... PRECHECK_PASSED
ZDM_GET_TGT_INFO ........... PRECHECK_PASSED
ZDM_PRECHECKS_SRC .......... PRECHECK_PASSED
ZDM_PRECHECKS_TGT .......... PRECHECK_PASSED
ZDM_SETUP_SRC .............. PRECHECK_PASSED
ZDM_SETUP_TGT .............. PRECHECK_PASSED
ZDM_PREUSERACTIONS ......... PRECHECK_PASSED
ZDM_PREUSERACTIONS_TGT ..... PRECHECK_PASSED
ZDM_VALIDATE_SRC ........... PRECHECK_PASSED
ZDM_VALIDATE_TGT ........... PRECHECK_PASSED
ZDM_POSTUSERACTIONS ........ PRECHECK_PASSED
ZDM_POSTUSERACTIONS_TGT .... PRECHECK_PASSED
ZDM_CLEANUP_SRC ............ PRECHECK_PASSED
ZDM_CLEANUP_TGT ............ PRECHECK_PASSED
Step 8: Initiate the migration.
Execute the same command for evaluation, but this time without the -eval parameter.
Oracle ZDM allows to pause of the migration process at any given stage, and hence, the migration process can be paused before the role swap and switchover phase. Upon executing the zdm migrate database command, the -pauseafter flag must be entered with the desired stage for pausing, in this case, ZDM_CONFIGURE_DG_SRC.
On the ZDM host as zdmuser:
[zdmuser@zdmhost ~]$ $ZDMHOME/bin/zdmcli migrate database \
-rsp /home/zdmuser/physical_online.rsp \
-sourcesid CDB001 \
-sourcenode source \
-srcauth zdmauth \
-srcarg1 user:opc \
-srcarg2 identity_file:/home/zdmuser/.ssh/id_rsa \
-srcarg3 sudo_location:/usr/bin/sudo \
-targetnode target \
-tgtauth zdmauth \
-tgtarg1 user:opc \
-tgtarg2 identity_file:/home/zdmuser/.ssh/id_rsa \
-tgtarg3 sudo_location:/usr/bin/sudo \
-targethome /u01/app/oracle/product/19.0.0.0/dbhome_1 \
-backupuser "oracleidentitycloudservice/sinan.petrus.toma@oracle.com" \
-pauseafter ZDM_CONFIGURE_DG_SRC

Enter source database CDB001 SYS password:
Enter user "oracleidentitycloudservice/sinan.petrus.toma@oracle.com" password: <-- this is the Authentication Token of the OCI user
zdmhost: 2021-04-14T13:14:13.244Z : Processing response file ...
Operation "zdmcli migrate database" scheduled with the job ID "67".
Check the job status. On the ZDM host as zdmuser:
[zdmuser@zdmhost ~]$ while :; do $ZDMHOME/bin/zdmcli query job -jobid 67; sleep 10; done

Job ID: 67
User: zdmuser
Client: zdmhost
Job Type: "MIGRATE"
...
Current status: PAUSED
Result file path: "/home/zdmuser/zdmbase/chkbase/scheduled/job-67-2021-04-14-13:14:25.log"
...
ZDM_GET_SRC_INFO .............. COMPLETED
ZDM_GET_TGT_INFO .............. COMPLETED
ZDM_PRECHECKS_SRC ............. COMPLETED
ZDM_PRECHECKS_TGT ............. COMPLETED
ZDM_SETUP_SRC ................. COMPLETED
ZDM_SETUP_TGT ................. COMPLETED
ZDM_PREUSERACTIONS ............ COMPLETED
ZDM_PREUSERACTIONS_TGT ........ COMPLETED
ZDM_VALIDATE_SRC .............. COMPLETED
ZDM_VALIDATE_TGT .............. COMPLETED
ZDM_OBC_INST_SRC .............. COMPLETED
ZDM_OBC_INST_TGT .............. COMPLETED
ZDM_BACKUP_FULL_SRC ........... COMPLETED
ZDM_BACKUP_INCREMENTAL_SRC .... COMPLETED
ZDM_DISCOVER_SRC .............. COMPLETED
ZDM_COPYFILES ................. COMPLETED
ZDM_PREPARE_TGT ............... COMPLETED
ZDM_SETUP_TDE_TGT ............. COMPLETED
ZDM_CLONE_TGT ................. COMPLETED
ZDM_FINALIZE_TGT .............. COMPLETED
ZDM_CONFIGURE_DG_SRC .......... COMPLETED
ZDM_SWITCHOVER_SRC ............ PENDING
ZDM_SWITCHOVER_TGT ............ PENDING
ZDM_POST_DATABASE_OPEN_TGT .... PENDING
ZDM_DATAPATCH_TGT ............. PENDING
ZDM_POST_MIGRATE_TGT .......... PENDING
ZDM_POSTUSERACTIONS ........... PENDING
ZDM_POSTUSERACTIONS_TGT ....... PENDING
ZDM_CLEANUP_SRC ............... PENDING
ZDM_CLEANUP_TGT ............... PENDING
Pay attention to the current job status. It is in PAUSED status now. Also, the progress stopped after phase ZDM_CONFIGURE_DG_SRC was COMPLETED.
Check the database roles. The source is primary now, and the target is standby:
[oracle@source ~]$ sqlplus / as sysdba
SQL> select database_role from v$database;
DATABASE_ROLE
----------------
PRIMARY

[oracle@target ~]$ sqlplus / as sysdba
SQL> select database_role from v$database;
DATABASE_ROLE
----------------
PHYSICAL STANDBY
At this stage, every change in the source database is immediately synchronized with the target database. Resume the job when your application is ready for migration.
Step 9: Complete the migration.
Resume the job from the previous step. On the ZDM host as zdmuser:
[zdmuser@zdmhost ~]$ $ZDMHOME/bin/zdmcli resume job -jobid 67
Query the status again and wait until all phases are completed.
Check the database roles again. The source is the standby now, and the target is primary:
[oracle@source ~]$ sqlplus / as sysdba
SQL> select database_role from v$database;
DATABASE_ROLE
----------------
PHYSICAL STANDBY

[oracle@target ~]$ sqlplus / as sysdba
SQL> select database_role from v$database;
DATABASE_ROLE
----------------
PRIMARY
Log Files
In case of any issue, check the following log files:
#job log file on the zdm host
/home/zdmuser/zdmbase/chkbase/scheduled/job-<job_id>-<data>.log

#ZDM log file on the zdm host
/home/zdmuser/zdmbase/crsdata/zdmhost/rhp/zdmserver.log.0
Conclusion
After investing some work in the setup, all steps are done for you in one click: backs up the source database, instantiates a standby database from this backup to the target environment, configures Data Guard to synchronize the source and target databases, and finally switches over to the target database.
ZDM offers a wide range of options that you might need for more flexibility and control. Have a look at the documentation for the complete list of available parameters.
Further Reading
- ZDM Physical Migration Step by Step Guide
- LiveLab: Physical Online Migration with Backup Location to Co-Managed Databases in OCI
- LiveLab: Physical Online Migration with Direct Data Transfer to Co-Managed Databases in OCI
- Oracle Zero Downtime Migration
- Part 1/5: Zero Downtime Migration (ZDM) – Introduction & Installation
- Part 2/5: Zero Downtime Migration (ZDM) – Logical Online Migration using Oracle GoldenGate
- Part 3/5: Zero Downtime Migration (ZDM) – Logical Offline Migration using Data Pump
- Part 4/5: Zero Downtime Migration (ZDM) – Physical Online Migration using Data Guard (this blog post)
- Part 5/5: Zero Downtime Migration (ZDM) – Physical Offline Migration using RMAN
- Use an Existing RMAN Backup with Zero Downtime Migration
- AWS RDS for Oracle to Autonomous Database using Zero Downtime Migration
- Zero Downtime Migration (ZDM) – Logical Offline Migration to Co-Managed Database Services
- Zero Downtime Migration (ZDM) – Logical Online Migration to VM DB Systems
