
Introduction
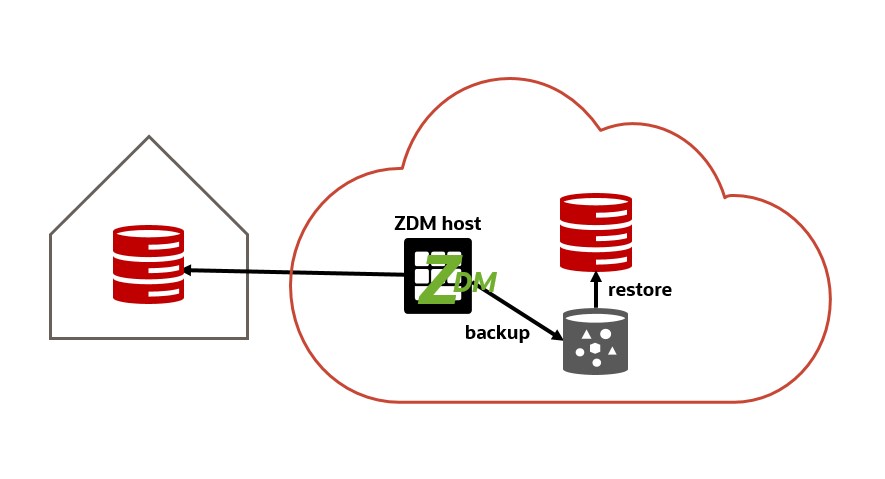
ZDM uses RMAN to perform an offline physical migration. It backs up the source database and instantiates a new database from this backup to the target environment. This is similar to cloning a database. The target database has no relationship to the source, so there is no data synchronization or fallback capability. No SQL*Net connectivity is needed between the source and target database servers.
This blog post provides a step by step instruction how to accordingly configure ZDM using RMAN with the minimal parameters required.
The Environment
We will use:
- The ZDM host as described in Part 1.
- Oracle database version 19.10 installed on a VM with IP 10.0.2.183 and hostname source as source database.
- VM DB System on Oracle Cloud with IP 10.0.2.162, hostname target, and database version 19.10 as target database.
ZDM requires you to configure a placeholder database target environment before beginning the migration process. ZDM uses the provisioned target as a template and recreates the target during the course of migration.
- Create the database with the same DB_NAME as the source database.
- The SYS password must be the same on the source and target database.
- Provision the target database from the cloud console without enabling automatic backups.
- The target database version should be the same as the source database version. If the target database is at a higher patch level than the source database, then ZDM runs datapatch as part of the migration.
- The COMPATIBLE database initialization parameter must be the same on the source and target database.
- ZDM release 21c supports only Grid Infrastructure-based database services as targets.
The placeholder target database is overwritten during migration, but it retains the overall configuration.
Migration
Step 1: Prepare the source database host.
Copy the SSH public key for zdmuser from the ZDM host (created in Part 1, post task 1) to the .ssh/authorized_keys file on the source database host for the user you want to use for login, in this case opc:
#on ZDM host as zdmuser
[zdmuser@zdmhost ~]$ cat .ssh/id_rsa.pub
#on the source database host as user opc
[opc@source ~]$ vi .ssh/authorized_keys
#insert the public key and save the changes
Add the target database server hostname and IP information into the /etc/hosts file. As root user:
[root@source ~]# vi /etc/hosts
#add the following entries
10.0.2.162  target.pubsubnetlb.vcnfra.oraclevcn.com  target
10.0.2.162  target-scan.pubsubnetlb.vcnfra.oraclevcn.com  target-scan
Step 2: Prepare the source database.
As SYS user:
-- Enable ARCHIVELOG mode for the database:
SQL> select log_mode from v$database;
LOG_MODE
------------
ARCHIVELOG

-- For Oracle Database 12c Release 2 and later, it is mandatory to configure TDE before migration begins
-- follow the steps in: https://database-heartbeat.com/2020/12/31/enable-tde-auto-login-wallet-and-secure-external-password-store-seps/
SQL> select wrl_type, status from v$encryption_wallet;
WRL_TYPE             STATUS
-------------------- ------------------------------
FILE                 OPEN

-- Set RMAN CONFIGURE CONTROLFILE AUTOBACKUP to ON
RMAN> CONFIGURE CONTROLFILE AUTOBACKUP ON;
Step 3: Prepare the target database host.
Copy the SSH public key for zdmuser from the ZDM host (created in Part 1, post task 1) to the .ssh/authorized_keys file on the target database host for the user you want to use for login, in this case opc:
#on ZDM host as zdmuser
[zdmuser@zdmhost ~]$ cat .ssh/id_rsa.pub
#on the target database host as user opc
[opc@target ~]$ vi .ssh/authorized_keys
#insert the public key and save the changes
Add the source database server hostname and IP information into the /etc/hosts file. As root user:
[root@target ~]# vi /etc/hosts
#add the following entries
10.0.2.183  source
Step 4: Prepare the ZDM host.
Add the source and target servers hostname and IP information into the /etc/hosts file. As root user:
[root@zdmhost ~]# vi /etc/hosts
#add the following entries
10.0.2.183  source
10.0.2.162  target.pubsubnetlb.vcnfra.oraclevcn.com  target
Test the connectivity to the source and target database servers:
[zdmuser@zdmhost ~]$ ssh -i /home/zdmuser/.ssh/id_rsa opc@source
Last login: Sun Apr 11 14:11:40 2021 from 130.61.21.179
[opc@source ~]$

[zdmuser@zdmhost ~]$ ssh -i /home/zdmuser/.ssh/id_rsa opc@target
Last login: Mon Apr 12 08:43:39 2021 from 185.108.11.223
[opc@target ~]$
Verify that TTY is disabled for the SSH privileged user. If TTY is disabled, the following command returns the date from the remote host without any errors:
[zdmuser@zdmhost ~]$ ssh -i /home/zdmuser/.ssh/id_rsa opc@source "/usr/bin/sudo /bin/sh -c date"
Mon Apr 12 08:48:59 GMT 2021

[zdmuser@zdmhost ~]$ ssh -i /home/zdmuser/.ssh/id_rsa opc@target "/usr/bin/sudo /bin/sh -c date"
Mon Apr 12 08:49:43 UTC 2021
Step 5: Preparing the Physical Migration Response File.
You’ll find a template at $ZDMHOME/rhp/zdm/template/zdm_template.rsp on the ZDM host that contains a brief description of the parameters and their possible values. Here we will create a new response file with the minimal parameters required. As zdmuser:
[zdmuser@zdmhost ~]$ vi /home/zdmuser/physical_offline.rsp

MIGRATION_METHOD=OFFLINE_PHYSICAL
DATA_TRANSFER_MEDIUM=OSS
HOST=https://swiftobjectstorage.eu-frankfurt-1.oraclecloud.com/v1/oraseemeadesandbox
OPC_CONTAINER=zdmbucket
TGT_DB_UNIQUE_NAME=CDB001_fra26k
PLATFORM_TYPE=VMDB
Step 6: Evaluate the configuration.
On the ZDM host as zdmuser:
[zdmuser@zdmhost ~]$ $ZDMHOME/bin/zdmcli migrate database \
-rsp /home/zdmuser/physical_offline.rsp \
-sourcesid CDB001 \
-sourcenode source \
-srcauth zdmauth \
-srcarg1 user:opc \
-srcarg2 identity_file:/home/zdmuser/.ssh/id_rsa \
-srcarg3 sudo_location:/usr/bin/sudo \
-targetnode target \
-tgtauth zdmauth \
-tgtarg1 user:opc \
-tgtarg2 identity_file:/home/zdmuser/.ssh/id_rsa \
-tgtarg3 sudo_location:/usr/bin/sudo \
-targethome /u01/app/oracle/product/19.0.0.0/dbhome_1 \
-backupuser "oracleidentitycloudservice/sinan.petrus.toma@oracle.com" \
-eval

Enter source database CDB001 SYS password:
Enter user "oracleidentitycloudservice/sinan.petrus.toma@oracle.com" password: <-- this is the Authentication Token of the OCI user
zdmhost: 2021-04-14T11:08:15.175Z : Processing response file ...
Operation "zdmcli migrate database" scheduled with the job ID "63".
If the source database is using ASM for storage management, then use -sourcedb <db_unique_name> instead of -sourcesid <SID> in the zdmcli command.
Check the job status. On the ZDM host as zdmuser:
[zdmuser@zdmhost ~]$ while :; do $ZDMHOME/bin/zdmcli query job -jobid 63; sleep 10; done

Job ID: 63
User: zdmuser
Client: zdmhost
Job Type: "EVAL"
...
Current status: SUCCEEDED
Result file path: "/home/zdmuser/zdmbase/chkbase/scheduled/job-63-2021-04-14-11:08:21.log"
...
ZDM_GET_SRC_INFO ........... PRECHECK_PASSED
ZDM_GET_TGT_INFO ........... PRECHECK_PASSED
ZDM_PRECHECKS_SRC .......... PRECHECK_PASSED
ZDM_PRECHECKS_TGT .......... PRECHECK_PASSED
ZDM_SETUP_SRC .............. PRECHECK_PASSED
ZDM_SETUP_TGT .............. PRECHECK_PASSED
ZDM_PREUSERACTIONS ......... PRECHECK_PASSED
ZDM_PREUSERACTIONS_TGT ..... PRECHECK_PASSED
ZDM_VALIDATE_SRC ........... PRECHECK_PASSED
ZDM_VALIDATE_TGT ........... PRECHECK_PASSED
ZDM_POSTUSERACTIONS ........ PRECHECK_PASSED
ZDM_POSTUSERACTIONS_TGT .... PRECHECK_PASSED
ZDM_CLEANUP_SRC ............ PRECHECK_PASSED
ZDM_CLEANUP_TGT ............ PRECHECK_PASSED
Step 7: Initiate the migration.
Execute the same command for evaluation, but this time without the -eval parameter.
On the ZDM host as zdmuser:
[zdmuser@zdmhost ~]$ $ZDMHOME/bin/zdmcli migrate database \
-rsp /home/zdmuser/physical_offline.rsp \
-sourcesid CDB001 \
-sourcenode source \
-srcauth zdmauth \
-srcarg1 user:opc \
-srcarg2 identity_file:/home/zdmuser/.ssh/id_rsa \
-srcarg3 sudo_location:/usr/bin/sudo \
-targetnode target \
-tgtauth zdmauth \
-tgtarg1 user:opc \
-tgtarg2 identity_file:/home/zdmuser/.ssh/id_rsa \
-tgtarg3 sudo_location:/usr/bin/sudo \
-targethome /u01/app/oracle/product/19.0.0.0/dbhome_1 \
-backupuser "oracleidentitycloudservice/sinan.petrus.toma@oracle.com"

Enter source database CDB001 SYS password:
Enter user "oracleidentitycloudservice/sinan.petrus.toma@oracle.com" password: <-- this is the Authentication Token of the OCI user
zdmhost: 2021-04-14T13:14:13.244Z : Processing response file ...
Operation "zdmcli migrate database" scheduled with the job ID "66".
Check the job status. On the ZDM host as zdmuser:
[zdmuser@zdmhost ~]$ while :; do $ZDMHOME/bin/zdmcli query job -jobid 66; sleep 10; done

Job ID: 66
User: zdmuser
Client: zdmhost
Job Type: "MIGRATE"
...
Current status: SUCCEEDED
Result file path: "/home/zdmuser/zdmbase/chkbase/scheduled/job-66-2021-04-14-11:33:22.log"
...
ZDM_GET_SRC_INFO ............... COMPLETED
ZDM_GET_TGT_INFO ............... COMPLETED
ZDM_PRECHECKS_SRC .............. COMPLETED
ZDM_PRECHECKS_TGT .............. COMPLETED
ZDM_SETUP_SRC .................. COMPLETED
ZDM_SETUP_TGT .................. COMPLETED
ZDM_PREUSERACTIONS ............. COMPLETED
ZDM_PREUSERACTIONS_TGT ......... COMPLETED
ZDM_VALIDATE_SRC ............... COMPLETED
ZDM_VALIDATE_TGT ............... COMPLETED
ZDM_OBC_INST_SRC ............... COMPLETED
ZDM_OBC_INST_TGT ............... COMPLETED
ZDM_BACKUP_FULL_SRC ............ COMPLETED
ZDM_BACKUP_INCREMENTAL_SRC ..... COMPLETED
ZDM_DISCOVER_SRC ............... COMPLETED
ZDM_COPYFILES .................. COMPLETED
ZDM_PREPARE_TGT ................ COMPLETED
ZDM_SETUP_TDE_TGT .............. COMPLETED
ZDM_OSS_RESTORE_TGT ............ COMPLETED
ZDM_BACKUP_DIFFERENTIAL_SRC .... COMPLETED
ZDM_OSS_RECOVER_TGT ............ COMPLETED
ZDM_FINALIZE_TGT ............... COMPLETED
ZDM_POST_DATABASE_OPEN_TGT ..... COMPLETED
ZDM_DATAPATCH_TGT .............. COMPLETED
ZDM_POST_MIGRATE_TGT ........... COMPLETED
ZDM_POSTUSERACTIONS ............ COMPLETED
ZDM_POSTUSERACTIONS_TGT ........ COMPLETED
ZDM_CLEANUP_SRC ................ COMPLETED
ZDM_CLEANUP_TGT ................ COMPLETED
Log Files
In case of any issue, check the following log files:
#job log file on the zdm host
/home/zdmuser/zdmbase/chkbase/scheduled/job-<job_id>-<data>.log

#ZDM log file on the zdm host
/home/zdmuser/zdmbase/crsdata/zdmhost/rhp/zdmserver.log.0
Conclusion
After investing some work in the setup, all steps are done for you in one click: backs up the source database and instantiates a new database from this backup to the target environment .
ZDM offers a wide range of options that you might need for more flexibility and control. Have a look at the documentation for the complete list of available parameters.
Further Reading
- Oracle Zero Downtime Migration
- Part 1/5: Zero Downtime Migration (ZDM) – Introduction & Installation
- Part 2/5: Zero Downtime Migration (ZDM) – Logical Online Migration using Oracle GoldenGate
- Part 3/5: Zero Downtime Migration (ZDM) – Logical Offline Migration using Data Pump
- Part 4/5: Zero Downtime Migration (ZDM) – Physical Online Migration using Data Guard
- Part 5/5: Zero Downtime Migration (ZDM) – Physical Offline Migration using RMAN (this blog post)
- Use an Existing RMAN Backup with Zero Downtime Migration
- AWS RDS for Oracle to Autonomous Database using Zero Downtime Migration
- Zero Downtime Migration (ZDM) – Logical Offline Migration to Co-Managed Database Services
- Zero Downtime Migration (ZDM) – Logical Online Migration to VM DB Systems
