
Introduction
Oracle Cloud provides automated resource provisioning and management by the click of the button, literally. You just login into the OCI Console, which is a web-based interface, and click on the button to provision and manage your resources.
However, managing large environments that way might become challenging. Additionally, you might want to execute some tasks at a specific time automatically without the need to wake up in the middle of the night to click the button. For this purpose, Oracle provides additional interfaces to interact with OCI resources programmatically, via Rest APIs, SDKs, and the Oracle Cloud Infrastructure Command Line Interface (OCI CLI), or short CLI. The latter is my favorite one as it is extremely simple to use and integrate with your shell scripts to achieve even a much higher degree of automation.
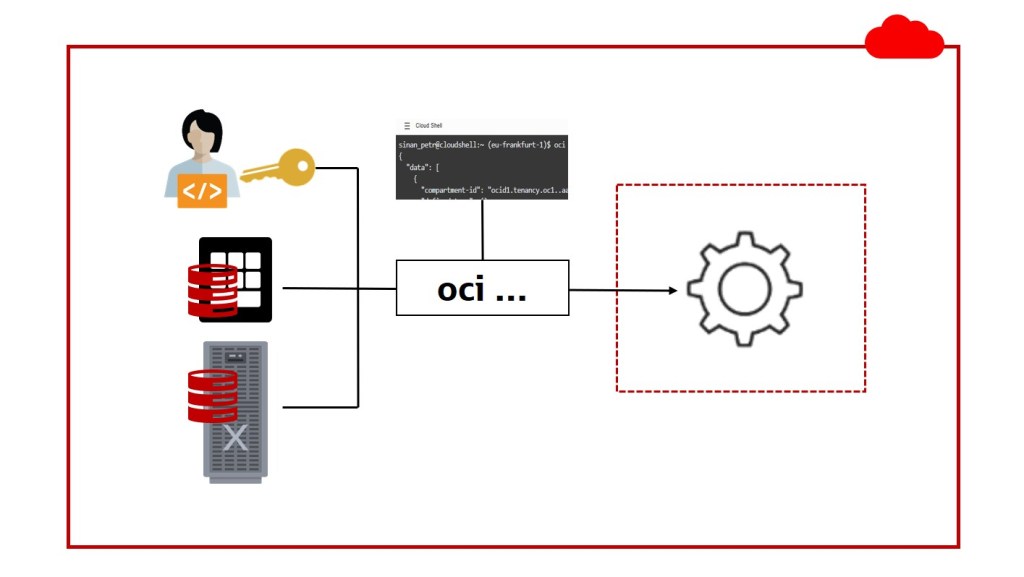
From the security perspective, CLI is just “someone” who wants to access OCI resources and hence has to authenticate itself against the Cloud Control Plane. In this blog post, we will see 3 ways (actually four) how to achieve that, what advantages do they have, and what to consider.
The Environment
- Compute VM1 in OCI to emulate a server that is not running in OCI.
- Compute VM2 in OCI to be used as is, having an Oracle Cloud Identifier (OCID).
- VM DB System in OCI, which also has an OCID.
OCI CLI Installation
OCI CLI is available for Linux, Mac OS, and windows. Follow the steps on the Quickstart page for installation. In my case on Linux:
# On the Compute VMs, the yum repository and pytho3 are already installed.
[opc@vm1 ~]$ bash -c "$(curl -L https://raw.githubusercontent.com/oracle/oci-cli/master/scripts/install/install.sh)"

===> In what directory would you like to place the install? (leave blank to use '/home/opc/lib/oracle-cli'):
===> In what directory would you like to place the 'oci' executable? (leave blank to use '/home/opc/bin'):
===> In what directory would you like to place the OCI scripts? (leave blank to use '/home/opc/bin/oci-cli-scripts'):
===> Modify profile to update your $PATH and enable shell/tab completion now? (Y/n): Y

-- Installation successful.
-- Run the CLI with /home/opc/bin/oci --help
To install OCI CLI on a VM DB System, you’ll first need to configure the yum repository and install python3:
[opc@db ~]$ curl -s http://169.254.169.254/opc/v1/instance/ | grep region
[opc@db ~]$ wget https://swiftobjectstorage.eu-frankfurt-1.oraclecloud.com/v1/dbaaspatchstore/DBaaSOSPatches/oci_dbaas_ol7repo -O /tmp/oci_dbaas_ol7repo
[opc@db ~]$ wget https://swiftobjectstorage.eu-frankfurt-1.oraclecloud.com/v1/dbaaspatchstore/DBaaSOSPatches/versionlock_ol7.list -O /tmp/versionlock.list

[opc@db ~]$ sudo mv /tmp/oci_dbaas_ol7repo /etc/yum.repos.d/ol7.repo
[opc@db ~]$ sudo mv /tmp/versionlock.list /etc/yum/pluginconf.d/versionlock.list
[opc@db ~]$ sudo yum repolist

[opc@db ~]$ sudo yum -y install python3 python3-tools
Note: for VM DB Systems it’s highly recommended to follow the manual installation procedure instead of installing OCI CLI via RPM. This ensures that OCI CLI is run in a virtual environment and will not conflict with the RPMs on the database VMs, which could lead to issues while updating the operating system at a later point in time.
At this stage, OCI CLI is installed, but we still need to authenticate ourselves to be able to interact with the OCI resources.
Authentication Method #1: User Principals
Use an OCI user and an API key for authentication. In this case, you’ll need to put your tenancy OCID, user OCID, region name, the path to an API key, and the fingerprint of the API key. The easiest way is to let OCI walk you through the setup process by executing the following command:
[opc@vm1 ~]$ oci setup config

Enter a location for your config [/home/opc/.oci/config]:
Enter a user OCID: ocid1.user.oc1..
Enter a tenancy OCID: ocid1.tenancy.oc1..
Enter a region by index or name(e.g. 1: ap-chiyoda-1, 2: ap-chuncheon-1, ...: eu-frankfurt-1
Do you want to generate a new API Signing RSA key pair? [Y/n]: Y
Enter a directory for your keys to be created [/home/opc/.oci]:
Enter a name for your key [oci_api_key]:
Enter a passphrase for your private key (empty for no passphrase):
Now, a config file and a key pair have been created:
[opc@vm1 ~]$ ls -l /home/opc/.oci/
total 12
-rw-------. 1 opc opc  302 Oct  1 11:13 config
-rw-------. 1 opc opc 1675 Oct  1 11:13 oci_api_key.pem
-rw-------. 1 opc opc  451 Oct  1 11:13 oci_api_key_public.pem

[opc@vm1 ~]$ cat /home/opc/.oci/config
[DEFAULT]
user=ocid1.user.oc1..
fingerprint=e1:c8:bb:6a:71:c4:d6:28:90:7a:e3:23:0a:ed:d5:8d
key_file=/home/opc/.oci/oci_api_key.pem
tenancy=ocid1.tenancy.oc1..
region=eu-frankfurt-1
Finally, you have to upload your API Signing public key through the OCI Console.
Get the content of the public key:
[opc@vm1 ~]$ cat /home/opc/.oci/oci_api_key_public.pem
-----BEGIN PUBLIC KEY-----
MIIBIjANBgkqhkiG9w0BAQEFAAOCAQ8AMIIBCgKCAQEAsGvXqNG0gvPbYM4ELD5e
l7ax47rnqEWKe3cxcpVR5+bDHSyKARKdCWpPGZA9+yg+coxa6aemS1cI2lBOZwRU
XFb3MhlGUGRKmZPHkr+bjLquH7dZURy/6rPT36AwblU2OluwHeNkwNRhdP6bJaIX
zXXSybq0lQxOEzU+LhAlCrxhvXaSaCyVvF9OeJ34NoWQO/9DzJsuG/rGwFk8yCzX
ED3mU0vdFWp03SciN0XPOmuc+R23kZpChVlS5BwCPfxXQC/azVaiKRzSTnLT/7Wl
vS3Py1LH1nr3z3beCqD3F5NJGLRzRrdeVRinA28cRFcb4wK0fDS7DTkqPcPxjp9Q
nwIDAQAB
-----END PUBLIC KEY-----
In the OCI Console, from your OCI user’s detail page, click on API Keys, then Add API Key:
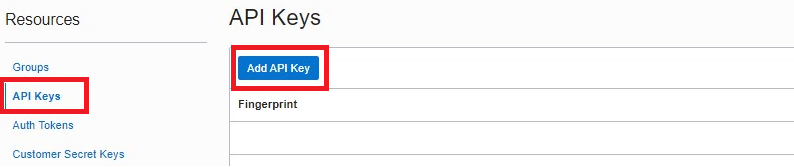
Choose Paste Public Key, put the content of the public key in the text area, and click Add. A new Fingerprint will be displayed on your user’s details page. The Fingerprint must be identical to the one in your config file in the .oci folder.

Now we are ready to execute our first CLI command:
[opc@vm1 ~]$ oci iam compartment list --compartment-id ocid1.tenancy.oc1..
{
  "data": [
    {
      "compartment-id": "ocid1.tenancy.oc1..",
      "defined-tags": {},
      "description": "Demo",
...
Advantages:
- You can use this method from any server within OCI or on-premises.
Considerations:
- The actions allowed to be executed depends on the user’s privileges.
- Other users on the machine will execute the commands in the name of that user.
- This configuration is not possible when using federated users.
- Overhead of managing users and keys.
Authentication Method #2: Instance Principals
Instead of using a user and a key, allow the VM Compute instance in OCI itself to execute CLI commands. For this purpose, we will need the OCID of the Compute instance as part of a Dynamic Group, and a Policy to assign the privileges to the Dynamic Group.
Create a Dynamic Group that contains the OCID of the Compute Instance:
Any { instance.id = 'ocid1.instance.oc1.eu-frankfurt-1.antheljsgxomteacwlr24a6qubm2x43pesldzpalj5xxc7rrlull2olmohpq' }

Create a Policy with the needed privileges:
allow dynamic-group DG_Instances to manage all-resources in tenancy

Now, in your Compute instance, you don’t need any config files or keys anymore.
You can set the Authentication Method once to instance_principal and execute your CLI commands as usual:
[opc@vm2 ~]$ export OCI_CLI_AUTH=instance_principal
[opc@vm2 ~]$ oci iam compartment list ...
[opc@vm2 ~]$ oci compute instance launch ...
[opc@vm2 ~]$ oci db autonomous-database start ...
Another way is to add the –auth instance_principal parameter to every single CLI command:
[opc@vm2 ~]$ oci iam compartment list ... --auth instance_principal
Advantages:
- You don’t need to deal with users and keys.
Considerations:
- Everyone who has access to this machine can execute the CLI commands.
- In OCI Auditing, it will be the instance that has executed a command, so you can’t map the actions to a real user.
- It is applicable for Compute instances only, but not for other OCI resources, e.g. database machines.
Authentication Method #3: Resource Principals
Resource Principals does not only allow Compute instances, but also other OCI resources like VM DB Systems and Exadata VM Clusters to authenticate against the Cloud Control Plane.
In this case, we will use resource.id instead of instance.id in the Dynamic Group. The OCID to be used is the one of the Compute instance, the DB System, or the Exadata VM Cluster:
Any { resource.id = 'ocid1.dbsystem.oc1.eu-frankfurt-1.antheljrgxomteaa6iouhwg6svjgvihlxwqui4qxyn52embh6szhwtg2rcra' }

Set the environment variables as below and execute your CLI commands from a Compute instance, VM DB System, or Exadata Cloud Service machines:
[opc@db ~]$ export OCI_CLI_AUTH=resource_principal  #or add --auth resource_principal to each command
[opc@db ~]$ export OCI_RESOURCE_PRINCIPAL_VERSION=1.1
[opc@db ~]$ export OCI_RESOURCE_PRINCIPAL_RPT_ENDPOINT="https://database.eu-frankfurt-1.oraclecloud.com" #replace with your region's endpoint
[opc@db ~]$ oci iam compartment list ...
[opc@db ~]$ oci compute instance launch ...
[opc@db ~]$ oci db autonomous-database start ...
Advantages:
- You don’t need to deal with users and keys.
- Applies to Compute instances as well as other OCI resources.
Considerations:
- Everyone who has access to this machine can execute the CLI commands.
- In OCI Auditing, it will be the resource that has executed a command, so you can’t map the actions to a real user.
Cloud Shell
Do you just want to get started immediately, without installing or configuring anything at all?
Then use Cloud Shell!
Just click on the Cloud Shell icon on the upper right side of the Cloud Console!


Advantages:
- Pre-installed and pre-authenticated CLI. Just log in and start typing.
- Each user uses its own Cloud Shell and only the privileges assigned to that user apply.
- All actions are audited and mapped to that user.
Considerations:
- It is not possible to schedule jobs like you’d do on your machine using crontab. The session has a maximum length of 24 hours anyway.
Summary
OCI CLI provides an easy way to benefit even more from Cloud automation by managing your OCI resources via a simple command-line tool. Authentication can be done by using a user and a key, Instance Principals, or Resource Principals.
Further Reading
- Command Line Interfaces (CLIs) in the Oracle Cloud
- Automate Patching and Upgrade your Cloud Databases using OCI CLI
- How to use Customer-Managed TDE Encryption Keys in Oracle Exadata Cloud Service
- CLI Command Reference
- Calling Services from an Instance
- How To configure oci-cli with Instance/Resource Principals (Doc ID 2763990.1)
