
Introduction
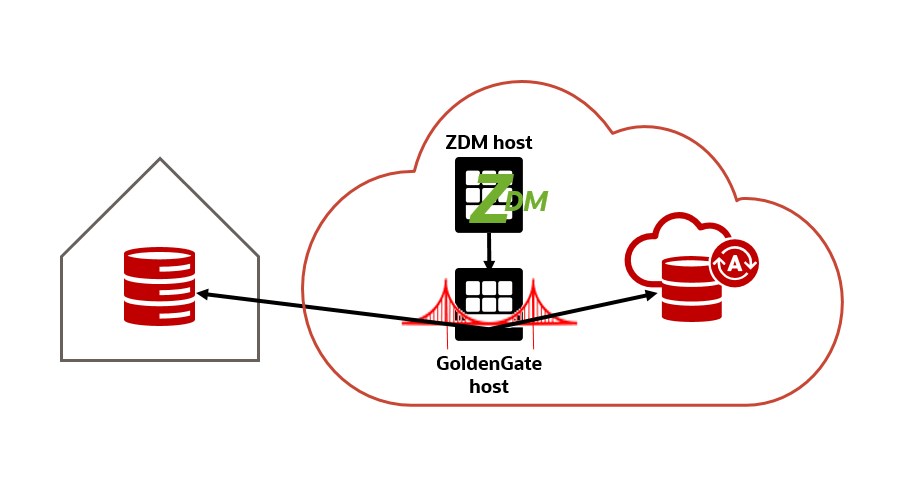
ZDM version 21.3 supports logical migrations using Oracle GoldenGate. This makes it possible to migrate to Oracle Autonomous Database with zero downtime. This blog post provides step-by-step instructions on how to accordingly configure ZDM with the minimal parameters required. Data Pump will be used to create the initial load and GoldenGate extract and replicate will keep the target database in sync with the source.
You don’t need to know what extract and replicate is or anything else about GoldenGate. ZDM does it all for you by following the Maximum Availability Architecture (MAA) best practices. Click the button and enjoy your coffee or tea. Other drinks are also supported. But before that, we need some preparation.
Oracle GoldenGate for Oracle – Database Migrations can be used for 183 days to perform migrations into Oracle databases located in Oracle Cloud using the following tools:
- Oracle Zero Downtime Migration
- Oracle Cloud Infrastructure Database Migration
The Environment
We will use:
- The ZDM host as described in Part 1.
- Oracle database version 19.16 installed on a VM with IP 10.0.2.185 and hostname onpremdb as source database.
- Oracle Autonomous Database as target database.
- GoldenGate from Oracle Cloud Marketplace:
From the main menu, click on “Marketplace”, “Applications”, search for “GoldenGate”, choose “Oracle GoldenGate – Database Migrations”, and keep the default version “21.7.0.0.1_v1.0 (Oracle DB – Microservices Edition – Promotional)”.
Provide the required information. I chose gghost as the hostname. Keep the default deployment names Marketplace. Enable the checkbox for “Deployment – Autonomous Database” and choose your target Autonomous Database. As version 21 only provides one deployment, here Marketplace, this value will be used for both source and target GoldenGate deployments.
After the compute VM is created, look for its IP address (here 10.0.2.37) and connect to it via SSH to get the oggadmin user password:
-bash-4.2$ cat /home/opc/ogg-credentials.json
{"username": "oggadmin", "credential": "G8nAt-L_%bGv4gLr"}
Migration
Step 1: Prepare the source database host.
Copy the SSH public key for zdmuser from the ZDM host (created in Part 1, post-task 1) to the .ssh/authorized_keys file on the source database host for the user you want to use for login, in this case, opc:
#on ZDM host as zdmuser
[zdmuser@zdmhost ~]$ cat .ssh/id_rsa.pub
#on the source database host as user opc
[opc@onpremdb ~]$ vi .ssh/authorized_keys
#insert the public key and save the changes
Step 2: Prepare the source database.
As SYS user:
-- Set streams_pool_size to 2G
SQL> alter system set streams_pool_size=2G scope=both;

-- Set global_names to false
SQL> alter system set global_names=false;

-- Enable ARCHIVELOG mode:
SQL> select log_mode from v$database;
LOG_MODE
------------
NOARCHIVELOG
SQL> shutdown immediate;
SQL> startup mount
SQL> alter database archivelog;
SQL> alter database open;
SQL> select log_mode from v$database;
LOG_MODE
------------
ARCHIVELOG

-- Enable FORCE LOGGING to ensure that all changes are found in the redo by the Oracle GoldenGate Extract process:
SQL> select force_logging from v$database;
FORCE_LOGGING
---------------------------------------
NO
SQL> alter database force logging;
SQL> select force_logging from v$database;
FORCE_LOGGING
---------------------------------------
YES

-- Enable database minimal supplemental logging:
SQL> select minimal from dba_supplemental_logging;
MINIMAL
----------
NO
SQL> alter database add supplemental log data;
SQL> select minimal from dba_supplemental_logging;
MINIMAL
----------
YES

-- Enable initialization parameter ENABLE_GOLDENGATE_REPLICATION:
SQL> alter system set ENABLE_GOLDENGATE_REPLICATION=TRUE scope=both;
System altered.

-- In case of Multitenant, create the user c##ggadmin in CDB$ROOT:
SQL> create user c##ggadmin identified by VerySecretPw_22 default tablespace users temporary tablespace temp;
grant connect, resource to c##ggadmin;
grant unlimited tablespace to c##ggadmin;
alter user c##ggadmin quota 10G on users;
grant select any dictionary to c##ggadmin;
grant create view to c##ggadmin;
grant execute on dbms_lock to c##ggadmin;
grant set container to c##ggadmin container=all;
exec dbms_goldengate_auth.GRANT_ADMIN_PRIVILEGE('c##ggadmin',container=>'all');

-- Create a GoldenGate administration user, ggadmin (in the PDB in case of Multitenant):
SQL> alter session set container=ORCLPDB;
create user ggadmin identified by VerySecretPw_22 default tablespace users temporary tablespace temp;
grant connect, resource to ggadmin;
grant unlimited tablespace to ggadmin;
alter user ggadmin quota 10G on users;
grant select any dictionary to ggadmin;
grant create view to ggadmin;
grant execute on dbms_lock to ggadmin;
exec dbms_goldengate_auth.GRANT_ADMIN_PRIVILEGE('ggadmin');
Step 3: Prepare the target database.
As ADMIN user:
SQL> alter user ggadmin identified by VerySecretPw_22 account unlock;
User GGADMIN altered.
Step 4: Prepare the GoldenGate host.
Your Autonomous Database Client Credentials (.zip file) will be found in the directory /u02/deployments/Marketplace/etc/adb:
-bash-4.2$ cd /u02/deployments/Marketplace/etc/adb
-bash-4.2$ ls -l
-rw-rw-r--. 1 opc opc  6701 Sep 16 10:32 cwallet.sso
-rw-rw-r--. 1 opc opc  6656 Sep 16 10:32 ewallet.p12
-rw-rw-r--. 1 opc opc  7475 Sep 16 10:32 ewallet.pem
-rw-rw-r--. 1 opc opc  3193 Sep 16 10:32 keystore.jks
-rw-rw-r--. 1 opc opc   691 Sep 16 10:32 ojdbc.properties
-rw-rw-r--. 1 opc opc  2803 Sep 16 10:32 README
-rw-rw-r--. 1 opc opc   131 Sep 16 13:06 sqlnet.ora
-rw-rw-r--. 1 opc opc  1920 Sep 16 10:32 tnsnames.ora
-rw-rw-r--. 1 opc opc  3378 Sep 16 10:32 truststore.jks
Edit the WALLET_LOCATION in the sqlnet.ora file pointing to this directory:
-bash-4.2$ vi sqlnet.ora
WALLET_LOCATION = (SOURCE = (METHOD = file) (METHOD_DATA = (DIRECTORY="/u02/deployments/Marketplace/etc/adb")))
SSL_SERVER_DN_MATCH=yes
Change the TNS_ADMIN entry for the target environment in the deployment registry file to point to the adb directory:
-bash-4.2$ vi /u02/deployments/ServiceManager/etc/conf/deploymentRegistry.dat
"Marketplace": {
   "$schema": "ogg:deployment",
   ...
   "environment": [
      {
         "name": "TNS_ADMIN",
         "value": "/u02/deployments/Marketplace/etc/adb"
      }
Step 5: Prepare the DZM host.
Add the server’s hostname and IP information into the /etc/hosts file. As root user:
[root@zdmhost ~]# vi /etc/hosts
#add the following entries
10.0.2.247 zdmhost.pubsubnetlb.vcnfra.oraclevcn.com    zdmhost
10.0.2.37  ogg21cora.subnetpublic.vcnfra.oraclevcn.com gghost
10.0.2.185 onpremdb.pubsubnetlb.vcnfra.oraclevcn.com   onpremdb
Verify that TTY is disabled for the SSH privileged user. If TTY is disabled, the following command returns the date from the remote host without any errors:
[zdmuser@zdmhost ~]$ ssh -i /home/zdmuser/.ssh/id_rsa opc@onpremdb "/usr/bin/sudo /bin/sh -c date"
Fri Sep 16 11:10:25 GMT 2022
Step 6: Create the ZDM response file on the ZDM host.
You’ll find a template at $ZDMHOME/rhp/zdm/template/zdm_logical_template.rsp on the ZDM host that contains a brief description of the parameters and their possible values. Here we will create a new response file with the minimum parameters required. As zdmuser:
[zdmuser@zdmhost ~]$ vi /home/zdmuser/logical_online.rsp

# migration method
MIGRATION_METHOD=ONLINE_LOGICAL
DATA_TRANSFER_MEDIUM=OSS
# data pump
DATAPUMPSETTINGS_JOBMODE=SCHEMA
DATAPUMPSETTINGS_METADATAREMAPS-1=type:REMAP_TABLESPACE,oldValue:USERS,newValue:DATA
DATAPUMPSETTINGS_DATABUCKET_NAMESPACENAME=oraseemeadesandbox
DATAPUMPSETTINGS_DATABUCKET_BUCKETNAME=zdmbucket
DATAPUMPSETTINGS_DATAPUMPPARAMETERS_EXPORTPARALLELISMDEGREE=2
DATAPUMPSETTINGS_DATAPUMPPARAMETERS_IMPORTPARALLELISMDEGREE=2
DATAPUMPSETTINGS_EXPORTDIRECTORYOBJECT_NAME=DATA_PUMP_DIR
# on source db (pdb): select directory_path from dba_directories where directory_name = 'DATA_PUMP_DIR';
DATAPUMPSETTINGS_EXPORTDIRECTORYOBJECT_PATH=/u01/app/oracle/admin/ORCL/dpdump/BFB29F07DDB2450FE053B902000ADDF9
DATAPUMPSETTINGS_IMPORTDIRECTORYOBJECT_NAME=DATA_PUMP_DIR
DATAPUMPSETTINGS_CREATEAUTHTOKEN=FALSE
DATAPUMPSETTINGS_DELETEDUMPSINOSS=TRUE
# source db (pdb)
SOURCEDATABASE_CONNECTIONDETAILS_HOST=onpremdb
SOURCEDATABASE_CONNECTIONDETAILS_PORT=1521
SOURCEDATABASE_CONNECTIONDETAILS_SERVICENAME=orclpdb
SOURCEDATABASE_ADMINUSERNAME=SYSTEM
SOURCEDATABASE_GGADMINUSERNAME=ggadmin
# source cdb
SOURCECONTAINERDATABASE_CONNECTIONDETAILS_HOST=onpremdb
SOURCECONTAINERDATABASE_CONNECTIONDETAILS_PORT=1521
SOURCECONTAINERDATABASE_CONNECTIONDETAILS_SERVICENAME=ORCL
SOURCECONTAINERDATABASE_ADMINUSERNAME=SYSTEM
SOURCECONTAINERDATABASE_GGADMINUSERNAME=c##ggadmin
# target db
TARGETDATABASE_OCID=ocid1.autonomousdatabase.oc1.eu-frankfurt-1...
TARGETDATABASE_ADMINUSERNAME=ADMIN
TARGETDATABASE_GGADMINUSERNAME=ggadmin
# oci cli
OCIAUTHENTICATIONDETAILS_USERPRINCIPAL_USERID=ocid1.user.oc1...
OCIAUTHENTICATIONDETAILS_USERPRINCIPAL_TENANTID=ocid1.tenancy.oc1...
OCIAUTHENTICATIONDETAILS_USERPRINCIPAL_FINGERPRINT=9f:3b:55:c1:bd:a4:3e:de:d7:e1:a1:12:eb:93:ba:3a
OCIAUTHENTICATIONDETAILS_USERPRINCIPAL_PRIVATEKEYFILE=/home/zdmuser/.oci/oci_api_key.pem
OCIAUTHENTICATIONDETAILS_REGIONID=eu-frankfurt-1
# GoldenGate
GOLDENGATEHUB_ADMINUSERNAME=oggadmin
GOLDENGATEHUB_SOURCEDEPLOYMENTNAME=Marketplace
GOLDENGATEHUB_TARGETDEPLOYMENTNAME=Marketplace
#use the FQDN (not the IP) of the GoldenGate host
GOLDENGATEHUB_URL=https://gghost.pubsubnetlb.vcnfra.oraclevcn.com
GOLDENGATEHUB_COMPUTEID=ocid1.instance.oc1.eu-frankfurt-1...
Set DATAPUMPSETTINGS_DELETEDUMPSINOSS=FALSE to keep the dump files on Object Storage after migration.
Step 7: Evaluate the configuration.
On the ZDM host as zdmuser:
[zdmuser@zdmhost ~]$ $ZDMHOME/bin/zdmcli migrate database \
-rsp /home/zdmuser/logical_online.rsp \
-sourcenode onpremdb \
-sourcesid ORCL \
-srcauth zdmauth \
-srcarg1 user:opc \
-srcarg2 identity_file:/home/zdmuser/.ssh/id_rsa \
-srcarg3 sudo_location:/usr/bin/sudo \
-eval

Enter source database administrative user "SYSTEM" password:
Enter source database administrative user "ggadmin" password:
Enter source container database administrative user "SYSTEM" password:
Enter source container database administrative user "c##ggadmin" password:
Enter target database administrative user "ADMIN" password:
Enter target database administrative user "ggadmin" password:
Enter Oracle GoldenGate hub administrative user "oggadmin" password:
Enter Authentication Token for OCI user "ocid1.user.oc1...":
Enter Data Pump encryption password:
Operation "zdmcli migrate database" scheduled with the job ID "35".
If the source database is using ASM for storage management, then use -sourcedb <db_unique_name> instead of -sourcesid <SID> in the zdmcli command.
In case you run into the “unable to find valid certification path to requested target” error, check Doc ID 2768483.1: Zero Downtime Migration – GoldenGate Hub Certificate Known Issues.
Check the job status. On the ZDM host as zdmuser:
[zdmuser@zdmhost ~]$ $ZDMHOME/bin/zdmcli query job -jobid 35

Job ID: 35
User: zdmuser
Client: zdmhost
Job Type: "EVAL"
...
Current status: EXECUTING
Current Phase: "ZDM_SETUP_SRC"
Result file path: "/home/zdmuser/zdmbase/chkbase/scheduled/job-35-2021-04-13-14:53:58.log"
...
ZDM_VALIDATE_TGT ...................... COMPLETED
ZDM_VALIDATE_SRC ...................... COMPLETED
ZDM_SETUP_SRC ......................... STARTED
ZDM_PRE_MIGRATION_ADVISOR ............. PENDING
ZDM_VALIDATE_GG_HUB ................... PENDING
ZDM_VALIDATE_DATAPUMP_SETTINGS_SRC .... PENDING
ZDM_VALIDATE_DATAPUMP_SETTINGS_TGT .... PENDING
ZDM_CLEANUP_SRC ....................... PENDING
Wait until all phases are completed. To repeat the check every 10 seconds:
[zdmuser@zdmhost ~]$ while :; do $ZDMHOME/bin/zdmcli query job -jobid 35; sleep 10; done

Job execution elapsed time: 1 minutes 32 seconds
ZDM_VALIDATE_TGT ...................... COMPLETED
ZDM_VALIDATE_SRC ...................... COMPLETED
ZDM_SETUP_SRC ......................... COMPLETED
ZDM_PRE_MIGRATION_ADVISOR ............. COMPLETED
ZDM_VALIDATE_GG_HUB ................... COMPLETED
ZDM_VALIDATE_DATAPUMP_SETTINGS_SRC .... COMPLETED
ZDM_VALIDATE_DATAPUMP_SETTINGS_TGT .... COMPLETED
ZDM_CLEANUP_SRC ....................... COMPLETED
Step 8: Initiate the migration.
Execute the same command for evaluation, but this time without the -eval parameter. Pause the migration after the step ZDM_MONITOR_GG_LAG. This will cause the data replication to run continuously until the Migration is resumed.
On the ZDM host as zdmuser:
[zdmuser@zdmhost ~]$ $ZDMHOME/bin/zdmcli migrate database \
-rsp /home/zdmuser/logical_online.rsp \
-sourcenode onpremdb \
-sourcesid ORCL \
-srcauth zdmauth \
-srcarg1 user:opc \
-srcarg2 identity_file:/home/zdmuser/.ssh/id_rsa \
-srcarg3 sudo_location:/usr/bin/sudo \
-pauseafter ZDM_MONITOR_GG_LAG

Enter source database administrative user "SYSTEM" password:
Enter source database administrative user "ggadmin" password:
Enter source container database administrative user "SYSTEM" password:
Enter source container database administrative user "c##ggadmin" password:
Enter target database administrative user "ADMIN" password:
Enter target database administrative user "ggadmin" password:
Enter Oracle GoldenGate hub administrative user "oggadmin" password:
Enter Authentication Token for OCI user "ocid1.user.oc1..aaaaaaaa7qclwl3z2vorsmka7rwbhmem4kt63yrsuj3cubdxojz7bwjsqv3q":
Enter Data Pump encryption password:
Operation "zdmcli migrate database" scheduled with the job ID "43".
Check the job status. On the ZDM host as zdmuser:
[zdmuser@zdmhost ~]$ while :; do $ZDMHOME/bin/zdmcli query job -jobid 36; sleep 10; done

Job ID: 43
User: zdmuser
Client: zdmhost
Job Type: "MIGRATE"
...
Current status: PAUSED
Current Phase: "ZDM_MONITOR_GG_LAG"
Result file path: "/home/zdmuser/zdmbase/chkbase/scheduled/job-43-2021-04-13-18:47:31.log"
...
ZDM_VALIDATE_TGT ...................... COMPLETED
ZDM_VALIDATE_SRC ...................... COMPLETED
ZDM_SETUP_SRC ......................... COMPLETED
ZDM_PRE_MIGRATION_ADVISOR ............. COMPLETED
ZDM_VALIDATE_GG_HUB ................... COMPLETED
ZDM_VALIDATE_DATAPUMP_SETTINGS_SRC .... COMPLETED
ZDM_VALIDATE_DATAPUMP_SETTINGS_TGT .... COMPLETED
ZDM_PREPARE_GG_HUB .................... COMPLETED
ZDM_ADD_HEARTBEAT_SRC ................. COMPLETED
ZDM_ADD_SCHEMA_TRANDATA_SRC ........... COMPLETED
ZDM_CREATE_GG_EXTRACT_SRC ............. COMPLETED
ZDM_PREPARE_DATAPUMP_SRC .............. COMPLETED
ZDM_PREPARE_DATAPUMP_TGT .............. COMPLETED
ZDM_DATAPUMP_EXPORT_SRC ............... COMPLETED
ZDM_UPLOAD_DUMPS_SRC .................. COMPLETED
ZDM_DATAPUMP_IMPORT_TGT ............... COMPLETED
ZDM_POST_DATAPUMP_SRC ................. COMPLETED
ZDM_POST_DATAPUMP_TGT ................. COMPLETED
ZDM_ADD_HEARTBEAT_TGT ................. COMPLETED
ZDM_ADD_CHECKPOINT_TGT ................ COMPLETED
ZDM_CREATE_GG_REPLICAT_TGT ............ COMPLETED
ZDM_MONITOR_GG_LAG .................... COMPLETED
ZDM_SWITCHOVER_APP .................... PENDING
ZDM_RM_GG_EXTRACT_SRC ................. PENDING
ZDM_RM_GG_REPLICAT_TGT ................ PENDING
ZDM_DELETE_SCHEMA_TRANDATA_SRC ........ PENDING
ZDM_RM_HEARTBEAT_SRC .................. PENDING
ZDM_RM_CHECKPOINT_TGT ................. PENDING
ZDM_RM_HEARTBEAT_TGT .................. PENDING
ZDM_CLEAN_GG_HUB ...................... PENDING
ZDM_POST_ACTIONS ...................... PENDING
ZDM_CLEANUP_SRC ....................... PENDING
Pay attention to the current job status. It is in PAUSED status now. Also, the progress stopped after phase ZDM_MONITOR_GG_LAG was COMPLETED.
At this stage, every change on the source database is immediately synchronized with the target database. Resume the job when your application is ready for migration.
Step 9: Complete the migration.
Resume the job from the previous step. On the ZDM host as zdmuser:
[zdmuser@zdmhost ~]$ $ZDMHOME/bin/zdmcli resume job -jobid 43
Query the status again and wait until all phases are completed.
Log Files
In case of any issue, check the following log files:
#job log file on the zdm host
/home/zdmuser/zdmbase/chkbase/scheduled/job-<job_id>-<data>.log

#ZDM log file on the zdm host
/home/zdmuser/zdmbase/crsdata/zdmhost/rhp/zdmserver.log.0

#Extract and Replicate config on the GoldenGate host
/u02/deployments/Marketplace/etc/conf/ogg/
GUI
Do you rather prefer using a graphical interface? Have a look at the Database Migration Service.
Conclusion
After investing some work in the setup, all steps are done for you in one click: the initial load using Data Pump (export from source, copy to Object Storage, import into the target database, and clean up the dump files), creating the appropriate GoldenGate configuration, and keeping both databases synchronized in real-time.
ZDM offers a wide range of options that you might need for more flexibility and control. Have a look at the documentation for the complete list of available parameters.
Further Reading
- Oracle Zero Downtime Migration
- Doc: Move to Oracle Cloud Using Zero Downtime Migration
- LiveLab: Zero Downtime Migration – Logical Online Migration to Oracle Autonomous
- Part 1/5: Zero Downtime Migration (ZDM) – Introduction & Installation
- Part 2/5: Zero Downtime Migration (ZDM) – Logical Online Migration using Oracle GoldenGate (this blog post)
- Part 3/5: Zero Downtime Migration (ZDM) – Logical Offline Migration using Data Pump
- Part 4/5: Zero Downtime Migration (ZDM) – Physical Online Migration using Data Guard
- Part 5/5: Zero Downtime Migration (ZDM) – Physical Offline Migration using RMAN
- Use an Existing RMAN Backup with Zero Downtime Migration
- AWS RDS for Oracle to Autonomous Database using Zero Downtime Migration
- Zero Downtime Migration (ZDM) – Logical Offline Migration to Co-Managed Database Services
- Zero Downtime Migration (ZDM) – Logical Online Migration to VM DB Systems
