
Introduction
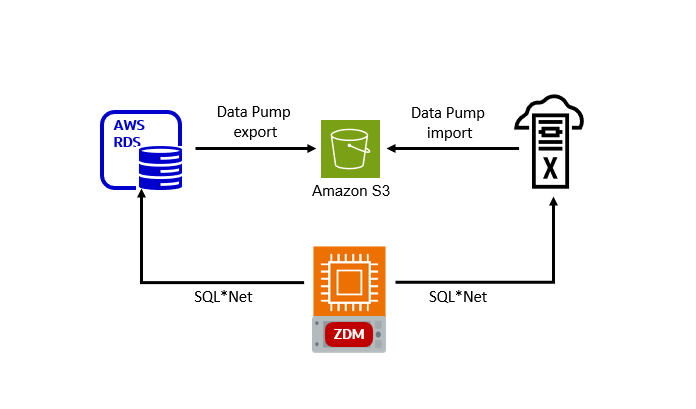
This blog post describes the steps to migrate from Oracle RDS to Exadata Database Service using Oracle Zero Downtime Migration (ZDM) logical offline method, which leverages Oracle Data Pump for data export and import and uses Amazon S3 Object Storage to store the Data Pump dump files.
The same steps apply if migrating to another co-managed Oracle Database Cloud Service, like Base Database Service or Exadata Exascale Cloud Service.
The Environment
- Source Database: Oracle RDS.
- Target Database: Exadata Database Service.
- Intermediate Storage Location: Amazon S3 Object Storage bucket.
- Oracle ZDM: installed on an AWS EC2 VM instance with RHEL 8.
Step 1: Download and Install Oracle ZDM
Download and install the Oracle ZDM software on an AWS EC2 VM instance following the steps in Setting Up Zero Downtime Migration Software or Part 1/5: Zero Downtime Migration (ZDM) – Introduction & Installation.
Step 2: Get your Access and Secret Keys for the S3 Bucket
You will need to provide ZDM access to the S3 to be able to upload the Data Pump export file to the object storage bucket.
Follow the AWS documentation or the example in Steps 1 and 2 in this blog post to get your Access Key ID and Secret Access Key. These should look like this:
Access key ID: AKIA2PCQOXHEFKTB6SU2
Secret access key: 7MymZxpyL3NDJeNpMrfuDE8FJ1fp70BNpsP2Le9b
Step 3: Enable your RDS Instance to Access the S3 Bucket
Review the conditions and follow the steps in the AWS documentation to allow your RDS instance to access the S3 bucket.
Step 4: Configure the Source RDS Database for Data Pump
For optimal Data Pump performance during offline logical migrations, it is recommended to set the STREAMS_POOL_SIZE database parameter to a minimum of 256MB-350MB.
Set the parameter in your RDS parameter group:
STREAMS_POOL_SIZE=268435456 --(=256MB)
Step 5: Prepare the Target Exadata VM Cluster Nodes
Copy the SSH public key for zdmuser from the ZDM host (as created in Part 1, post task 1) to the .ssh/authorized_keys file on the target database host for the user you want to use for login, in this case, opc. Copy the SSH public key to all Exadata VM Cluster nodes:
#on ZDM host as zdmuser
[zdmuser@zdmhost ~]$ cat .ssh/id_rsa.pub
#on the target database host as user opc
[opc@exavm1 ~]$ vi .ssh/authorized_keys
#insert the public key and save the changes
[opc@exavm2 ~]$ vi .ssh/authorized_keys
#insert the public key and save the changes
Step 6: Configure the Target Exadata Database for Data Pump
As SYS user:
alter system set streams_pool_size = 256M;
Step 7: Prepare the DZM Service Host
Add the target database server’s hostnames and IP addresses to the /etc/hosts file. As root user:
[root@zdmhost ~]# vi /etc/hosts
#add the following entries
10.10.0.1 exavm1
10.10.0.2 exavm2
Verify that TTY is disabled for the SSH privileged user. If TTY is disabled, the following command returns the date from the remote host without any errors:
[zdmuser@zdmhost ~]$ ssh -i /home/zdmuser/.ssh/id_rsa opc@exavm1 "/usr/bin/sudo /bin/sh -c date"
Thu Oct  2 09:25:17 GMT 2025

[zdmuser@zdmhost ~]$ ssh -i /home/zdmuser/.ssh/id_rsa opc@exavm2 "/usr/bin/sudo /bin/sh -c date"
Thu Oct  2 09:25:29 GMT 2025
Step 8: Create the ZDM Response File
Create a new response file on the ZDM host. Here is an example with the minimum parameters required. As zdmuser:
[zdmuser@zdmhost ~]$ vi logical_offline.rsp
# migration method
MIGRATION_METHOD=OFFLINE_LOGICAL
DATA_TRANSFER_MEDIUM=AMAZONS3
# AWS RDS Oracle
SOURCEDATABASE_ENVIRONMENT_NAME=AMAZON
SOURCEDATABASE_ENVIRONMENT_DBTYPE=RDS_ORACLE
SOURCEDATABASE_ADMINUSERNAME=admin
SOURCEDATABASE_CONNECTIONDETAILS_HOST=orards2.cvi2oskioo1c.us-east-1.rds.amazonaws.com
SOURCEDATABASE_CONNECTIONDETAILS_SERVICENAME=ORCL
SOURCEDATABASE_CONNECTIONDETAILS_PORT=1521
# data pump
DATAPUMPSETTINGS_EXPORTDIRECTORYOBJECT_NAME=DATA_PUMP_DIR
DATAPUMPSETTINGS_JOBMODE=SCHEMA
INCLUDEOBJECTS-1=owner:HR
DATAPUMPSETTINGS_IMPORTDIRECTORYOBJECT_NAME=DATA_PUMP_DIR
DATAPUMPSETTINGS_IMPORTDIRECTORYOBJECT_PATH=/u02/app/oracle/product/19.0.0.0/dbhome_1/rdbms/log/39035FC9A0DD562BE063240181AC869C
# target db
TARGETDATABASE_OCID=ocid1.database.oc1.iad.xxx
TARGETDATABASE_CONNECTIONDETAILS_SERVICENAME=pdb01.client.odb1.oraclevcn.com
TARGETDATABASE_CONNECTIONDETAILS_HOST=exavm1
TARGETDATABASE_CONNECTIONDETAILS_PORT=1521
TARGETDATABASE_ADMINUSERNAME=SYSTEM
# oci cli
OCIAUTHENTICATIONDETAILS_USERPRINCIPAL_USERID=ocid1.user.oc1..xxx
OCIAUTHENTICATIONDETAILS_USERPRINCIPAL_TENANTID=ocid1.tenancy.oc1..xxx
OCIAUTHENTICATIONDETAILS_USERPRINCIPAL_FINGERPRINT=43:05:e5:1f:63:8a:29:f3:02:67:ff:56:57:e3:bc:33
OCIAUTHENTICATIONDETAILS_USERPRINCIPAL_PRIVATEKEYFILE=/home/zdmuser/.oci/oci_api_key.pem
OCIAUTHENTICATIONDETAILS_REGIONID=us-ashburn-1
# s3 credentials
DUMPTRANSFERDETAILS_S3BUCKET_NAME=s3zdm
DUMPTRANSFERDETAILS_S3BUCKET_REGION=us-east-1
DUMPTRANSFERDETAILS_S3BUCKET_ACCESSKEY=AKIA2PCQOXHEFKTB6SU2
Step 9: Evaluate the Migration
On the ZDM host, as zdmuser:
[zdmuser@zdmhost ~]$ $ZDMHOME/bin/zdmcli migrate database \
-rsp logical_offline.rsp \
-targetnode exavm1 \
-tgtauth zdmauth \
-tgtarg1 user:opc \
-tgtarg2 identity_file:/home/zdmuser/.ssh/id_rsa \
-tgtarg3 sudo_location:/usr/bin/sudo \
-targethome /u02/app/oracle/product/19.0.0.0/dbhome_1 \
-eval
You will interactively be asked to enter the passwords for the RDS and Exadata Database admin users.
Check the job status. On the ZDM host, as zdmuser:
[zdmuser@zdmhost ~]$ $ZDMHOME/bin/zdmcli query job -jobid 1
Job ID: 1
Job Type: "EVAL"
Current status: SUCCEEDED
ZDM_VALIDATE_TGT ...................... COMPLETED
ZDM_VALIDATE_SRC ...................... COMPLETED
ZDM_SETUP_SRC ......................... COMPLETED
ZDM_PRE_MIGRATION_ADVISOR ............. COMPLETED
ZDM_VALIDATE_DATAPUMP_SETTINGS_SRC .... COMPLETED
ZDM_VALIDATE_DATAPUMP_SETTINGS_TGT .... COMPLETED
ZDM_PREPARE_DATAPUMP_SRC .............. COMPLETED
ZDM_DATAPUMP_ESTIMATE_SRC ............. COMPLETED
ZDM_CLEANUP_SRC ....................... COMPLETED
Step 10: Start the Migration
Execute the same command for evaluation, but this time without the -eval parameter. On the ZDM host, as zdmuser:
[zdmuser@zdmhost ~]$ $ZDMHOME/bin/zdmcli migrate database \
-rsp logical_offline.rsp \
-targetnode exavm1 \
-tgtauth zdmauth \
-tgtarg1 user:opc \
-tgtarg2 identity_file:/home/zdmuser/.ssh/id_rsa \
-tgtarg3 sudo_location:/usr/bin/sudo \
-targethome /u02/app/oracle/product/19.0.0.0/dbhome_1
Check the job status. On the ZDM host, as zdmuser:
[zdmuser@zdmhost ~]$ $ZDMHOME/bin/zdmcli query job -jobid 2
Job ID: 2
Job Type: "MIGRATE"
Current status: SUCCEEDED
ZDM_VALIDATE_TGT ...................... COMPLETED
ZDM_VALIDATE_SRC ...................... COMPLETED
ZDM_SETUP_SRC ......................... COMPLETED
ZDM_PRE_MIGRATION_ADVISOR ............. COMPLETED
ZDM_VALIDATE_DATAPUMP_SETTINGS_SRC .... COMPLETED
ZDM_VALIDATE_DATAPUMP_SETTINGS_TGT .... COMPLETED
ZDM_PREPARE_DATAPUMP_SRC .............. COMPLETED
ZDM_DATAPUMP_ESTIMATE_SRC ............. COMPLETED
ZDM_PREPARE_DATAPUMP_TGT .............. COMPLETED
ZDM_DATAPUMP_EXPORT_SRC ............... COMPLETED
ZDM_TRANSFER_DUMPS_SRC ................ COMPLETED
ZDM_DATAPUMP_IMPORT_TGT ............... COMPLETED
ZDM_POST_DATAPUMP_SRC ................. COMPLETED
ZDM_POST_DATAPUMP_TGT ................. COMPLETED
ZDM_REFRESH_MVIEW_TGT ................. COMPLETED
ZDM_POST_ACTIONS ...................... COMPLETED
ZDM_CLEANUP_SRC ....................... COMPLETED
Troubleshooting
In case of any issues, check the following log files:
- ZDM Server Log: $ZDM_BASE/crsdata/<zdm_service_node>/rhp/rhpserver.log.0
- Target server logs:
<oracle_base>/zdm/zdm_<tgt_db_name>_<job_id>/zdm/log
Further Reading
- Oracle Zero Downtime Migration – product page
- ZDM Logical Offline Migration from Oracle RDS to Autonomous Database
- ZDM Logical Online Migration from Oracle RDS to Autonomous Database
- ZDM Logical Offline Migration from Oracle RDS to Exadata Database Service (this blog post)
- ZDM Logical Online Migration from Oracle RDS to Exadata Database Service
- Various blog posts related to ZDM migrations and Multicloud
