

Introduction
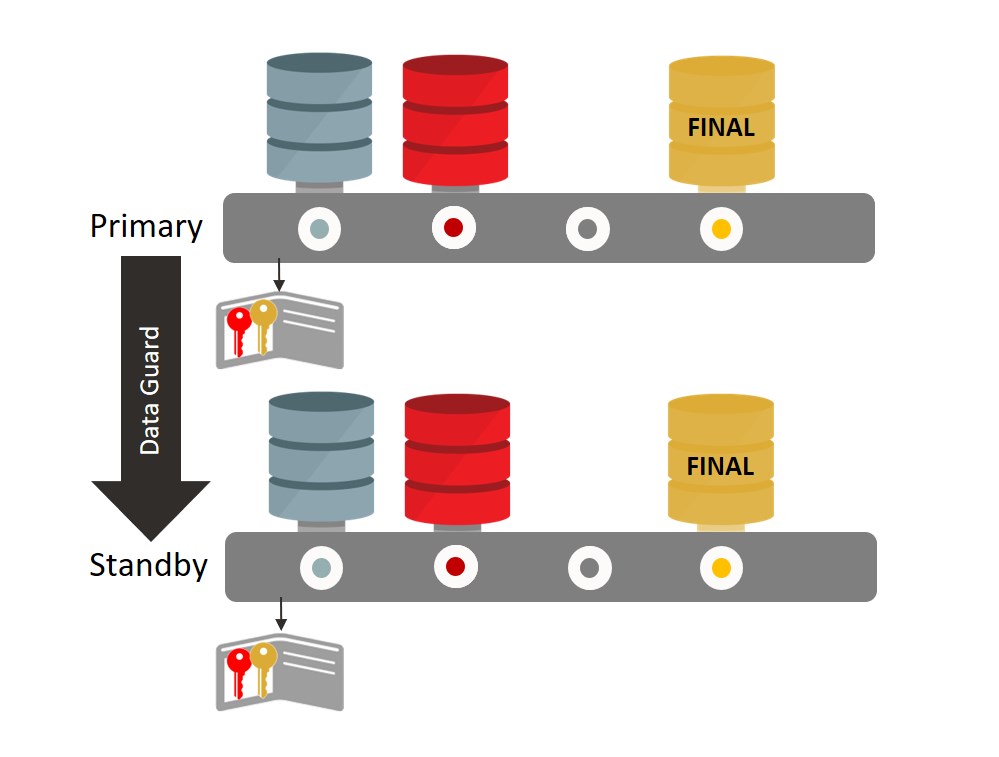
Oracle Multitenant is integrated with Oracle Data Guard. Data Guard is configured at the CDB level and will replicate all transactions from the primary to the standby for all PDBs in a single stream, including creating and deleting PDBs. But!
When we create a new PDB, which is a clone from PDB$SEED, or create a local clone, the data files of the source PDB are already present on the standby site, and hence, the operation replays successfully on the standby database too.
However, when creating a remote clone, the source data files are only present on the remote CDB but not on the standby site. The remote clone operation will succeed on the primary but leave you with no data files on standby.
In this blog post, we will discuss a solution using “transient no-standby PDB” to overcome this challenge.
The Environment
We will use the following:
- Source: Single Instance Database version 19.12, using Multitenant, TDE encrypted, and WE8CED character set. Database unique name is CDBWE8_fra3s6.
- Target: RAC Database version 19.12 in Active Data Guard configuration, using Multitenant, TDE encrypted, and AL32UTF8 character set.
- Primary database unique name is RACCDB_AD1.
- Standby database unique name is RACCDB_fra2xr.
The same procedure applies to single-instance and RAC databases as source or target. The character set could be the same or even different when a few things are considered as described here.
The target database doesn’t need to use Active Data Gaurd either. The same applies to Data Guard. However, the CDB$ROOT needs to be open in read-only mode on standby. In Oracle database version 19c, the Active Data Guard option license is not required when only the CDB$ROOT is open read-only on standby.
Oracle Database version 21c
In 21c, a new feature called PDB Recovery Isolation was introduced. With that, a hot clone operation does not require any further manual steps. PDB Recovery Isolation requires the Active Data Guard option.
On the Source Database
Step 1: Prepare the C##SYSOPER user on the Source Database
Grant the C##SYSOPER user the required privileges to be used for the database link:
SQL> grant create session, sysoper to C##SYSOPER identified by WElcome123## container=all;

Grant succeeded.
On the Target Primary Database
Step 2: Create Database Link from Target to Source
Create a database link on the target primary database pointing to the source database:
SQL> create database link DBLINK_TO_WE8 connect to C##SYSOPER identified by WElcome123## using '<connection_string_to_source_database>';

Database link created.
As we are not using a database link with the same name as the database it connects to, we need to additionally set the global_names parameter to false:
SQL> alter system set global_names=false scope=both sid='*';

System altered.
Step 3: Create a Remote Hot Clone PDB from the Source Database
Use the database link from the previous step to create a hot clone from the source PDB, however providing the STANDBYS=NONE clause, so the clone PDB will only exist on the primary database, but not on the standby. This is not our final clone, but just a “transient” one. This is why it’s called “transient no-standby PDB“.
SQL> create pluggable database TRANSPDB from PDBWE8@DBLINK_TO_WE8 keystore identified by "WElcome123##" STANDBYS=NONE;

Pluggable database created.

SQL> alter pluggable database TRANSPDB open instances=all;

Pluggable database altered.

SQL> show pdbs

    CON_ID CON_NAME                       OPEN MODE  RESTRICTED
---------- ------------------------------ ---------- ----------
         2 PDB$SEED                       READ ONLY  NO
         3 RACPDB                         READ WRITE NO
         4 TRANSPDB                       READ WRITE NO
Now, if you check the standby site, you’ll see the transient PDB in “MOUNTED” mode, but there are no data files associated with it:
-- on the standby
SQL> show pdbs

    CON_ID CON_NAME                       OPEN MODE  RESTRICTED
---------- ------------------------------ ---------- ----------
         2 PDB$SEED                       READ ONLY  NO
         3 RACPDB                         READ ONLY  NO
         4 TRANSPDB                       MOUNTED

SQL> select name from v$datafile where con_id=4;

NAME
--------------------------------------------------------------
/u01/app/oracle/product/19.0.0.0/dbhome_1/dbs/UNNAMED00044
/u01/app/oracle/product/19.0.0.0/dbhome_1/dbs/UNNAMED00045
/u01/app/oracle/product/19.0.0.0/dbhome_1/dbs/UNNAMED00046
/u01/app/oracle/product/19.0.0.0/dbhome_1/dbs/UNNAMED00047
/u01/app/oracle/product/19.0.0.0/dbhome_1/dbs/UNNAMED00048
/u01/app/oracle/product/19.0.0.0/dbhome_1/dbs/UNNAMED00049

Step 4: Create a self-referencing Database Link on the Primary Database
On the target primary, grant the C##SYSOPER user the required privileges and create a database link using the connection string of the primary itself:
SQL> grant create session, sysoper to C##SYSOPER identified by WElcome123## container=all;

Grant succeeded.

SQL> create database link DBLINK_TO_PRIM connect to C##SYSOPER identified by WElcome123## using '<connection_string_of_primary>';

Database link created.
This operation will be replicated via Data Guard redo-apply on the standby database, so we have a database link on the standby pointing to the primary. This IS COOL!
As the database link on standby is not using the exact name of the database is connecting to, we need to set global_names in the standby database to false:
-- on standby
SQL> alter system set global_names=false scope=both sid='*';

System altered.

On the Standby Database
Step 5: Set standby_pdb_source_file_dblink on Standby
On the standby database, set the standby_pdb_source_file_dblink parameter to the name of the database link created in step 4:
SQL> alter system set standby_pdb_source_file_dblink=DBLINK_TO_PRIM scope=both sid='*';

System altered.
This parameter specifies the name of the database link that will automatically be used in the next step to copy the data files from the primary to standby during a local clone operation.
Back to the Primary Database
Step 6: Create a Local Cold Clone from the Transient PDB
On the primary database, set the transient PDB in read-only mode, and create a clone of it, this time using STANDBYS=ALL:
SQL> alter pluggable database TRANSPDB close immediate instances=all;

Pluggable database altered.

SQL> alter pluggable database TRANSPDB open read only instances=all;

Pluggable database altered.

SQL> create pluggable database FINALPDB from TRANSPDB keystore identified by "WElcome123##" STANDBYS=ALL;

Pluggable database created.

-- open thenew PDB
SQL> alter pluggable database FINALPDB open instances=all;

Pluggable database altered.

-- on the standby
SQL> show pdbs;

    CON_ID CON_NAME                       OPEN MODE  RESTRICTED
---------- ------------------------------ ---------- ----------
         2 PDB$SEED                       READ ONLY  NO
         3 RACPDB                         READ ONLY  NO
         4 TRANSPDB                       MOUNTED
         5 FINALPDB                       MOUNTED

SQL> select name from v$datafile where con_id=5;

NAME
-----------------------------------------------------------------------------------------
+DATA/RACCDB_FRA2XR/C9A7E2196EE27681E0531F02640A18C1/DATAFILE/system.280.1089037503
+DATA/RACCDB_FRA2XR/D125EC846C2D2376E053A800000A3055/DATAFILE/sysaux.281.1089037509
+DATA/RACCDB_FRA2XR/D125EC846C2D2376E053A800000A3055/DATAFILE/undotbs1.282.1089037513
+DATA/RACCDB_FRA2XR/D125EC846C2D2376E053A800000A3055/DATAFILE/users.283.1089037515
+DATA/RACCDB_FRA2XR/D125EC846C2D2376E053A800000A3055/DATAFILE/we8tbs.284.1089037515
+DATA/RACCDB_FRA2XR/D125EC846C2D2376E053A800000A3055/DATAFILE/undo_2.285.1089037517
This time, the new PDB clone is created with all data files as on the primary, as the data files have been copied over the database link created in step 4. This is our final PDB.
However, suppose you use local software wallets to manage the TDE master encryption keys instead of Oracle Key Vault (OKV) or OCI Vault in Oracle Cloud. In that case, the Data Guard Redo Apply will stop after opening the PDB, as the standby does not have access to the TDE key of the newly cloned PDB:
dgmgrl
DGMGRL> connect sys;
DGMGRL> show configuration;

Configuration - RACCDB_AD1_RACCDB_fra2xr

  Protection Mode: MaxPerformance
  Members:
  RACCDB_AD1    - Primary database
    RACCDB_fra2xr - Physical standby database
      Error: ORA-16810: multiple errors or warnings detected for the member

Fast-Start Failover:  Disabled

Configuration Status:
ERROR   (status updated 37 seconds ago)
If your source PDB did not have a TDE key, then Redo Apply will stop once you create a new one as described in the next step.

Step 7: Create a new TDE Key for the Final PDB
After cloning an encrypted PDB, do not continue using the same key of the source PDB, but create a new TDE master encryption key for the newly cloned PDB instead:
SQL> alter session set container=FINALPDB;

Session altered.

SQL> administer key management set key force keystore identified by WElcome123## with backup;

keystore altered.
Step 8: Copy the TDE Wallet Files to the Standby Site
Copy the TDE wallet files from the primary to the standby server:
scp -p /opt/oracle/dcs/commonstore/wallets/tde/RACCDB_AD1/*wallet.* oracle@<standby_server>:/opt/oracle/dcs/commonstore/wallets/tde/RACCDB_fra2xr/
cwallet.sso         100% 9432     5.8MB/s   00:00
ewallet.p12         100% 9387     8.3MB/s   00:00
For the new keys to get recognized by the standby database, we need to close and re-open the key store on the standby database:
-- on the standby
SQL> administer key management set keystore close container=ALL;

keystore altered.

-- key store will open automatically as soon as we query the v$encryption_wallet view
SQl> select p.con_id, p.name, p.open_mode, ew.wrl_type, ew.wallet_type, ew.status
from v$pdbs p join v$encryption_wallet ew on (ew.con_id = p.con_id);

    CON_ID NAME                           OPEN_MODE            WRL_TYPE             WALLET_TYPE          STATUS
---------- ------------------------------ -------------------- -------------------- -------------------- --------------------
         2 PDB$SEED                       READ ONLY            FILE                 AUTOLOGIN            OPEN
         3 RACPDB                         READ ONLY            FILE                 AUTOLOGIN            OPEN
         4 TRANSPDB                       MOUNTED              FILE                 AUTOLOGIN            OPEN
         5 FINALPDB                       MOUNTED              FILE                 AUTOLOGIN            OPEN
Step 9: Start the Redo Apply
Now, the Redo Apply process can be started again:
DGMGRL> edit database RACCDB_fra2xr set state = 'apply-on';

-- wait a few seconds
DGMGRL> show configuration

Configuration - RACCDB_AD1_RACCDB_fra2xr

  Protection Mode: MaxPerformance
  Members:
  RACCDB_AD1    - Primary database
    RACCDB_fra2xr - Physical standby database

Fast-Start Failover:  Disabled

Configuration Status:
SUCCESS   (status updated 71 seconds ago)
Step 10: Drop the Transient PDB
Finally, you may want to drop the transient PDB. On the primary database:
SQL> alter pluggable database TRANSPDB close immediate instances=all;

Pluggable database altered.

SQL> drop pluggable database TRANSPDB including datafiles;

Pluggable database dropped.
Drop the database links if not needed anymore.
Considerations
Let’s consider the storage and time needed for this scenario:
- Storage: we need 2x the size of the PDB to be cloned on the primary database, once for the transient no-standby PDB, and once for the final PDB. This is only used temporarily until the transient no-standby PDB is deleted. However, this might become challenging when cloning huge PDBs.
- Time: we need to execute two cloning operations, one remote, and one local. The time needed mainly depends on database size, degree of parallelism, and the network throughput between the source and primary for the first clone, and primary and standby for the second clone. However, the local clone is a cold clone that just copies the datafiles without the need for any recovery operations. Therefore, the cold clone should be much faster than the hot clone, especially if the source was a transactional busy database.
If you want to avoid the second local clone, you could continue recovering the transient no-standby PDB on the standby site as described in this blog post.
Conclusion
In Data Guard environments, creating a new PDB or cloning local PDB replays successfully on the standby, as the data files of the source are present on the standby site too. This is obviously not the case for remote cloning. To copy the datafiles to the standby, you have to:
- Create a transient no-standby PDB first, then create a local clone of that PDB while using a database link from standby to primary (discussed here), or
- Recover the no-standby PDB on the standby site as discussed in this blog post).
The following lists the steps executed above:

Further Reading
- Create PDBs in a Data Guard Environment with TDE enabled
- Using STANDBYS=NONE to create PDBs in a Data Guard environment with TDE enabled
- A Simple Approach – Creating PDBs in a Data Guard environment with TDE enabled
- How to create PDBs with different Character Sets in the same CDB
- Multitenant: Enhanced Integration with Data Guard
- Video (min. 18:20 till 25:44): Oracle Multitenant meets MAA: Deep dive
- Doc ID 2274735.1: Using standby_pdb_source_file_dblink and standby_pdb_source_file_directory to Maintain Standby Databases when Performing PDB Remote Clones or Plugins

1 comment for “Hot Clone a remote PDB in Data Guard Environments using Transient no-standby PDBs”