

Introduction
Creating and cloning PDBs in a multitenant environment is a simple and straightforward task, also when TDE is enabled. However, in a Data Guard environment where primary and standby use their own TDE wallets, it becomes challenging. In a previous blog post, we discussed how creating the master encryption key on the primary PDB stops the Data Guard synchronization and how to deal with it.
In this blog post, we will have a look at a second approach, using the STANDBYS=NONE clause, that enables us to create or clone PDBs in a Data Guard environment with TDE enabled without breaking the Data Guard configuration.
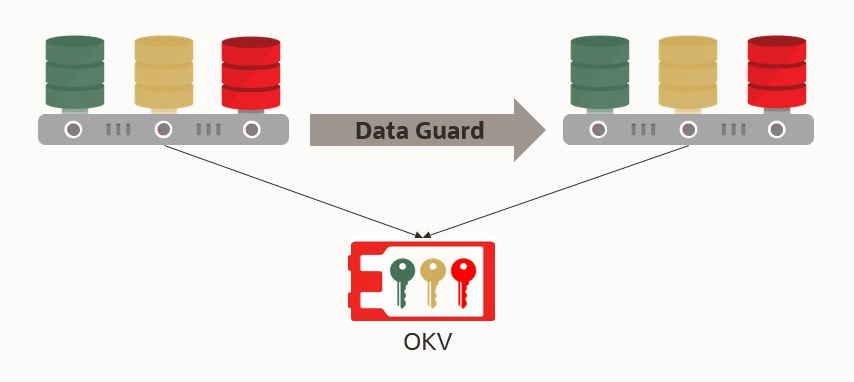
If you are using Oracle Key Vault (OKV) to manage your TDE encryption keys, then you can stop reading here. With OKV the creation of PDBs is seamless and you don’t need to consider anything further, as both primary and standby use the same TDE wallet that is managed by OKV.
The Environment
Oracle Database single instance release version 19.9 with Data Guard and TDE enabled. I’m using the Database Cloud Service on virtual machines with Enterprise Edition as TDE is enabled by default and I could create Data Guard with a click of the button.
Step 0: Check the Configuration
Use the following commands and queries to check the Data Guard configuration and the datafiles status on the standby after each step:
-- check DG configuration
dgmgrl
DGMGRL> connect sys
DGMGRL> show configuration

-- format
set lines 300
col filename for a100
col status for a10
col online for a20
col online_status for a20
col error for a20
col key_id for a60
col creation_time for a40
col pdbname for a10

-- PDB recovery status
select recovery_status
from v$pdbs
where name = 'PDB002';

-- status of datafiles
select d.file#, d.name as filename, d.status
from v$datafile d join v$pdbs p on (d.con_id = p.con_id)
where p.name = 'PDB002';

-- status of tempfiles
select t.file#, t.name as filename, t.status
from v$tempfile t join v$pdbs p on (t.con_id = p.con_id)
where p.name = 'PDB002';

-- status of files needing media recovery
select r.*
from v$recover_file r join v$pdbs p on (r.con_id = p.con_id)
where p.name = 'PDB002';

-- check master encryption keys
select p.con_id, p.name as pdbname, p.open_mode, ek.key_id --, ek.creation_time, ek.KEY_USE
from v$pdbs p left outer join v$encryption_keys ek on (ek.con_id = p.con_id)
where p.name = 'PDB002';
Step 1: Create PDB on Primary
Create your new PDB using the STANDBYS=NONE clause including the master encryption key for the PDB.
On the primary:
SQL> create pluggable database PDB002 admin user pdb2admin identified by <pdb_admin_password> STANDBYS=NONE;
SQL> alter pluggable database PDB002 open;
SQL> alter session set container=PDB002;
SQL> administer key management set key force keystore identified by <TDE_Password> with backup;
The redo for the PDB creation will be applied to the standby database. However, v$pdb will show a recovery status of DISABLED, the datafile status will show RECOVER, and the system datafile a status of SYSOFF. The PDB on standby has no files to access at this moment.


Next, we will copy the data files to the standby host and enable recovery so the new PDB is protected by Data Guard.
The standby PDB will also need the master encryption key that was created and stored in the wallet on the primary. So let’s copy this first to the standby.
Step 2: Copy TDE Wallet to Standby
Copy the TDE wallet files from the primary to the standby. The location of the TDE wallet is defined by the ENCRYPTION_WALLET_LOCATION parameter in the sqlnet.ora file:
cat $ORACLE_HOME/network/admin/sqlnet.ora
scp -p /opt/oracle/dcs/commonstore/wallets/tde/<primary_db_unique_name>/*wallet.* oracle@<standby_server_ip>:/opt/oracle/dcs/commonstore/wallets/tde/<standby_db_unique_name>/
Close and re-open the wallet so the new master encryption key gets recognized.
On the standby:
SQL> administer key management set keystore close container=ALL;
SQL> select status from v$encryption_wallet; --opens the wallet automatically

Step 3: Disable Archivelog Deletion Policy
If you are using a strict archive log deletion policy like APPLIED ON ALL STANDBY, disable it and put it back later on after the PDB has been recovered.
On both the primary and standby:
rman target /
RMAN> show archivelog deletion policy;
RMAN> configure archivelog deletion policy to none;
Step 4: Restore PDB on Standby
Copy the PDB datafiles to the standby using RMAN.
On the standby:
rman target sys@<standby_db_unique_name>
RMAN> run {
    set newname for pluggable database PDB002 to new;
    restore pluggable database PDB002 from service <primary_db_unique_name>;
}
Step 5: Recover PDB on Standby
After the files have been copied, enable recovery of the standby PDB.
First, the redo apply must be stopped for the standby database:
dgmgrl
DGMGRL> connect sys
DGMGRL> edit database <standby_db_unique_name> set state = 'apply-off';
On the standby:
rman target sys@<standby_db_unique_name>
RMAN> switch pluggable database PDB002 to copy;


In the case of Active Data Guard (ADG) and the standby database is open in READ ONLY mode, shut it down and restart it in MOUNT mode.
If ADG, on the standby:
SQL> shutdown immediate
SQL> startup mount
Enable recovery:
SQL> alter session set container = PDB002;
SQL> alter pluggable database enable recovery;
From 18c onward, we need to set the restored datafiles online.
On the standby:
SQL> alter session set container = PDB002;
SQL> set lines 300
SQL> set pages 0
SQL> spool online_files.sql
SQL> select 'alter database datafile '||''''||name||''''||' online;' from v$datafile;
SQL> spool off
SQL> host vi online_files.sql -- Edit the created file to remove any heading, format and feedback lines
SQL> @online_files.sql

Start the redo apply of the standby database again:
dgmgrl
DGMGRL> connect sys
DGMGRL> edit database <standby_db_unique_name> set state = 'apply-on';
The PDB datafiles on the standby will be recovered. This process can take a few minutes to complete.

In the case of Active Data Guard, open the database and the PDBs in READ ONLY mode.
If ADG, on the standby:
SQL> alter database open;
SQL> alter pluggable database all open;
Step 6: Create TEMP file on Standby
As tempfiles are not copied to the standby PDB, add a new tempfile to the TEMP tablespace.
In case of Active Data Guard, the PDB is already opened in READ ONLY mode as in the previous step.
On the standby:
SQL> alter session set container = PDB002;
SQL> alter tablespace temp add tempfile;
If you are NOT using Active Data Guard, then add the temp file after switchover/failover, or: stop the redo apply, open the database in READ ONLY, create the temp file, restart in MOUNT mode, and enable redo to apply again:
DGMGRL> edit database <standby_db_unique_name> set state = 'apply-off';
SQL> alter database open;
SQL> alter pluggable database PDB002 open;
SQL> alter session set container = PDB002;
SQL> alter tablespace temp add tempfile;
SQL> alter session set container = cdb$root;
SQL> shutdown immediate
SQL> startup mount
DGMGRL> edit database <standby_db_unique_name> set state = 'apply-on';
DGMGRL> show configuration
Step 7: Enable Archivelog Deletion Policy
Turn back your original archivelog deletion policy.
On both primary and standby:
rman target /
RMAN> configure archivelog deletion policy to APPLIED ON ALL STANDBY;
Conclusion
Using STANDBYS=NONE requires running a long series of commands using the Data Guard Broker, RMAN, SQL, and scp utilities. This is really a very long process just to create a new PDB. But, every action is controlled and it works fine. If you planning to create multiple PDBs, then it would be worth it to invest some time in scripting the commands and run them all at once. The primary database is up and running during the whole process.

Good news: to achieve the same results, there is a much simpler approach. Stay tuned for the next blog post.
Further Reading
- Create PDBs in a Data Guard Environment with TDE enabled
- Enable TDE, auto-login wallet, and Secure External Password Store (SEPS)
- Making Use Deferred PDB Recovery and the STANDBYS=NONE Feature with Oracle Multitenant (Doc ID 1916648.1)
- Data Guard Physical Standby – Managing temporary tablespace tempfiles (Doc ID 1514588.1)
- Data Guard Impact on Oracle Multitenant Environments (Doc ID 2049127.1)
