

Introduction
Oracle Databases in Oracle Cloud use Transparent Data Encryption (TDE) by default to protect data at rest. The default configuration “Oracle-Managed Keys” stores the master encryption keys in a wallet file locally on the database servers. Now, Oracle also supports the integration with the OCI Vault Service, where you are able to create and control your TDE master encryption keys or import your existing ones.
OCI Vault provides a highly available, durable, and managed service to create and control all your keys from a central location.
Do not confuse OCI Vault with Oracle Key Vault (OKV):
- OCI Vault: a cloud service to manage encryption keys.
- Oracle Key Vault (OKV): a full-stack software appliance to manage encryption keys (and much more).
In this blog post, well will see how to create a database that uses customer-managed keys, and how to change the key management for an existing database from oracle-managed keys (using local wallet) to customer-managed keys (using OCI Vault).
The Environment
- Exadata Cloud Service (ExaCS) X7-2 quarter rack
- Oracle Database version 19.11 using multitenant architecture
Preparation
Step 1: Create a Vault and an Encryption Key
From the Cloud Console, search for “Vault” and click on the “Vault” service in “Identity & Security”.

Click on “Create Vault”, provide a name for your Vault, and create the Vault. When the Vault becomes active, click on the name of your Vault to see the Vault’s details.

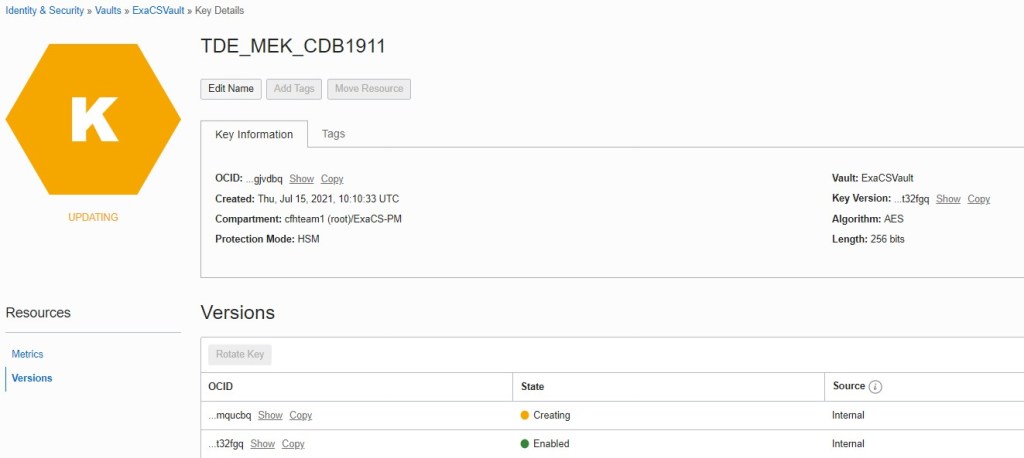
Click on “Create Key”, provide a name for your key, and choose AES 256 as this is the only supported encryption algorithm for TDE customer-managed keys.

Create the key. The key will be available within few seconds.
Step 2: Allow your Exadata Database resources to access the keys in the OCI Vault
Get the Exadata VM Cluster OCID from the VM Cluster details page.
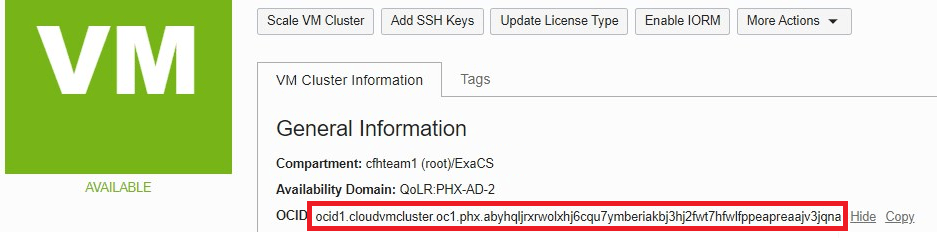
Create a Dynamic Group providing the VM Cluster OCID as a resource.
Any { resource.id = 'ocid1.cloudvmcluster.oc1.phx.abyhqljrxrwolxhj6cqu7ymberiakbj3hj2fwt7hfwlfppeapreaajv3jqna' }

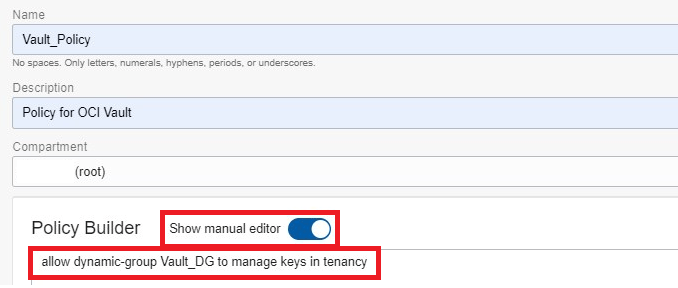
Create a Policy to allow the members of the Dynamic Group to access the keys in OCI Vault.
allow dynamic-group Vault_DG to read vaults in tenancy
allow dynamic-group Vault_DG to manage keys in tenancy
Step 3: Allow Access to Oracle Services Network
Configure your Exadata client subnet security list to allow egress traffic to Oracle Services Network. The route table must have the rule to forward the traffic to Oracle Services Network via a Service Gateway.
Step 4: Update the dbaastools to the latest version
Log in to your Exadata virtual machine as user root and execute the following commands to update the dbaastools to the latest version.
sudo -s
rpm -qa | grep dbaas
dbaascli patch tools list
dbaascli admin updateStack
Creating a new Database
To use customer-managed keys for a new database, just scroll down to the Advanced Options, click on the “Encryption” tab, choose “Use customer-managed keys” and select the Vault and the Key you created previously.

Ok, that was very simple! Now, let’s have a look at how the TDE configuration does look like when using oracle-managed keys, change the key management to customer-managed keys, and see the changes applied to the TDE configuration.
Change the Key Management Type for an existing Database
Before the Change
Before we change the key management type, let’s have a look at the current configuration when the database uses oracle-managed keys (local wallet file).
-- formatting
set lines 300
set pages 100
col name for a20
col wrl_type for a10
col status for a15
col wallet_order for a15
col key_id for a60
col keystore_type for a20
col origin for a20
col encryptionalg for a15
col encryptedts for a15
col inst_id for 999
col value for a60

-- status of the wallet and the wallet location
SQL> select p.con_id, p.name, p.open_mode, ew.wrl_type, ew.wallet_type, ew.status, ew.wallet_order
from v$pdbs p join v$encryption_wallet ew on (ew.con_id = p.con_id)
order by p.con_id;

    CON_ID NAME            OPEN_MODE  WRL_TYPE   WALLET_TYPE          STATUS          WALLET_ORDER
---------- --------------- ---------- ---------- -------------------- --------------- ---------------
         2 PDB$SEED        READ ONLY  FILE       AUTOLOGIN            OPEN            SINGLE
         3 PDB1            READ WRITE FILE       AUTOLOGIN            OPEN            SINGLE

-- master encryption key description attributes
SQL> select con_id, key_id, keystore_type, origin from v$encryption_keys;

    CON_ID KEY_ID                                                       KEYSTORE_TYPE        ORIGIN
---------- ------------------------------------------------------------ -------------------- --------------------
         1 ASFX5KQeDE9mvwJzKyhBtD8AAAAAAAAAAAAAAAAAAAAAAAAAAAAA         SOFTWARE KEYSTORE    LOCAL
         3 AfuItHCV5k/Fv1BsWpeHJgoAAAAAAAAAAAAAAAAAAAAAAAAAAAAA         SOFTWARE KEYSTORE    LOCAL

-- encrypted tablespaces
SQL> select t.con_id, t.name, et.encryptionalg, et.encryptedts, et.encryptedkey from v$tablespace t join v$encrypted_tablespaces et on (t.ts# = et.ts#) order by t.con_id, name;

    CON_ID NAME            ENCRYPTIONALG   ENCRYPTEDTS     ENCRYPTEDKEY
---------- --------------- --------------- --------------- ----------------------------------------------------------------
         1 SYSAUX          AES128          YES             0D9F8565ACC8FA55F9622697FE362D4E00000000000000000000000000000000
         1 SYSTEM          AES128          YES             9E1C0695053E874930B89C69681807DB00000000000000000000000000000000
         . ......

-- wallet path and configuration
SQL> select name, value from v$parameter where name in ('wallet_root', 'tde_configuration');

NAME                 VALUE
-------------------- ------------------------------------------------------------
wallet_root          /var/opt/oracle/dbaas_acfs/CDB1911/wallet_root
tde_configuration    keystore_configuration=FILE

-- content of the wallet directory
ls -ltr /var/opt/oracle/dbaas_acfs/CDB1911/wallet_root/tde
-rw------- 1 oracle oinstall 5467 Jul 15 07:14 ewallet.p12 --password wallet
-rw------- 1 oracle oinstall 5512 Jul 15 07:14 cwallet.sso --auto login wallet
Changing the Key Management Type to use Customer-Managed Keys
From the database details page, click on “More Actions”, then “Administer Encryption Keys”.

Click on “Change Key Management Type”, select “Use customer-manged keys”, and select the Vault and the Key you created previously.

Click on “Apply”. You we be prompted to confirm your change by typing the database name and clicking on “Change Key Management Type”.
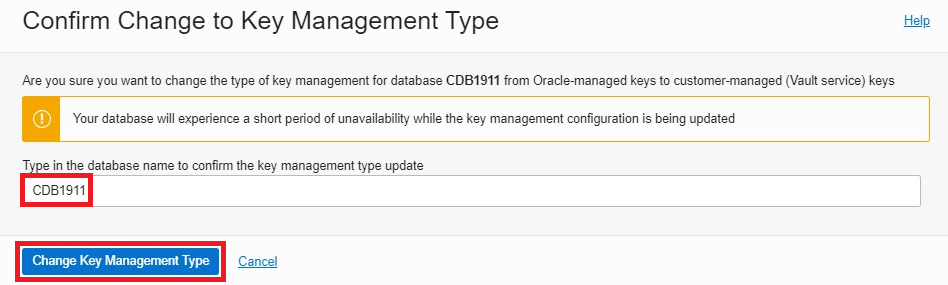
The database goes into the “Updating” status in the UI until the operation completes.
Meanwhile, if you are curious, you can monitor the database alert log in the background.
tail -f /u02/app/oracle/diag/rdbms/cdb1911_phx1qn/CDB19111/trace/alert_CDB19111.log
The conversion to customer-managed keys takes about 15 minutes in total. Changing key management causes the database to become unavailable, as all database instances will be restarted. After the operation completes successfully, the UI will reflect the change. The UI takes further few seconds to show the change.

After the Change
Now, let’s have a look at the new TDE configuration and see what has been changed.
Status of the wallet and the wallet location:

We have additional “OKV” wallet, which is the primary wallet.
However, this is a bit confusing for me, as we are not using OKV (Oracle Key Vault), but the OCI Vault service. These are two very different things.
On another database, which is a non-CDB version 12.1, the wallet type is showing “HSM”, which is the more correct value for OCI Vault in my opinion.

Master encryption key description attributes:

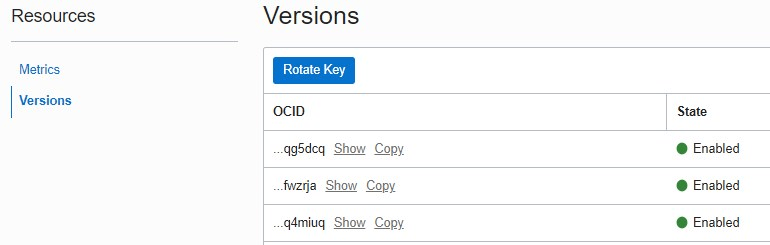
The KEY_ID has been changed as the master encryption key has been rotated. You’ll see a new key version being automatically created for the OCI Vault Key on the key’s details page.
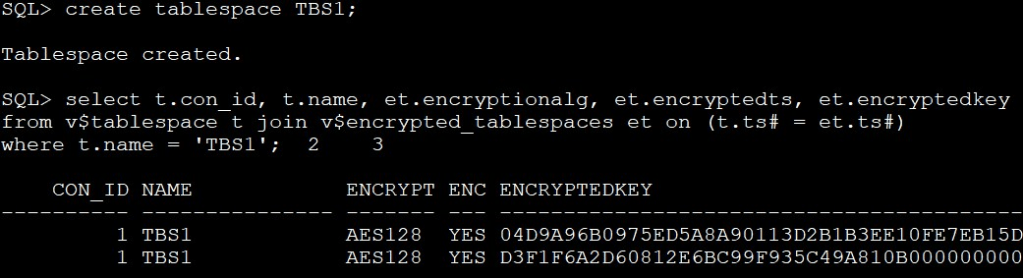
Encrypted tablespaces:

The tablespace encryption keys have been changed, but the encryption algorithm remains AES128. So this is independent of the master encryption key being AES256.
Wallet path and configuration

The wallet_root remains the same, while tde_configuration gets “OKV|FILE” instead of just “FILE”.
Content of the wallet directory

The password wallet (ewallet.p12) and the auto-login wallet (cwallet.sso) are both still there. The ewallet.p12 still contains the keys.
cd /var/opt/oracle/dbaas_acfs/CDB1911/wallet_root/tde
orapki wallet display -wallet ./ewallet.p12
...
ORACLE.SECURITY.DB.ENCRYPTION.AfuItHCV5k/Fv1BsWpeHJgoAAAAAAAAAAAAAAAAAAAAAAAAAAAAA
ORACLE.SECURITY.DB.ENCRYPTION.ASFX5KQeDE9mvwJzKyhBtD8AAAAAAAAAAAAAAAAAAAAAAAAAAAAA
...
So, how to check whether the keys in OCI vault are being used? This is quite simple. Rename the ewallet.p12 password wallet and restart the database. The restart will be successful as the auto-login wallet is used.

Creating a new tablespace will also be successful:
Creating further Pluggable Databases
When creating a new pluggable database from PDB$SEED, the new PDB will not have any master encryption keys.
dbaascli pdb create --pdbName PDB2 --dbName CDBNAME --pdbAdminUserName pdbadmin

SQL> alter pluggable database PDB2 open instances=all;

Pluggable database altered.

SQL> alter session set container = PDB2;

Session altered.

SQL> select key_id, keystore_type, origin from v$encryption_keys;

no rows selected
Create a new master encryption key.
SQL> ADMINISTER KEY MANAGEMENT SET KEY FORCE KEYSTORE IDENTIFIED BY MyWalletPW__11 WITH BACKUP;

keystore altered.

SQL> select key_id, keystore_type, origin from v$encryption_keys;

KEY_ID                                   KEYSTORE_TYPE        ORIGIN
---------------------------------------- -------------------- --------------------
06AD09A1F0E7014F21BF9F2150E312A6D5       OKV                  LOCAL
While the command is executing, you’ll see a new key version being created in the UI.
Local PDB Cloning works the same way:
SQL> create pluggable database PDB3 from PDB1 keystore identified by "MyWalletPW__11";

Pluggable database created.
For remote PDB Cloning, the target CDB must also use OCI Vault for key management and use the same OCI Vault key. When you change the key management for the target CDB, you have to choose the same key being used by the source CDB. During the operation, a new key version will be created.
-- on source CDB
SQL> grant create session, sysoper to C##SYSOPER identified by MySYSoperWP__11 container=all;

Grant succeeded.

-- on target CDB
SQL> create database link DBLINK_TO_B connect to C##SYSOPER identified by MySYSoperWP__11 using '(DESCRIPTION = (ADDRESS_LIST = (ADDRESS = (PROTOCOL = TCP)(HOST = 10.0.2.2)(PORT = 1521))) (CONNECT_DATA = (SERVICE_NAME = CDB1911B_phx1n8.exacsdns.exavcn.oraclevcn.com)))';

Database link created.

SQL> create pluggable database PDB1RC from PDB1@DBLINK_TO_B keystore identified by "MyWalletPW__11";

Pluggable database created.
Further Considerations
Create a new database from backup
Usually, you are able to create a new database from backup using Cloud Tooling. However, if the database is using OCI Vault for key management, then backups encrypted using customer-manged keys can only be used for the in-place restore.


Export Keys using ADMINISTER KEY MANAGEMENT SQL Command
The ADMINISTER KEY MANAGEMENT SQL command can only be used to export keys from a wallet, but not from OKV or OCI Vault.
SQL> administer key management export keys with secret "MySecretPW__11" to '/home/oracle/cdb.key' force keystore identified by "MyWalletPW__11";

ORA-46650: cannot retrieve information for a master key identifier
If you want to do so, you need to migrate back from the external keystore first.
Migrating Back from an External Keystore
Migrating from customer-managed keys back to oracle-managed keys functionality is not provided via Cloud Tooling. However, you can migrate out of OCI Vault to a local wallet again by following this documentation. The database remains available during this operation.
SQL> alter system set tde_configuration='KEYSTORE_CONFIGURATION=FILE' scope=both sid='*';

System altered.

-- reverse migrate the keystore, execute on one node
SQL> ADMINISTER KEY MANAGEMENT SET ENCRYPTION KEY IDENTIFIED BY "MyWalletPW__11" REVERSE MIGRATE USING "SYS:MyWalletPW__11" WITH BACKUP;

keystore altered.

-- restart the database instances on all other nodes to reflect the change
srvctl stop instance -db CDB1911_phx1qn -instance CDB19112
srvctl start instance -db CDB1911_phx1qn -instance CDB19112

SQL> select p.con_id, p.name, p.open_mode, ew.wrl_type, ew.wallet_type, ew.status, ew.wallet_order
from v$pdbs p join v$encryption_wallet ew on (ew.con_id = p.con_id)
order by p.con_id;

    CON_ID NAME            OPEN_MODE  WRL_TYPE   WALLET_TYPE          STATUS     WALLET_ORDER
---------- --------------- ---------- ---------- -------------------- ---------- ---------------
         2 PDB$SEED        READ ONLY  FILE       PASSWORD             OPEN       SINGLE
         3 PDB1            READ WRITE OKV        OKV                  OPEN       SECONDARY
         3 PDB1            READ WRITE FILE       PASSWORD             OPEN       PRIMARY
-- password wallet is the primary now

-- change the keystore password if required (do not change the password if you want to "reverse reverse migrate", check next topic below)
SQL> ADMINISTER KEY MANAGEMENT ALTER KEYSTORE PASSWORD IDENTIFIED BY "MyWalletPW__11" SET "MyWalletPW__22" WITH BACKUP USING 'pwd_change';

keystore altered.

-- export the master encryption key
SQL> administer key management export keys with secret "MySecretPW__22" to '/home/oracle/cdb.key' force keystore identified by "MyWalletPW__22";

keystore altered.
Keep in mind that this is a manual operation outside of the Cloud Tooling, so the changes will not be synced back to the cloud control plane, and the UI would still show “customer-managed keys”.
“Reverse Reverse Migrate”
What if you want to get back to OCI Vault again? There is no option in the Cloud Console for that, but you can use the dbaascli command line tool to achieve this. And remember, from the cloud control plane point’s of view, the database IS using OCI Vault.
The database becomes unavailable during this operation, as all database instances will be restarted. It takes around 5-7 minutes to complete.
Note: The database name must be in uppercase for the db wallet (cwallet.sso) to be found in /var/opt/oracle/dbaas_acfs/CDB1911/db_wallet/, which contains the TDE password. This is why you don’t need to provide the TDE password in the dbaascli command.
-- as root user
KEY_OCID=ocid1.key.oc1.phx.bbqccvs3aafqw.abyhqljr7pca4v7beztarxj2kd6ekhwp5h3nco65wl6n5csp6emluegjvdbq
DBNAME=CDB1911
dbaascli tde file_to_hsm --kmsKeyOCID $KEY_OCID --dbname $DBNAME --precheckOnly yes
dbaascli tde file_to_hsm --kmsKeyOCID $KEY_OCID --dbname $DBNAME --precheckOnly no

# if you changed the password during reverse migrate, then:
# set it back to the original value using "dbaascli tde changePassword --dbname $DBNAME", this will update the db wallet as well.
# or revert it back in the database: ADMINISTER KEY MANAGEMENT ALTER KEYSTORE PASSWORD IDENTIFIED BY MyWalletPW__22 SET MyWalletPW__11 WITH BACKUP;
And here we are, OCI Vault is primary again:
select p.con_id, p.name, p.open_mode, ew.wrl_type, ew.wallet_type, ew.status, ew.wallet_order
from v$pdbs p join v$encryption_wallet ew on (ew.con_id = p.con_id)
order by p.con_id;

    CON_ID NAME            OPEN_MODE  WRL_TYPE   WALLET_TYPE          STATUS          WALLET_ORDER
---------- --------------- ---------- ---------- -------------------- --------------- ---------------
         2 PDB$SEED        READ ONLY  FILE       AUTOLOGIN            OPEN            SINGLE
         2 PDB$SEED        READ ONLY  OKV        OKV                  OPEN            SINGLE
         3 PDB1            READ WRITE FILE       AUTOLOGIN            OPEN            SECONDARY
         3 PDB1            READ WRITE OKV        OKV                  OPEN            PRIMARY
In Oracle database version 18c onward, if WALLET_ROOT and TDE_CONFIGURATION parameters are set, the wallet configuration in sqlnet.ora is ignored.
Conclusion
Using OCI Vault for managing your TDE encryption keys is quite simple, whether immediately at database creation time or changing the key management afterwards. Just create or import your own key in the Vault service and select it at database creation time or afterwards when changing the key management.
Once you are using OCI Vault (customer-managed keys), you cannot switch back to use a local wallet (oracle-managed keys) using cloud tooling. However, reserving this operation is possible using SQL commands. It’s even possible to switch back to OCI Vault again using the dbaascli command line tool.
Last but not least, do NOT confuse OCI Vault with Oracle Key Vault (OKV).
