

Introduction
This is a step by step instruction of the minimum steps needed to import your Data Pump dump files into Oracle Autonomous Database. Without installing anything! Before you export your data, have a look at best practices and what to consider when you migrate to Autonomous Database.
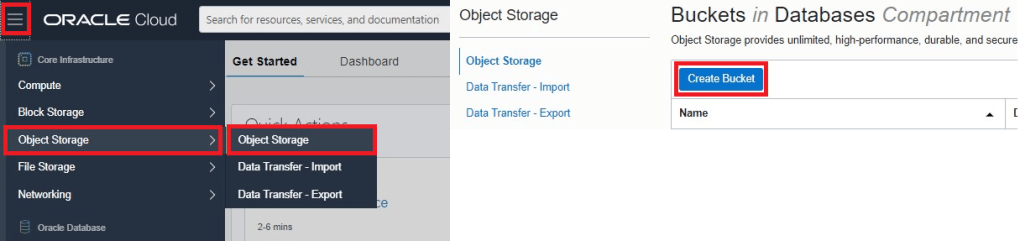
Step 0: Upload you Dump Files into Object Storage
On the web console, click the navigation menu in the upper left side and select Object Storage > Object Storage. Click on Create Bucket, enter a bucket name, and click Create.
Click on the created bucket, then on Upload. Select your dump files to be uploaded and click Upload.
Click on View Object Details in the right hand side ellipsis menu and copy the Object Store URL.

Step 1: Create your Autonomous Database
On the web console, click the navigation menu in the upper left side and select Autonomous Transaction Processing (or your preferred workload type). Click on Create Autonomous Database. Enter your values and click on Create Autonomous Database.

Step 2: Connect to your Autonomous Database
Copy the OCID of your Autonomous Database.

You don’t need to download or install any SQL and Data Pump clients. Everything is read to use in the Cloud Shell. Click on the Cloud Shell icon on the upper right side of your web console next to the region name. The Linux Shell will be opened at the bottom of your screen.

Even the OCI CLI is pre-configured and pre-authorized and we can use it to download the Autonomous Database Client Credentials (the wallet zip file):
ADB_OCID=ocid1.autonomousdatabase.oc1.eu-frankfurt-1.abtheljsa52y7jeuf3lqwi2fgpqjym27h3cadlgf6d7kfvvzmrkrk7s3fgja
FILE_NAME=wallet.zip
WALLET_PW=MyNewWallet__PW11
oci db autonomous-database generate-wallet --autonomous-database-id $ADB_OCID --file $FILE_NAME --password $WALLET_PW

Unzip the wallet file and change the DIRECTORY parameter in sqlnet.ora to the directory where you unzipped the wallet.zip file
unzip wallet.zip
pwd
/home/sinan_petr
vi sqlnet.ora
WALLET_LOCATION = (SOURCE = (METHOD = file) (METHOD_DATA = (DIRECTORY="/home/sinan_petr")))

Connect to your Autonomous Database:
export TNS_ADMIN=/home/sinan_petr
cat tnsnames.ora
sqlplus ADMIN@atptarget_medium

If your Autonomous Database is configured with a Private Endpoint, then you will need a jump server (a compute VM in a public subnet). From the Cloud Shell, ssh to the jump server and work from there:
ssk-keygen #in case you don't have any ssh key on your Cloud Shell machine
#add the public key into the .authorized_keys file in the .ssh folder on your jump server
ssh opc@<public_ip_of_jump_server>
On the jump server you need the database clients installed. An easy way to get that is to create a compute VM using the Developer Image which includes the Oracle Instant Client 21 and much more.
Step 3: Allow your Autonomous Database to Access Object Storage
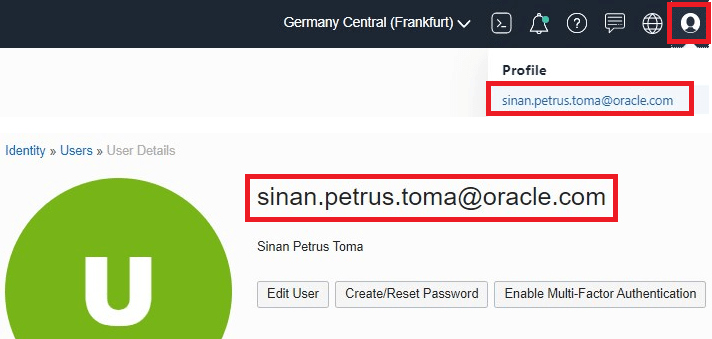
Click on the Profile icon on the upper right side of your web browser, then on your user name. Notice your user name. If the user is an Identity Cloud Service Provider (IDCS) user, then the IDCS name will be part of your user name.
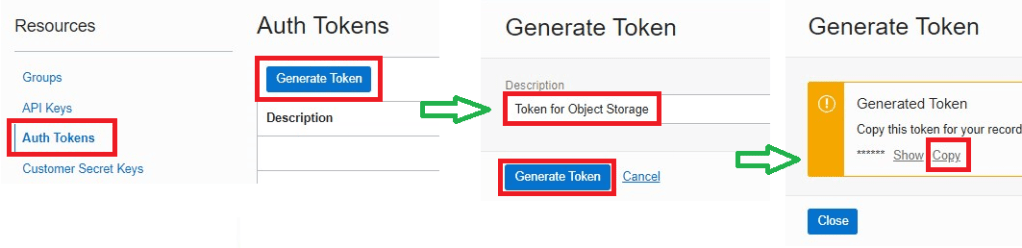
Click on Auth Tokens and then on Generate Token. Enter a Description and click on Generate Token. Copy this token for your records. It will not be shown again.
Execute the following command in your Autonomous Database using the user name and token to create the credentials in the database:
SQL> SET DEFINE OFF -- to disable the special character & if contained in the password
SQL> BEGIN
  DBMS_CLOUD.CREATE_CREDENTIAL(
    credential_name => 'OBJECT_STORE_CRED',
    username => 'sinan.petrus.toma@oracle.com',
    password => ')(:CxXyfvGs4+k6RZonU'
  );
END;
/

PL/SQL procedure successfully completed.
Step 4: Import your Data Pump dump files into Autonomous Database
Create a parameter file using the Object Store URL from step 1 and credential name from step 3:
vi imp.par
directory=DATA_PUMP_DIR
credential=OBJECT_STORE_CRED
schemas=sampleuser
remap_tablespace=USERS:DATA
dumpfile=https://objectstorage.eu-frankfurt-1.oraclecloud.com/n/oci_core_emea_od_kasher/b/dumpfiles/o/sampleuser.dmp
Execute the import command:
impdp userid=ADMIN@atptarget_medium parfile=imp.par

Connected to: Oracle Database 19c Enterprise Edition Release 19.0.0.0.0 - Production
Master table "ADMIN"."SYS_IMPORT_SCHEMA_01" successfully loaded/unloaded
Starting "ADMIN"."SYS_IMPORT_SCHEMA_01":  userid=ADMIN/********@atptarget_medium parfile=imp.par
Processing object type SCHEMA_EXPORT/USER
Processing object type SCHEMA_EXPORT/DEFAULT_ROLE
Processing object type SCHEMA_EXPORT/TABLESPACE_QUOTA
Processing object type SCHEMA_EXPORT/PASSWORD_HISTORY
Processing object type SCHEMA_EXPORT/PRE_SCHEMA/PROCACT_SCHEMA
Processing object type SCHEMA_EXPORT/TABLE/TABLE
Processing object type SCHEMA_EXPORT/TABLE/TABLE_DATA
. . imported "SAMPLEUSER"."SAMPLETABLE"                  5.062 KB       1 rows
Processing object type SCHEMA_EXPORT/TABLE/STATISTICS/TABLE_STATISTICS
Processing object type SCHEMA_EXPORT/STATISTICS/MARKER
Job "ADMIN"."SYS_IMPORT_SCHEMA_01" successfully completed at Fri Mar 5 15:02:56 2021 elapsed 0 00:00:11
That’s it! We are done!
