

Oracle Autonomous Database eliminates the human labor associated with database tuning, security, backups, patching, upgrade, and other routine management tasks traditionally had to be performed manually. Other tasks like restore and recovery, migration, cloning, and moving data are done on demand (manually), but differently and more conveniently than on-premise.
Data Pump is a very useful utility to extract data from the database for, but not only:
- (Cross-platform) database migration
- Cloning a subset of a production database for test and development
- Archiving data for regulatory compliance
As the Autonomous Database also eliminates human error to enhance security, no direct access to the underlying storage and operating system is allowed. So the question is, where are my dump files? and how to get them out of the local database machine?
To make the answer short, it is by using the DBMS_CLOUD package and Object Storage.
In this blog post we are automating the following steps:
- Export data from Autonomous Database
- Copy the dump files to the Object Storage in the same region (update Nov. 2020: meanwhile it is possible to export directly to Object Storage)
- Delete the dump files from the local database machines’ file system
- Copy the dump files to Object Storage in a second region (update Nov. 2020: meanwhile it is possible to define a policy to copy the files automatically across regions)
- Delete or archive the dump files after a specific period of time
Let’s start:
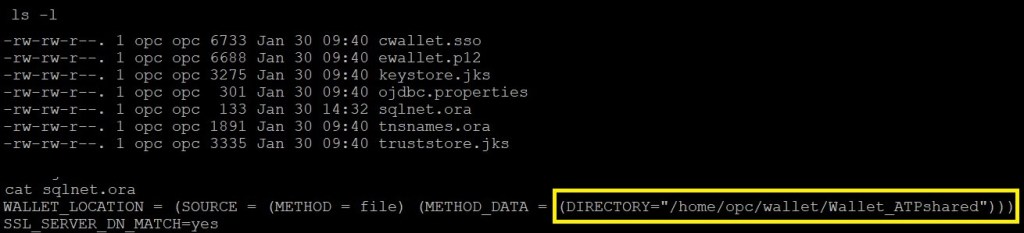
Step 1: download the Database Client Credentials (Wallet zip file), unzip it on your local machine (this could be a Compute VM on OCI), and change the DIRECTORY value in the sqlnet.ora file to the path where you unzipped the wallet.
In this example, the wallet is unzipped into /home/opc/wallet/Wallet_ATPshared
Step 2: download Oracle Instant Client (Basic, SQL*Plus, and Tools Package) and unzip the files in a directory of your choice on your local machine, e.g. /home/opc/instantclient_18_5
This directory now contains the sqlplus, impdp, and expdb binaries.
Step 3: Connect to the Autonomous Database. named “atpshared” in this example:
export TNS_ADMIN=/home/opc/wallet/Wallet_ATPshared
export LD_LIBRARY_PATH=/home/opc/instantclient_18_5
/home/opc/instantclient_18_5/sqlplus USER/PASSWORD@atpshared_high
Step 4: create a bucket in Object Storage, e.g. named “dumps_bucket”
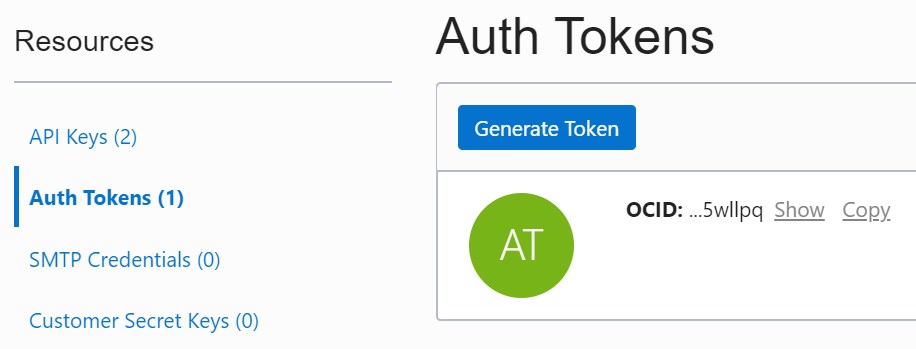
Step 5: allow your Autonomous Database to access Object Storage by creating an Auth Token from your OCI User’s details page and creating the credentials in the database.
SQL> SET DEFINE OFF -- to disable the special character & if contained in the password
SQL> begin
DBMS_CLOUD.create_credential(credential_name => 'OBJ_STORE_CRED',
username => 'your OCI user name, e.g. firstname.lastname@example.com',
password => 'auth_token_generated_in_privious_step, e.g. i1mst8yBiUo7Torr5Dq');
end;
/
Check the created credentials: SELECT owner, credential_name FROM dba_credentials;
Set the DEFAULT_CREDENTIAL database property by executing the following command:
SQL> ALTER DATABASE PROPERTY SET default_credential='OWNER.OBJ_STORE_CRED';
Check the value setting:
SQL> SELECT property_value FROM database_properties WHERE PROPERTY_NAME='DEFAULT_CREDENTIAL';
Step 6: Check the default DATA_PUMP_DIR directory created by default.
SQL> SELECT * FROM dba_directories WHERE directory_name = 'DATA_PUMP_DIR';
Step 7: export your data into the DATA_PUMP_DIR using expdp
expdp userid=USER/PASSWORD@atpshared_high
directory=DATA_PUMP_DIR
dumpfile=export_%U.dmp logfile=export.log
PARALLEL=2
ENCRYPTION=ALL
COMPRESSION=ALL
schemas=DBUSER1,DBUSER2
- Use ENCRYPTION=ALL to encrypt the entire dump file set if desired
- Use COMPRESSION=ALL to compress data before writing to the dump file set
- For the best performance use the HIGH database service for your connection and set the PARALLEL parameter to the number of CPUs in your Autonomous Database. Remember that 1 OCPU is equal to 2 vCPUs, so you can use PARALLEL=2xOCPU
Step 8: if you need a higher degree of parallelism, just scale up the OCPU count right before starting the export and scale it down back immediately after the export finishes by using the OCI CLI command to update the cpu count:
oci db autonomous-database update --autonomous-database-id <DB_OCID> --cpu-core-count <integer>
This is an online operation and usually takes about 1 to 2 minutes to complete.
Step 9: View the generated dump files. As we don’t have access to the operating system, Oracle provides the DBMS_CLOUD PL/SQL package to view this information:
SQL> select * from DBMS_CLOUD.LIST_FILES('DATA_PUMP_DIR');
Step 10: copy the dump files to Object Storage by executing the following command (adjust the tenancy and region name)
SQL> begin
DBMS_CLOUD.PUT_OBJECT('OBJ_STORE_CRED','https://swiftobjectstorage.eu-frankfurt-1.oraclecloud.com/v1/yourTenancyName/dumps_bucket/export_01.dmp', 'DATA_PUMP_DIR', 'export_01.dmp');
DBMS_CLOUD.PUT_OBJECT('OBJ_STORE_CRED','https://swiftobjectstorage.eu-frankfurt-1.oraclecloud.com/v1/yourTenancyName/dumps_bucket/export_02.dmp', 'DATA_PUMP_DIR', 'export_02.dmp');
end;
/
The dump files are now available in your Object Storage bucket.
Step 11: After copying the files to the Object Storage, they still exist in the local directory on the database machine and the storage used counts against your storage quota for the database. You can remove the files by executing the following command:
SQL> begin
DBMS_CLOUD.DELETE_FILE('DATA_PUMP_DIR', 'export_01.dmp');
DBMS_CLOUD.DELETE_FILE('DATA_PUMP_DIR', 'export_02.dmp');
end;
/
Step 12: copy the dump files to Object Storage of another region by executing the following command:
oci os object copy --namespace-name <object_storage_namespace> --bucket-name <source_bucket_name> --source-object-name <source_object> --destination-namespace <destination_namespace_string> --destination-region <destination_region> --destination-bucket <destination_bucket_name> --destination-object-name <destination_object_name>
For this step you need a policy with the following statement:
Allow group <GroupName> to manage object-family in tenancy
Step 13: steps 1 to 6 are a one time configuration you need to execute manually only once.
To run steps 7 to 12 automatically, download this shell script to your local machine, adjust the values as needed, and run it regularly, e.g. by using a cronjob every day at 3 a.m.:
0 3 * * * /home/opc/datapump/export.sh > /home/opc/datapump/export_`date '+\%Y\%m\%d_\%H\%M\%S'`.log
Step 14: Object Storage offers a Lifecycle Management to automatically manage the archiving and deletion of objects in your Object Storage. Using this feature you can keep the dump files in the Object Storage only for a specific period of time and deleting or archiving them afterward.
On the bucket details page, click on “Lifecycle Policy Rules” and then on “Create Rule”. Select to archive or to delete the files, specify the number of days, and click “Create”.

For this step you need a policy with the following statement (change region as required):
Allow service object-storage-eu-frankfurt-1 to manage object-family in tenancy
Done! And we have a great solution for automating data archiving for a very low cost!
