

Introduction
Oracle GoldenGate is a software product that allows you to replicate, filter, and transform data from one database to another in real-time. It can be used to migrate databases with (near) zero downtime. As logical replication, source and target databases could be of different versions, platforms, and character sets. Even many non-Oracle databases are supported.
Until then, it was possible to replicate data INTO an Oracle Autonomous Database. Starting Dec. 23rd, 2020, it is also possible to extract data FROM an Oracle Autonomous Database on Shared Exadata Infrastructure using Oracle GoldenGate.
For example, now it is possible to replicate data between two Oracle Autonomous Databases and keep them in sync while both databases are open in Read-Write mode. The databases could be in different regions and/or belong to different tenancies.
Step 0: Preparation
For this blog post I’m using:
- Oracle Autonomous Database in the San Jose region as Source database.
- Oracle Autonomous Database in Tokyo region as Target database.
- Compute VM with GoldenGate image from Market Place in Frankfurt region (it could be anywhere).
Screenshots in gray are from the source database, in turquoise from the target database, and in International Orange (Golden Gate Bridge) RGB(192,54,44) from the GoldenGate compute VM.
Create a VM using GoldenGate Image from Marketplace
From the main menu, click on “Marketplace”, “Applications”, search for “GoldenGate”, choose “Oracle GoldenGate for Oracle”, and continue with the default version 19.1.0.0.201013_MLR32153823


I’ll keep the deployment names “Source” and “Target”, choose Oracle database version 19c, and do NOT enable the checkbox “deployment 2 – autonomous database”. We will configure this in later steps.

After creation, a compute VM will be created including Oracle GoldenGate software installed. Log in via SSH as user opc as you would do with any usual compute VM, and get the oggadmin user credentials:
ssh opc@158.191.139.138
cat /home/opc/ogg-credentials.json

Now we can access the GoldenGate Service Manager in a web browser:
https://158.191.139.138/

To find out the deployment directory, click on “ServiceManager”, and look for “GoldenGate Config Home”

In the shell again, have a look at the deployment registry file. You’ll see two sections, “Source” and “Target”. For each one, there is a TNS_ADMIN value specified:
cat /u02/deployments/ServiceManager/etc/conf/deploymentRegistry.dat
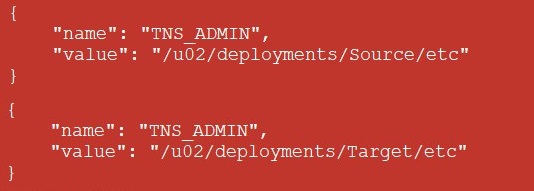
Download the Autonomous Database Client Credentials (zip file) for your source database, copy it to the TNS_ADMIN directory /u02/deployments/Source/etc on the compute VM, unzip it there, and edit the WALLET_LOCATION in the sqlnet.ora file pointing to this directory.

Repeat for the target database, now under the directory /u02/deployments/Target/etc.
Sample Data in Source Database
Connect to the source database, create a user and a table, and insert one row into that table:
sqlplus ADMIN/ADBadmPW__21@adbsanjose_low
create user repluser identified by ADBadmPW__21 default tablespace DATA quota unlimited on DATA;
create table repluser.repltable (id number primary key);
insert into repluser.repltable values (1);
commit;
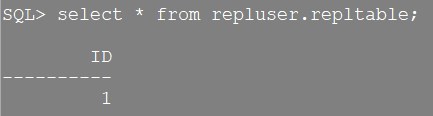
select * from repluser.repltable;
Step 1: Extract
In the source database, unlock the ggadmin user and enable supplemental logging:
alter user ggadmin identified by ADBadmPW__21 account unlock;
ALTER PLUGGABLE DATABASE ADD SUPPLEMENTAL LOG DATA;
select minimal from dba_supplemental_logging;

Determine the current SCN in the source database:
select current_scn from v$database;

On the GoldenGate compute VM, create a parameter file for Extract:
mkdir /u02/trails/dirdat
vi /u02/deployments/Source/etc/conf/ogg/extract1.prm
EXTRACT extract1
USERID ggadmin@adbsanjose_low, PASSWORD ADBadmPW__21
EXTTRAIL ./dirdat/sa
ddl include mapped
TABLE repluser.*;
Launch to the GoldenGate Admin Client, connect to the “Source” deployment, add the ggadmin user credentials, and connect to the database:
/u01/app/ogg/oracle19/bin/adminclient
CONNECT https://localhost deployment Source as oggadmin password n8lPa.GstcKuXzbi !
ALTER CREDENTIALSTORE ADD USER ggadmin@adbsanjose_low PASSWORD ADBadmPW__21 alias adbsanjose_low
DBLOGIN USERIDALIAS adbsanjose_low

Create the Extract using the SCN number determined above, register it to the database, and add the extract trail:
ADD EXTRACT extract1, INTEGRATED TRANLOG, SCN 8859005063
REGISTER EXTRACT extract1 DATABASE
ADD EXTTRAIL ./dirdat/sa, EXTRACT extract1

Start the Extract and check the status:
START EXTRACT extract1
INFO EXTRACT extract1, DETAIL

Look at /u02/deployments/Source/var/log/ggserr.log for logging information.
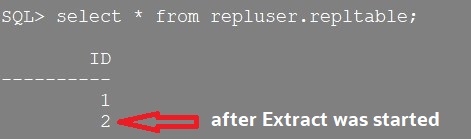
From now on, every transaction after SCN 8859005063 will be recorded in the Extract trail. So let’s do it:
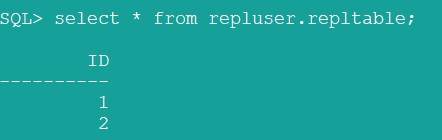
insert into repluser.repltable values (2);
commit;
select * from repluser.repltable;
Step 2: Initial Load
If we would create and start the replication now, GoldenGate will not find the schema and table in the target database to insert that second row from the previous step into it. So first, we have to move all data from the source as of SCN 8859005063 (our sample table included only one row at that time) to the target database.
We will use the Data Pump Export and Import FLASHBACK_SCN parameter for this:
expdp userid=ADMIN/ADBadmPW__21@adbsanjose_low schemas=repluser directory=DATA_PUMP_DIR dumpfile=export.dmp logfile=export.log FLASHBACK_SCN=8859005063
BEGIN
DBMS_CLOUD.PUT_OBJECT ('DEF_CRED_NAME',	'https://objectstorage.us-sanjose-1.oraclecloud.com/n/yournamespace/b/dumps/o/export.dmp', 'DATA_PUMP_DIR', 'export.dmp');
END;
/
impdp userid=ADMIN/ADBadmPW__21@adbtokyo_low credential=DEF_CRED_NAME schemas=repluser directory=DATA_PUMP_DIR dumpfile=https://objectstorage.us-sanjose-1.oraclecloud.com/n/yournamespace/b/dumps/o/export.dmp logfile=import.log

Query the data in the target database:
select * from repluser.repltable;
If you are just testing and playing around, you can create the user and the table on the target database manually by using the SQL commands from step 0.
Step 3: Replicate
In the target database, unlock the ggadmin user:
alter user ggadmin identified by ADBadmPW__21 account unlock;

On the GoldenGate compute VM, create a parameter file for Replicate:
vi /u02/deployments/Target/etc/conf/ogg/replic1.prm
Replicat replic1
USERID ggadmin@adbtokyo_low, PASSWORD ADBadmPW__21
map repluser.*, target repluser.*;
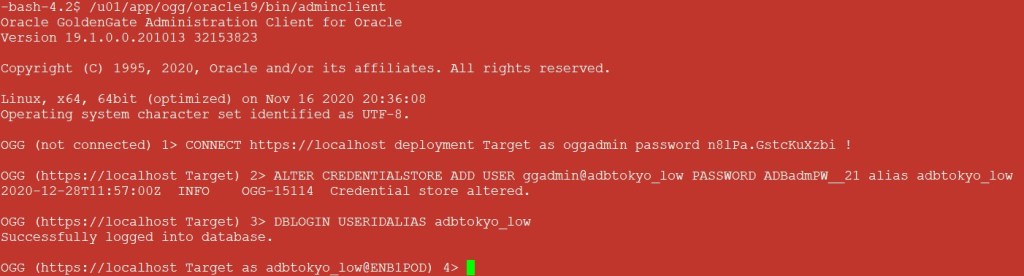
Launch the GoldenGate Admin Client, connect to the “Target” deployment, add the ggadmin user credentials, and connect to the database:
/u01/app/ogg/oracle19/bin/adminclient
CONNECT https://localhost deployment Target as oggadmin password n8lPa.GstcKuXzbi !
ALTER CREDENTIALSTORE ADD USER ggadmin@adbtokyo_low PASSWORD ADBadmPW__21 alias adbtokyo_low
DBLOGIN USERIDALIAS adbtokyo_low
Create the checkpoint table and add the Replicate:
ADD CHECKPOINTTABLE ggadmin.CKPTAB
Add Replicat replic1 exttrail ./dirdat/sa CHECKPOINTTABLE ggadmin.CKPTAB

Start the replication:
Start Replicat replic1
info replicat replic1, DETAIL

Look at /u02/deployments/Target/var/log/ggserr.log for logging information.
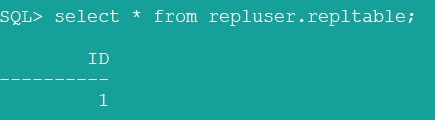
As soon as replication is started, the second row in our sample table will be automatically added to the target database:
select * from repluser.repltable;
Step 4: Synchronization
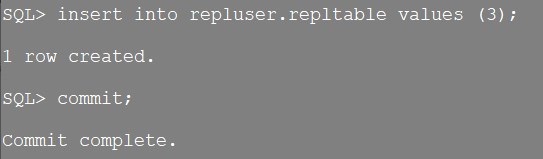
From now on, every transaction on the source for the user repluser will be immediately applied to the target database.
Insert to the source:
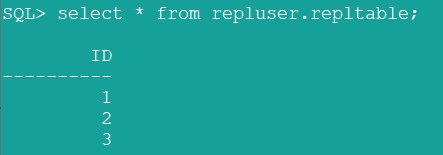
Replicated to target:
As we added “ddl include mapped” to the Extract parameter file, DDL will also be replicated. Create a table on the source:

Replicated on target:

Step 5: Clean Up
The following commands will clean up the GoldenGate configurations from previous steps:
/u01/app/ogg/oracle19/bin/adminclient
CONNECT https://localhost deployment Source as oggadmin password n8lPa.GstcKuXzbi !
stop EXTRACT extract1
delete EXTRACT extract1
ALTER CREDENTIALSTORE DELETE USER ggadmin alias adbsanjose_low

rm /u02/trails/dirdat/sa*

/u01/app/ogg/oracle19/bin/adminclient
CONNECT https://localhost deployment Target as oggadmin password n8lPa.GstcKuXzbi !
DBLOGIN USERIDALIAS adbtokyo_low
stop REPLICAT replic1
delete REPLICAT replic1
delete CHECKPOINTTABLE ggadmin.CKPTAB
ALTER CREDENTIALSTORE DELETE USER ggadmin alias adbtokyo_low
Conclusion
Moving an Oracle Autonomous Database to another region and/or another tenancy can now be done with (near) zero downtime by creating a GoldenGate Replica and keep it up to date.
The same procedure can also be used to replicate an on-premises database to Oracle Autonomous Database and achieve (near) zero downtime migration.
Further Reading
- Video: Migrating data to Autonomous Data Warehouse using Oracle GoldenGate
- Video: Tips & Tricks Connections for GG-MP Connections to Oracle DBs
- Web: Oracle GoldenGate
- Doc: Oracle GoldenGate 19c – Get Started
- Doc: Configuring Extract to Capture from an Autonomous Database
- Doc: Configuring Replicat to Apply to an Autonomous Databases
