

In this part we will introduce the following migration methods using Multitenant Architecture:
- Unplug & Plug
- Remote Cloning
- Remote Hot Cloning
- PDB Refreshable Clone
- PDB Relocate
Multitenant Architecture
The multitenant architecture provides easy and powerful features to move databases across platforms, even with just one single SQL command. It’s almost magic!
The multitenant option was introduced in version 12c to enable an Oracle database to function as a multitenant container database (CDB). A CDB includes zero, one, or many customer-created pluggable databases (PDBs). Consolidating pluggable databases in a hosting infrastructure database ease database management operations such as backups, patching, or upgrades as a single common operation for all hosted pluggable databases.
The PDBs share background processes, memory, (undo) and redo logs. At the physical level, each pluggable database has its own set of data files that stores the data for that PDB.
The multitenant architecture allows migrating PDBs across platforms by unplugging the PDB from the source and plug it into the destination CDB, or just remote clone the PDB in one step. It is as easy as that!
Unplug/Plug and cloning can also be used to migrate from 12c non-CDB to multitenant architecture. Direct migration to pluggable databases is not supported for 11g and previous releases. All 11g and lower version databases have to be upgraded to at least 12.1 first to use multitenant migration methods.
After introducing Data Guard and Golden Gate in part 4, Data Pump in part 5, and RMAN in part 6, now we continue our journey with further migration methods using multitenant architecture:
14. Unplug & Plug
A pluggable database (PDB) can be unplugged from the source CDB and plugged again into the same or different CDB on the same or different database server. Behind the scene, unplug and plug uses RMAN and Data Pump technology to migrate the databases from one platform to another.
The migration steps consist of:
- Close the PDB on the source CDB on-premise.
- Unplug the on-premise PDB to generate the XML file containing the PDB metadata.
- Use the scp utility to copy the PDB data files and XML file to the DBCS compute node in the cloud.
- Plugin the PDB into the target CDB in the cloud.
- Upgrade the target PDB in case your CDB in the cloud has a higher release version than the CDB on-premise. If the target CDB is on the same release version but has a higher patch level, you only need to run datapatch for the target PDB.
- Open the target PDB in Read-Write mode.

For detailed steps and code examples have a look at:
- Unplugging/Plugging a PDB at Oracle doc.
- Unplug a 12.2.0.1 PDB and plugin into 18c in the Cloud blog.
- Upgrade PDBs – One at a Time via unplug/plug/upgrade blog.
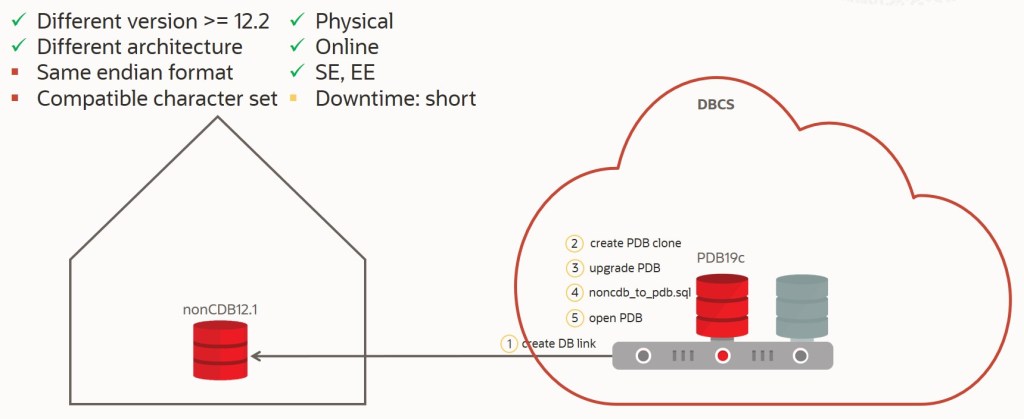
You can use this method to plug in a 12c non-CDB as PDB into a CDB.
The migration steps consist of:
- Set the source 12c non-CDB on-premise in Read-Only mode.
- Run the DBMS_PDB.DESCRIBE procedure to create an XML file that describes the non-CDB.
- Use the scp utility to copy the non-CDB data files and XML file to the DBCS compute node in the cloud.
- Plugin the non-CDB as PDB into the target CDB in the cloud.
- Upgrade the target PDB in case your CDB in the cloud has a higher release version than the CDB on-premise. If the target CDB is on the same release version but has a higher patch level, you only need to run datapatch for the target PDB.
- Run the $ORACLE_HOME/rdbms/admin/noncdb_to_pdb.sql script to delete unnecessary metadata from the SYSTEM tablespace of the new PDB. This script must be run before the PDB can be opened for the first time.
- Open the target PDB in Read-Write mode.

For detailed steps and code examples have a look at:
- Unplugging/Plugging Non-CDB at Oracle doc.
- Database Migration from non-CDB to PDB – Plugin, upgrade, convert blog.
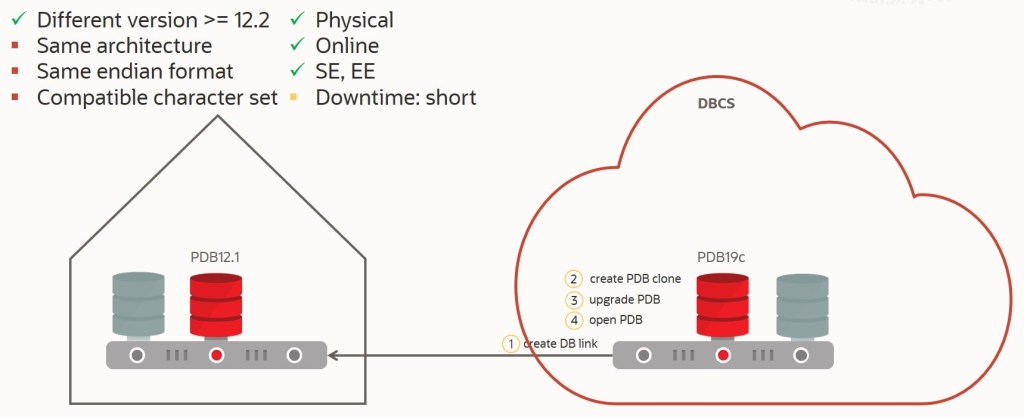
15. Remote Cloning
Remote Cloning enables you to copy the PDB in one step by creating a database link on the target CDB and clone the source PDB instead of unplug and plug.
Local vs. remote cloning: local means the new cloned PDB is on the same CDB as the source PDB, while remote cloning indicates that the new cloned PDB is on a different CDB (this CDB can be on the same or different server/platform, on-premise or in the cloud).
The migration steps consist of:
- Create a database link on the target CDB in the cloud pointing to the source CDB on-premise.
- Set the PDB on-premise in Read-Only mode.
- On the target CDB in the Cloud, run the CREATE PLUGGABLE DATABASE … FROM SQL command to clone the PDB from on-premise to the cloud. If the source PDB has encrypted data or a Keystore set, then you must provide the Keystore password by including the KEYSTORE IDENTIFIED BY <keystore_password> clause in the CREATE PLUGGABLE DATABASE … FROM SQL statement. You must provide this password even if the source PDB is using an auto-login software Keystore. You can determine whether the source PDB has encrypted data or a Keystore by querying the DBA_ENCRYPTED_COLUMNS data dictionary view.
- Upgrade the target PDB in case your CDB in the cloud has a higher release version than the CDB on-premise. If the target CDB is on the same release version but has a higher patch level, you only need to run datapatch for the target PDB.
- Open the target PDB in Read-Write mode.

For detailed steps and code examples have a look at:
- Remote Cloning a PDB at Oracle doc.
- Cloning a PDB from Oracle 12.1 to Oracle 12.2 blog.
- If your PDB is encrypted with Transparent Data Encryption (TDE), then have a look at the great videos provided by Peter Wahl about remote cloning and upgrading TDE encrypted PDBs on YouTube.
A 12c non-CDB can also be cloned to a new PDB. Run the noncdb_to_pdb.sql script in addition to the previous steps.

For detailed steps and code examples have a look at:
- Remote Cloning Non-CDB at Oracle doc.
- Database Migration from non-CDB to PDB – Clone via NON$CDB, upgrade, convert blog.
16. Remote Hot Cloning
When the CDB is in ARCHIVELOG mode and local undo mode, the source PDB can be open in Read-Write mode and operational during the cloning process. This technique is known as hot cloning. This feature is available starting from release version 12.2.
The migration steps are the same as remote cloning but ignoring setting the source PDB in Read-Only mode. This is a great feature to test the migration while the source database is online and operational. Later, when you run the real migration, you would set the source PDB in Read-Only mode and/or stop the application to avoid any data modification on the source during the migration process.
For detailed steps and code examples have a look at:
Hot cloning is also possible if the source database is a 12.2 non-CDB. Run the noncdb_to_pdb.sql script in addition to the previous steps.
17. PDB Refreshable Clone
Starting from release version 12.2 onwards it is possible to clone a PDB and keep it in sync with the source PDB. The sync operation can be executed manually or automatically. The minimum sync delay that can automatically be configured is one minute.
You will use this method to minimize the downtime significantly (down to one minute) by cloning the source PDB and keep the clone in sync until the final migration point, where you just need to open the target PDB in Read-Write mode to stop the synchronization process and use the new PDB as your primary production database.
The migration steps consist of:
- Create a database link on the target CDB in the cloud pointing to the source CDB on-premise.
- On the target CDB in the Cloud, run the CREATE PLUGGABLE DATABASE … FROM … REFRESH MODE SQL command to clone the PDB from on-premise to the cloud and keep it in sync.
- Sync your source with the target manually if you are using the manual refresh mode.
- Upgrade the target PDB in case your CDB in the cloud has a higher release version than the CDB on-premise. If the target CDB is on the same release version but has a higher patch level, you only need to run datapatch for the target PDB.
- Open the target PDB in Read-Write mode.

For detailed steps and code examples have a look at:
- Upgrade Testing with a Refreshable PDB – does this work? blog.
- Refreshable PDB Switchover in Standard Edition Cloud Service blog.
18. PDB Relocate
One other technique starting from 12.2 is to RELOCATE the PDB. Relocate uses the hot clone functionality in the background and drops the source PDB after it appears in the destination CDB.
The big difference here is that the source PDB does not exist anymore after the operation. In case anything unexpectedly happens (e.g. during the upgrade if needed), you have to fix the issue on the target PDB as there is no fallback because the source PDB does not exist anymore! So you have to think about it twice whether you want to use this method to migrate your production database.
The migration steps consist of:
- Create a database link on the target CDB in the cloud pointing to the source CDB on-premise.
- On the target CDB in the Cloud, run the CREATE PLUGGABLE DATABASE … FROM … RELOCATE SQL command to move the PDB from on-premise to the cloud.
- Upgrade the target PDB in case your CDB in the cloud has a higher release version than the CDB on-premise. If the target CDB is on the same release version but has a higher patch level, you only need to run datapatch for the target PDB.
- Open the target PDB in Read-Write mode.
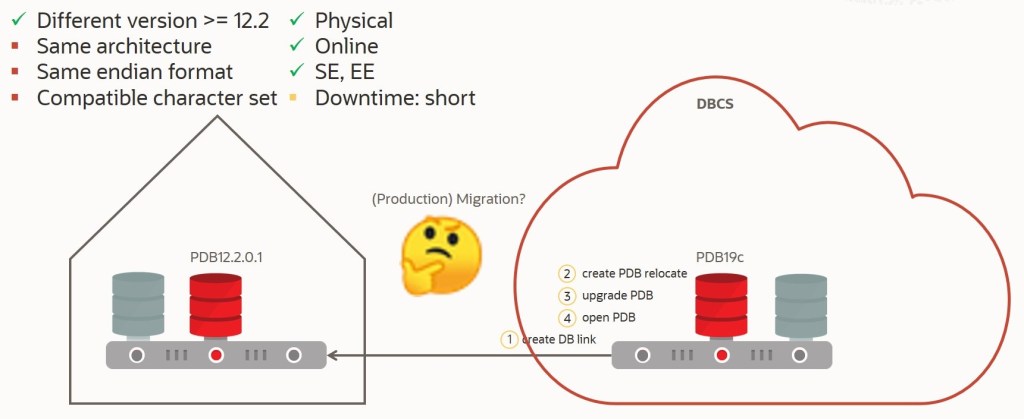
So what is the benefit of the relocate method if we can achieve the same result using cloning, which also provides a fallback option to the source PDB? It is the AVAILABILITY MAX clause that provides a (near) zero downtime. It requires the source and destination databases to be at the same release version level.

For detailed steps and code examples have a look at:
- Upgrade PDBs with RELOCATE – How does it work? blog.
- Save Patching Downtime with Oracle Multitenant? blog.
Further Reading
Almost all the referenced blogs in this article are written by Mike Dietrich. And there are even much much more:
- Database Migration from non-CDB to PDB – The Minimal Downtime Challenge
- Database Migration from non-CDB to PDB – The Fallback Challenge
- Database Migration from non-CDB to PDB – Typical Plugin Issues and Workarounds
- Database Migration from non-CDB to PDB – Various Pitfalls
Thank you very much Mike for all these countless blogs, examples, and recommendations!!!
Conclusion
Multitenant architecture is a great option for database consolidation and simplifying database management operations. It provides numerous migration methods to move PDBs across platforms. The migration methods are very easy and straightforward allowing moving a 12c non-CDB or PDB to a target CDB with a higher release version, hot cloning while the source PDB remains online, and refresh and relocate capabilities to significantly reduce downtime. Even switching between Standard Edition and Enterprise Edition is possible.
Multitenant migration methods copy data files at the physical level and require access to the underlying database infrastructure or the root container database. Hence, the targets are Oracle databases on Oracle Database Cloud Service (DBCS).

Further Reading
- Part 1/10: Why to Migrate your Oracle Database to Oracle Cloud?
- Part 2/10: Introduction to Oracle Database Cloud Services
- Part 3/10: Oracle Database Migration Considerations
- Part 4/10: Automation Tools and Maximum Availability Architecture Migration Methods
- Part 5/10: Migration Methods using Data Pump
- Part 6/10: Migration Methods using RMAN
- Part 7/10: Migration Methods using Multitenant Architecture (this blog post)
- Part 8/10: Migration Tools and Methods for Small Amount of Data
- Part 9/10: Migrating Oracle Databases from AWS to Oracle Cloud
- Part 10/10: Summary and a Migration Decision Tree
