
End of February 2020 Private Endpoints in Autonomous Database on Shared Exadata Infrastructure were announced.
This blog post shows an example architecture and a high-level step by step instruction for creating the necessary OCI resources to implement Private Endpoints to access the Autonomous Database from private network only.
All values used here are an example and you are free to choose other ones as desired.
Step 1: create a VCN with CIDR 10.0.0.0/16
Step 2: create three subnets as follows:
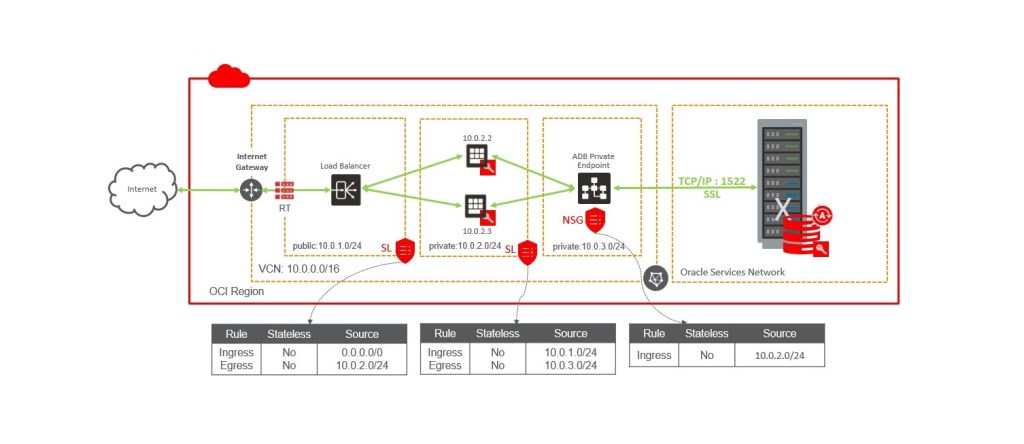
- Public subnet “SNpublic” with CIDR 10.0.1.0/24 for the load balancer
- Private subnet “SNapp” with CIDR 10.0.2.0/24 for the application servers
- Private subnet “SNadb” with CIDR 10.0.3.0/24 for the ADB private endpoint
Step 3: create an Internet Gateway, a Route Table with a rule for the Internet Gateway, and assign the Route Table to the public subnet SNpublic.
Step 4: create a Security List named “SLpublic” with the following rules: Ingress: 0.0.0.0/0, Egress: 10.0.2.0/24. For simplicity and demo purposes, choose “All protocols”. Assign this Security List to the public subnet SNpublic.
Step 5: create a Security List named “SLapp” with the following rules: Ingress: 10.0.1.0/24, Egress: 10.0.3.0/24 and assign it to the private subnet SNapp.
Step 6: create a Network Security Group named “NSGadb” with the following rules: Ingress: 10.0.2.0/24, no Egress rules as we are using Stateful Rules here.
Step 7: this is the BIG MOMENT! Create the Autonomous Database and choose “Virtual cloud network” on the creation page.

Select the VCN we created in step 1, the private subnet SNadb created in step 2, and the network security group NSGadb created in step 5.
Step 8: create your application server in the private subnet SNapp.
Step 9: create a public Load Balancer in the public subnet SNpublic and add the application server from step 7 as Backend Set.
Step 10: Download the Autonomous Database Client Credentials and put them on the application server in the private subnet. To access these compute instances, use a Jump Server in the public subnet.
And the finale good news: you can test this configuration using the Always Free resources!
