

Scripts, batch jobs, and application code need to provide a database username and password to connect to the database. Using wallets risk is reduced because such passwords are no longer exposed in plain text, and password management policies are more easily enforced without changing application code whenever user names or passwords change.
Connect using the connect /@TNS_ALIAS command instead of specifying a user name and password explicitly. This simplifies the maintenance of the scripts and secures the password management for the applications.
Preparation: we are using the following variable values as an example
WALLET_DIR=/home/oracle/mywalletdir/
WALLET_PW=MyWalletPW11__
WALLET_FILE=mywallet.zip
ADB_OCID=ocid1.autonomousdatabase.oc1.eu-zurich-1.xxxxxxxxxx
OCI_REGION=eu-zurich-1
Step 1:
A) For Autonomous Database: download Client Credentials (Wallet) using the console or OCI CLI command:
cd $WALLET_DIR
oci db autonomous-database generate-wallet --autonomous-database-id $ADB_OCID --file $WALLET_FILE --password $WALLET_PW --region $OCI_REGION
and unzip the wallet file:
unzip $WALLET_FILE
B) for non Autonomous Database: create a wallet using the mkstore utility:
mkstore -wrl $WALLET_DIR -create
You will be prompted to choose a password (in this example MyWalletPW11__).
You can also choose to create a local auto login wallet. Local auto login wallets cannot be moved to another server. They must be used on the host on which they are created.
orapki wallet create -wallet $WALLET_DIR -pwd $WALLET_PW -auto_login_local
Step 2: change/add the WALLET_LOCATION in sqlnet.ora to the current directory where you unzipped/created the wallet and add SQLNET.WALLET_OVERRIDE = TRUE

Step 3: create a new TNS alias in tnsnames.ora

Step 4: add username and password to the wallet
TNS_ALIAS=ADBALIAS
USERNAME=ADMIN
USERPW=MyAdminPW22__ (this is the password of the database user ADMIN)
mkstore -wrl $WALLET_DIR -createCredential $TNS_ALIAS $USERNAME $USERPW
You will be prompted to enter the wallet password. This is the password you provided when downloading/creating the wallet (in this example MyWalletPW11__)

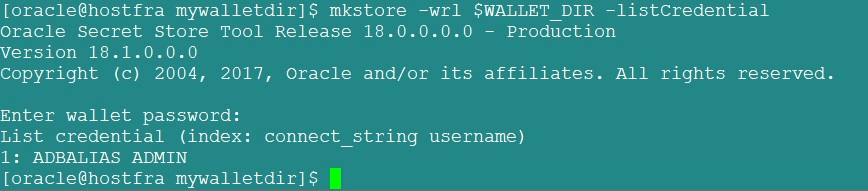
Step 5: check the credentials in the wallet file
mkstore -wrl $WALLET_DIR -listCredential
Step 6: connect to (autonomous) database without providing username and password
export TNS_ADMIN=$WALLET_DIR
sqlplus /@$TNS_ALIAS

It works in the same way for data pump export and import utility:
expdp /@$TNS_ALIAS
Step 7: to modify or delete the credentials from the wallet file
mkstore -wrl $WALLET_DIR -modifyCredential $TNS_ALIAS $USERNAME $USERPW
mkstore -wrl $WALLET_DIR -deleteCredential $TNS_ALIAS
Step 8: to view the values of the connection string, username, and password
mkstore -wrl $WALLET_DIR -viewEntry oracle.security.client.connect_string1
Enter wallet password:
oracle.security.client.connect_string1 = ADBALIAS

mkstore -wrl $WALLET_DIR -viewEntry oracle.security.client.username1
Enter wallet password:
oracle.security.client.username1 = ADMIN

mkstore -wrl $WALLET_DIR -viewEntry oracle.security.client.password1
Enter wallet password:
oracle.security.client.password1 = MyAdminPW22__
Where to get mkstore and orapki utilities?
mkstore and orapki are part of the Oracle Database Client installation.
Conclusion
Storing the credentials in the wallet provides an easy way to connect to the database without providing a username and password in clear text. Anyway, for each database user we need to create a dedicated TNS alias.
