

Introduction
Oracle Application Continuity hides database interruptions from end-users and applications. A simple test using SQL*Plus was discussed in this blog post. However, SQL*Plus is usually not your real application that will be used in production. Also, SQL*Plus is not a pooled application, and it’s recommended to use Connection Pools for Application Continuity.
This blog post provides a simple Java example using a JDBC driver with Universal Connection Pool (UCP) for a quick start connecting to an Oracle Autonomous Database. Refer to the official Oracle documentation at the end of this post for a complete list of recommendations for your production implementations.
The Environment
- Always Free Oracle Autonomous Database running on Oracle Cloud.
- Java JDK 11.
- Eclipse IDE for Java Developers on my local Windows PC.
Database Side
For Autonomous Database on Dedicated Exadata Infrastructure, Transparent Application Continuity is enabled by default for the predefined services tp_tls, tp, tpurgent_tls and tpurgent. No further action is needed on the database side if you are using these services.
Connect as ADMIN
Connect to the Autonomous Database as ADMIN user, e.g., using the SQL tab in Database Actions:

Enable Application Continuity
Oracle Autonomous Database offers predefined database services. Enable Application Continuity for the service used by the application:
SQL> execute DBMS_APP_CONT_ADMIN.ENABLE_AC('lmdzfmg7spyxoty_adbfree_high.adb.oraclecloud.com', 'LEVEL1', 1200);
PL/SQL procedure successfully completed.

SQL> exec DBMS_APP_CONT_ADMIN.SET_DRAINING('lmdzfmg7spyxoty_adbfree_high.adb.oraclecloud.com', 10, 'IMMEDIATE');
PL/SQL procedure successfully completed.

SQL> select name, failover_type, stop_option, drain_timeout from dba_services where lower(name) = lower('lmdzfmg7spyxoty_adbfree_high.adb.oraclecloud.com');
NAME                                               FAILOVER_TYPE   STOP_OPTION     DRAIN_TIMEOUT
-------------------------------------------------- --------------- --------------- -------------
LMDZFMG7SPYXOTY_ADBFREE_high.adb.oraclecloud.com   LEVEL1          IMMEDIATE                  10
Create Database User
Create a user and a simple table for testing:
SQL> create user acusr identified by VerySecretPW__2023 quota unlimited on data;
User created.

SQL> grant dwrole to acusr;
Grant succeeded.

SQL> create table acusr.actab (text varchar2(128));
Table created.
Client Side
Autonomous Client Credentials
Download the client credentials (.zip wallet file) and unzip it on your client machine, in my case, in the C:\Users\SPETRUS\Documents\spetrus\development\ADB_wallets\ADBFREE directory.
Set the WALLET_LOCATION directory in sqlnet.ora to point to this directory:
WALLET_LOCATION = (SOURCE = (METHOD = file) (METHOD_DATA = (DIRECTORY="C:\Users\SPETRUS\Documents\spetrus\development\ADB_wallets\ADBFREE")))
SSL_SERVER_DN_MATCH=yes
Install JDK
If you are always using Java, you should have the JDK already in place. If you are new to Java:
For Windows, follow the installation as described here.
For Linux, you can follow the installation guide or use yum:
sudo yum install java-11-openjdk
Install Eclipse IDE for Java
If it’s not your favorite (yet) and you want to try it out, you can download it here.
For Windows, follow the installation instructions.
For Linux, simply unzip and execute the binary:
tar -zxvf eclipse-java-2022-12-R-linux-gtk-x86_64.tar.gz
chmod 744 eclipse
./eclipse
Download JDBC and UCP .jar Libraries
Download the zipped JDBC driver (ojdbc11.jar) and Companion Jars file ojdbc11-full.tar.gz from the JDBC and UCP download page.
Extract the zip file and add the following JAR files to your application’s CLASSPATH:
- ons.jar, ojdbc11.jar, and ucp11.jar
In Eclipse, right-click on your project name, then Build Path, and Configure Build Path…:
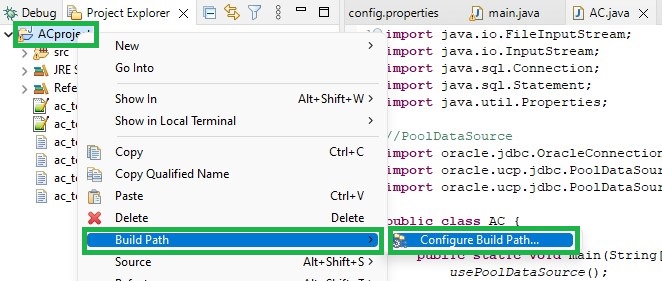
Select Libraries, Classpath, click on Add External Jars…, select the .jar files mentioned above from the directory where you extract the zip file, and click Apply and Close:

Java Example
Create a new Java Class (AC.java) with the following example code:
import java.io.FileInputStream;
import java.io.InputStream;
import java.sql.Connection;
import java.sql.Statement;
import java.util.Properties;
//PoolDataSource
import oracle.jdbc.OracleConnection;
import oracle.ucp.jdbc.PoolDataSourceFactory;
import oracle.ucp.jdbc.PoolDataSource;
public class AC {
public static void main(String[] args) {
usePoolDataSource();
}
public static void usePoolDataSource() {
try {
//use Universal Connection Pool (UCP)
PoolDataSource pds = PoolDataSourceFactory.getPoolDataSource();
pds.setConnectionFactoryClassName("oracle.jdbc.datasource.impl.OracleDataSource");
pds.setConnectionPoolName("JDBC_UCP");
//pds.setInitialPoolSize(10);
pds.setMinPoolSize(4);
pds.setMaxPoolSize(20);
//load properties
String PROP_FILE = "C:\Users\SPETRUS\Documents\spetrus\development\java\ACproject\src\config.properties";
InputStream propInput = new FileInputStream(PROP_FILE);
Properties prop = new Properties();
prop.load(propInput);
//set properties
System.setProperty("oracle.net.tns_admin", prop.getProperty("tns_admin"));
pds.setURL("jdbc:oracle:thin:@"+prop.getProperty("tns_alias"));
pds.setUser(prop.getProperty("db_user"));
pds.setPassword(prop.getProperty("db_password"));
//enable FAN and connection tests
pds.setConnectionWaitTimeout(3);
pds.setFastConnectionFailoverEnabled(true);
pds.setValidateConnectionOnBorrow(true);
//disable auto-commit
pds.setConnectionProperty(OracleConnection.CONNECTION_PROPERTY_AUTOCOMMIT, "false");
pds.setConnectionProperty(OracleConnection.CONNECTION_PROPERTY_IMPLICIT_STATEMENT_CACHE_SIZE, "100");
//get connection from the pool
Connection conn = pds.getConnection();
//conn.beginRequest(); //not needed, as connection pool sets explicit begin request boundary at getConnection()
conn.setAutoCommit(false);
//execute query
Statement stmt = conn.createStatement();
String insert = "insert into acusr.actab values ('Using Application Continuity')";
int result = stmt.executeUpdate(insert);
System.out.println("insert result is: " + result);
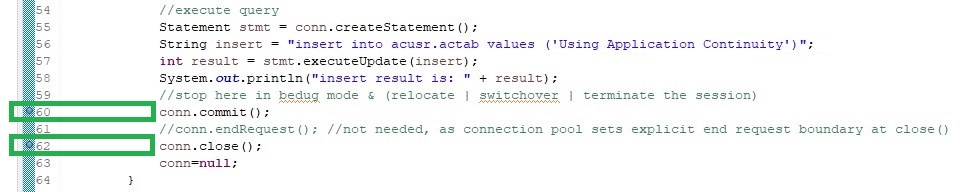
//stop here in bedug mode & (relocate | switchover | terminate the session)
conn.commit();
//conn.endRequest(); //not needed, as connection pool sets explicit end request boundary at close()
conn.close();
conn=null;
}
catch (Exception e) {
e.printStackTrace();
}
}
}
The config.properties file contains the following values in my case:
tns_admin=C:\\Users\\SPETRUS\\Documents\\spetrus\\development\\ADB_wallets\\ADBFREE
tns_alias=adbfree_high
db_user=acusr
db_password=VerySecretPW__2023
For testing, you can also put the values directly in the code instead of using a properties file.
Time to Test
Set two break points before the commit executes and before the end of the request:
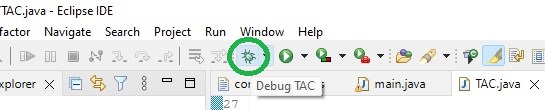
Execute in Debug mode:
The program will stop before the commit executes:

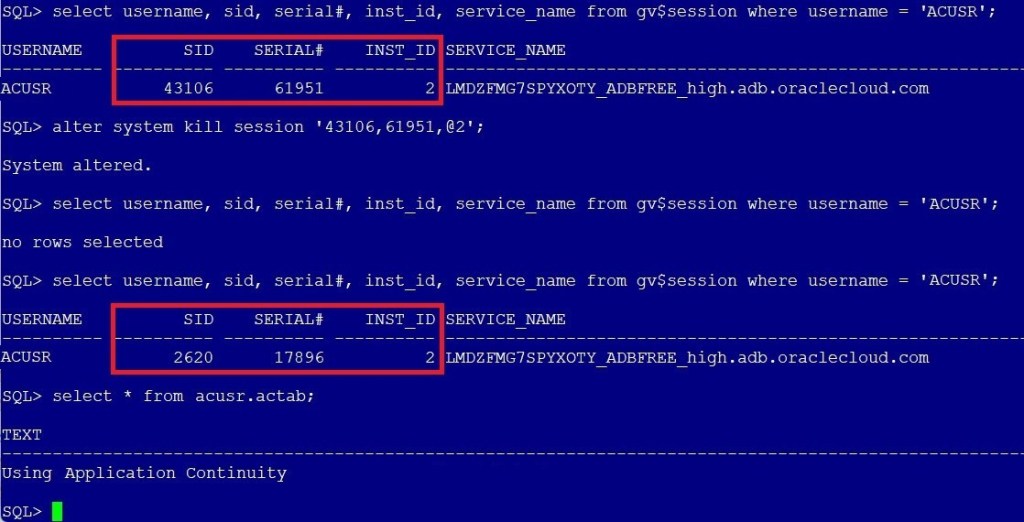
At this point, log in to the database and query the existing session for the user ACUSR:
set lines 300
col username for a10
col service_name for a60
SQL> select username, sid, serial#, inst_id, service_name from gv$session where username = 'ACUSR';
Note the SID, SERIAL#, and INST_ID:

Now terminate this session:
SQL> alter system kill session '43106,61951,@2';
System altered.
Query the gv$session again:

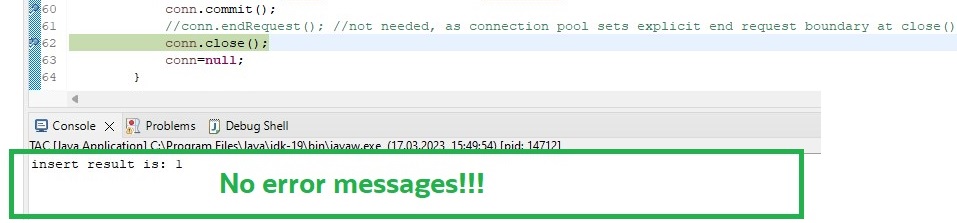
Back to Eclipse, resume the execution:

The execution continues and stops at the next break point.
Most importantly, the application continued without getting any error messages, even though the session was terminated meanwhile:
Back to the database querying gv$session, you will see the user now is connected via another session.
The commit was successfully completed without any interruption for the application:
Conclusion
Oracle Application Continuity hides database interruptions from end-users by replaying in-flight transactions on available database instances, completely transparent to end-users and without any application code changes needed.
The Java code provided is an example to get you started using Oracle Application Continuity with Java. For production implementations, please follow the instructions and recommendations provided by Oracle.
Further Reading
- Application Continuity for Java – JDBC Developer’s Guide
- Ensuring Application Continuity – Universal Connection Pool Developer’s Guide
- Application Checklist for Continuous Service with Autonomous Database on Shared Infrastructure
- Best Practices for Applications Using Autonomous Database – Dedicated
- Application Checklist for Continuous Service for MAA Solutions
- Best Practices for Adopting Transparent Application Continuity
- Application Continuity for the Oracle Database
- Oracle JDBC Drivers – What JDBC driver version to choose
- Java Development with Autonomous Transaction Processing Dedicated (ATP-D)
