

Introduction
When it comes to create, patch, or upgrade your Oracle database in the cloud, Oracle provides Database Software Images that include a specific Release Update (RU), e.g. 18.11, 19.7 or 19.9. However, if you need some additional one-off (interim) patches on top of that RU, you would have to apply them manually afterwards. This additional manual work can be avoided when using Custom Database Software Images.
Creating a Custom Database Software Image allows you to choose a Release Update, and now this is the point, add a list of one-off patches or an Oracle Home inventory file to it. After creation, you can use this Image for:
- Create a new database
- Patch an existing database
- For 19c images, upgrade an existing database
Your database then will have these one-off patches already included without any manual effort.
Custom Database Software Images are available for Virtual Machine, Bare Metal Machine, and Exadata DB Systems. In this blog, for the sake of simplicity, we’ll use VM DB Systems. The process for Exadata is slightly different, as it uses out of place patching by moving the database to another database home. But it is still very easy. I’ll cover that in an extra blog.
VM DB Systems allow creating only one database home with one database that is the same version as the database home.
The Environment
I’ll create a Custom Database Software Image using version 19.8 with three additional one-off patches (jut as example: 28889389,30835853,31301460), and use this to:
- Create a new VM DB System
- Patch an existing VM DB System version 19.7
- Upgrade an existing VM DB System version 18.11
0. Create a Custom Database Software Image
Using the console, from the main menu, choose “Bare Metal, VM, and Exadata”. On the left side, under “Resources”, click “Database Software Images”, then “Create”.

Using OCI CLI:
Create a json file with the desired values as follows with VM_BM_SHAPE as value for the imageShapeFamily parameter:
vi create_image.json
{
   "compartmentId": "ocid1.compartment.oc1..........loa4a",
   "databaseSoftwareImageOneOffPatches": [
     "28889389",
     "30835853",
     "31301460"
   ],
   "databaseVersion": "19.0.0.0",
   "displayName": "Custom_Image_19.8_plus_three_one-offs",
   "imageShapeFamily": "VM_BM_SHAPE",
   "imageType": "DATABASE_IMAGE",
   "patchSet": "19.8.0.0"
}
Use the file to create the database software image:
oci db database-software-image create --from-json file://create_image.json
If you want a sample JSON file with all possible parameters, execute:
oci db database-software-image create --generate-full-command-json-input
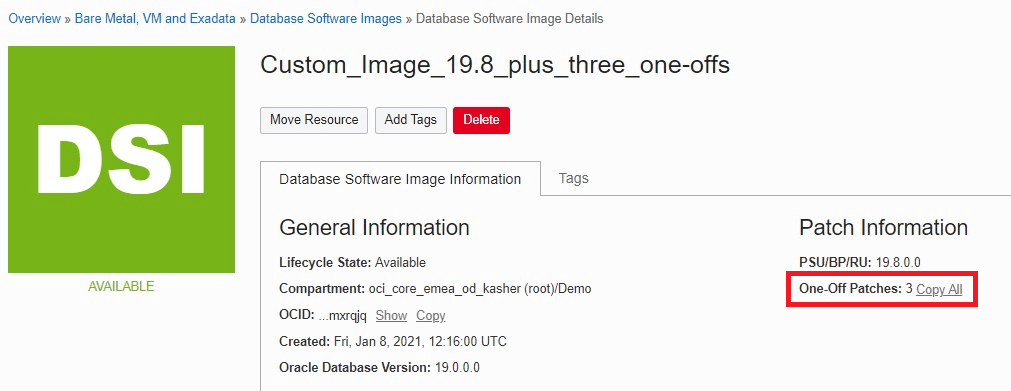
After creation is completed, check the image in the console. Click on “Copy All” to copy the one-off patch numbers included in this software image:
1. Create a new VM DB System
Using the console, from the main menu, choose “Bare Metal, VM, and Exadata”, and click “Create”. You have to use “Oracle Grid Infrastructure” as Storage Management Software to be able to use custom database software images. Logical Volume Manager (LVM) based VM DB Systems use volume cloning to provision faster, so using custom images is not possible.

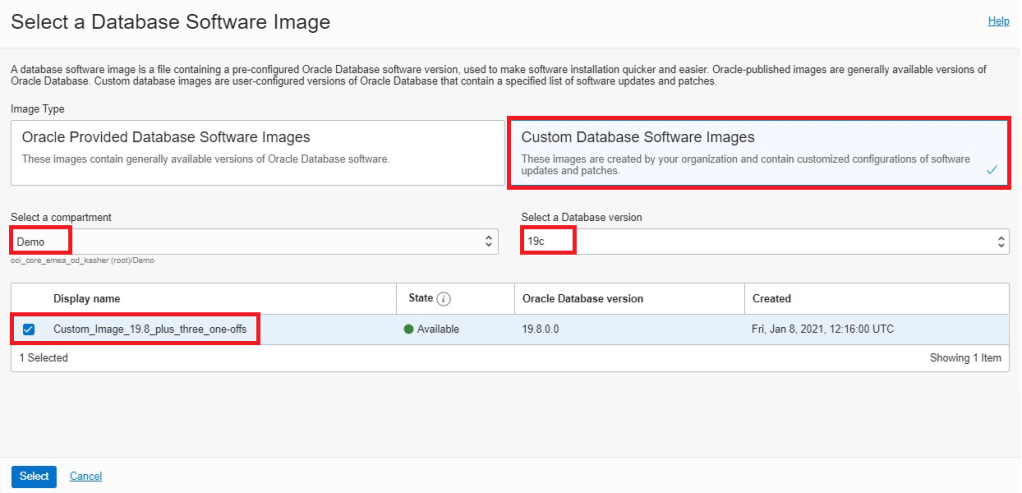
After you fill out all information needed on the first page, click “Next”, then “Change Database Image”

Click “Custom Database Software Images”, select a compartment and a database version, and choose the custom database software image created in the previous step:
After creation is completed, verify that one-off patches are included. On the DB system, as the oracle user:
$ORACLE_HOME/OPatch/opatch lsinventory

#look for the patch number
Patch  30835853     : applied
Patch  28889389     : applied
Patch  31301460     : applied
Using the OCI CLI. To launch a new DB system:
oci db system launch ... --database-software-image-id ...
2. Patch an existing Database
Using the console, from the database details page, on the left side under “Resources”, click “Updates (n)”, then “Custom Database Software Images”. Select a compartment to list the custom database software images. From the dotted menu on the right side, click “Precheck”, then “Apply”.
Pay attention that Type is Patch and Action is Apply in this case, as the database version is 19.7, and the custom image is 19.8 (plus one-offs).

Using OCI CLI to run the precheck, to apply the patch, and to check the status:
DATABASE_OCID=ocid1.database.oc1.eu-frankfurt-1..........ochjq
IMAGE_OCID=ocid1.databasesoftwareimage.oc1.eu-frankfurt-1..........xrqjq

#precheck
oci db database patch --database-id $DATABASE_OCID --database-software-image-id $IMAGE_OCID --patch-action PRECHECK

#apply
oci db database patch --database-id $DATABASE_OCID --database-software-image-id $IMAGE_OCID --patch-action APPLY

#check status
oci db patch-history list by-database --database-id $DATABASE_OCID | jq '.data[0]."lifecycle-state"'
3. Upgrade an existing Database
Using the console, from the database details page, on the left side under “Resources”, click “Updates (n)”, then “Custom Database Software Images”. Select a compartment to list the custom database software images. From the dotted menu on the right side, click “Precheck”, then “Upgrade”.
Pay attention that Type is Upgrade and Action also Upgrade in this case, as the database version is 18.11, and the custom image is 19.8 (plus one-offs).

Using OCI CLI to run the precheck, to upgrade the database, and to check the status:
DATABASE_OCID=ocid1.database.oc1.eu-frankfurt-1..........wey5q
IMAGE_OCID=ocid1.databasesoftwareimage.oc1.eu-frankfurt-1..........xrqjq

#precheck
oci db database upgrade-with-database-software-image --database-id $DATABASE_OCID --database-software-image-id $IMAGE_OCID --action PRECHECK

#upgrade
oci db database upgrade-with-database-software-image --database-id $DATABASE_OCID --database-software-image-id $IMAGE_OCID --action UPGRADE

#check status
oci db database list-upgrade-history --database-id $DATABASE_OCID --sort-by TIMESTARTED --sort-order DESC | jq '.data[0]."lifecycle-state"'
