
Introduction
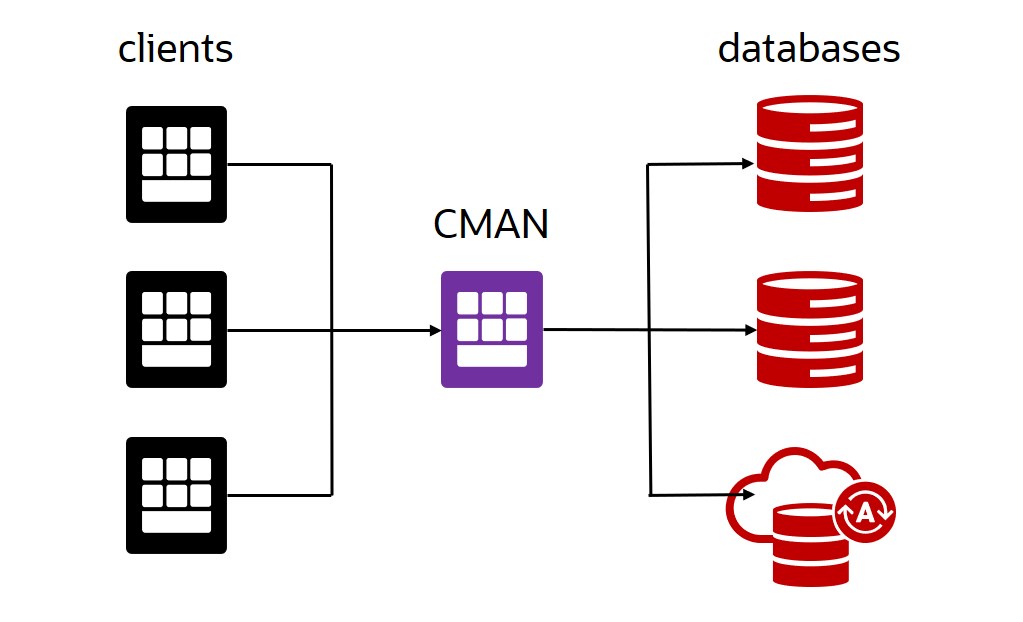
Oracle Connection Manager (CMAN) is a software that acts as a proxy server to forward connection requests from clients to databases.It operates on the session level and is usually installed on a separate server. CMAN is available for installations with Oracle Database Enterprise Edition 12c and higher.
Use Cases
CMAN could be useful in many use cases like:
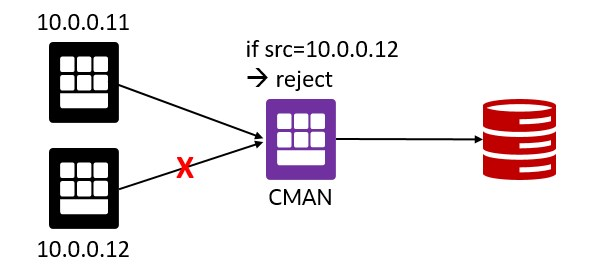
- Access control: use rule-based configuration to reject or accept specific client requests, e.g. based on client IP address.
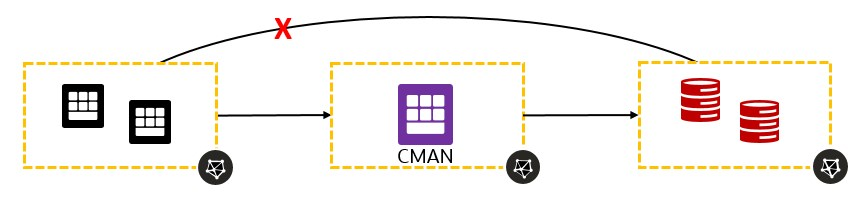
- Transit Routing: clients do not have direct access to one or more databases, CMAN redirects the connections from the clients to the corresponding databases
- Different Ports: target databases use different ports, e.g. 1521 and 1522, but these ports are not open on the client side. Configure CMAN to use a different port, e.g. 1999

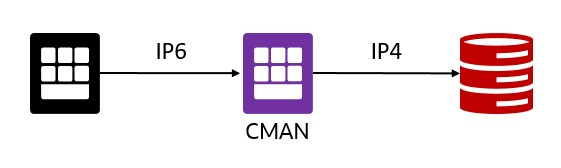
- Different IP protocols: clients and databases use different IP protocols, e.g. client uses IP6, but the database uses IP4. CMAN serves as a network bridge between IPv6 and IPv4. In this case, CMAN must run on a dual-stack host configured with at least one IPv6 and at least one IPv4 interface.
- Database link from Autonomous Database to private IP: this feature is on the road map and is coming soon. Until then, you can use CMAN as a workaround as described in this blog (didn’t try it myself).
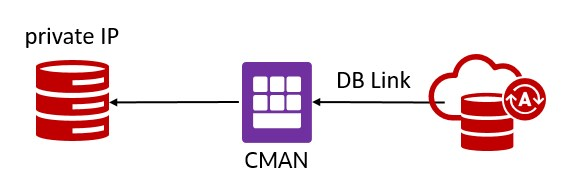
Update Dec. 13, 2021: creating database links from Autonomous Database to private IPs is now possible.
Test Environment
For testing, I’m using the following:
- Compute VM named “client”, IP=10.0.0.11 (screenshots in gray)
- Compute VM named “cman”, IP=10.0.0.8 (screenshots in purple)
- DBCS VM named “dbcs01”, IP=10.0.0.5 and ADB named “ATP19C” (screenshots in turquoise)
Installation
Prepare the cman VM for installation. The following command will create the oracle user, install packages, change kernel parameters, etc.
sudo su -
yum install oracle-database-preinstall-19c.x86_64

Download the Oracle Client 19.3.0 (LINUX.X64_193000_client.zip) from the Oracle Database 19c download page, copy it to the cman VM under /home/oracle and unzip it as user oracle.

A directory named “client” will be created.
As user oracle, create the following directories on the cman VM:
mkdir -p /home/oracle/base/product/cman193
mkdir /home/oracle/oraInventory
Create a response file cman193.rsp with the following content:
vi /home/oracle/cman193.rsp
oracle.install.responseFileVersion=/oracle/install/rspfmt_clientinstall_response_schema_v19.0.0
ORACLE_HOSTNAME=cman
UNIX_GROUP_NAME=oinstall
INVENTORY_LOCATION=/home/oracle/oraInventory
SELECTED_LANGUAGES=en
ORACLE_HOME=/home/oracle/base/product/cman193
ORACLE_BASE=/home/oracle/base/
oracle.install.client.installType=Custom
oracle.install.client.customComponents="oracle.sqlplus:19.0.0.0.0","oracle.network.client:19.0.0.0.0","oracle.network.cman:19.0.0.0.0","oracle.network.listener:19.0.0.0.0"
Install CMAN:
/home/oracle/client/runInstaller -silent -responseFile /home/oracle/cman193.rsp ORACLE_HOME_NAME=cman193

Finalize the installation as root user:
/home/oracle/oraInventory/orainstRoot.sh
/home/oracle/base/product/cman193/root.sh
Configuration
In this step, we are going to configure CMAN. First, open the port the CMAN listener should use on the cman VM. In this case, I’m using port 1999 to demo that it must not necessarily be 1521 and to distinguish it from the database listener port. As root:
firewall-cmd --permanent --add-port=1999/tcp
firewall-cmd --reload

As user oracle, create the CMAN configuration file cman.ora with the following content:
Important: Change the host IP address to your cman VM IP!
mkdir -p /home/oracle/base/network/admin
vi /home/oracle/base/network/admin/cman.ora
cman = (configuration=
  (address=(protocol=tcp)(host=10.0.0.8)(port=1999))
  (parameter_list =
    (log_level=ADMIN)
    (max_connections=1024)
    (idle_timeout=0)
    (registration_invited_nodes = *)
    (inbound_connect_timeout=0)
    (session_timeout=0)
    (outbound_connect_timeout=0)
    (max_gateway_processes=16)
    (min_gateway_processes=2)
    (remote_admin=on)
    (trace_level=off)
    (max_cmctl_sessions=4)
    (event_group=init_and_term,memory_ops)
  )
  (rule_list=
    (rule=
       (src=*)(dst=*)(srv=*)(act=accept)
       (action_list=(aut=off)(moct=0)(mct=0)(mit=0)(conn_stats=on))
  ) )
)
CMAN is a powerful tool. This is just a sample and simple configuration. Check the Oracle documentation for more configuration details, especially regarding security.
Start CMAN:
export ORACLE_HOME=/home/oracle/base/product/cman193
export TNS_ADMIN=/home/oracle/base/network/admin
/home/oracle/base/product/cman193/bin/cmctl
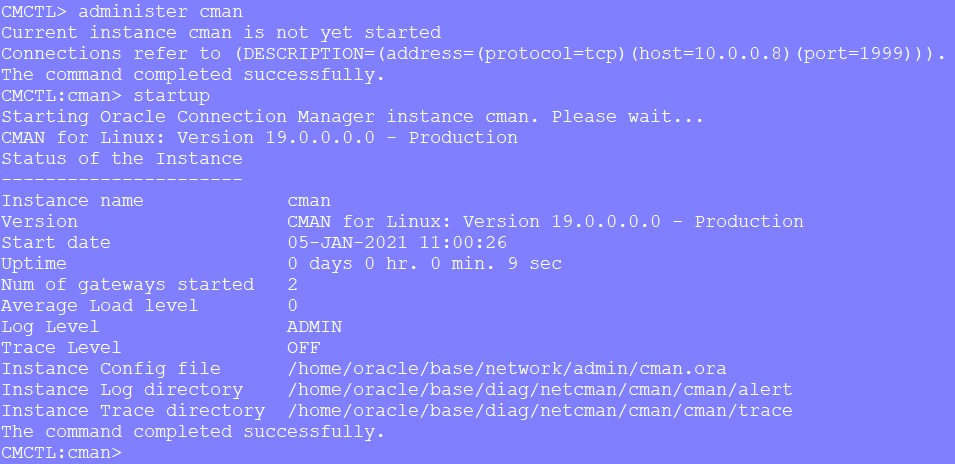
CMCTL> administer cman
CMCTL:cman> startup
You can check status and services using the following commands:
CMCTL:cman> show status
CMCTL:cman> show services
Database Connections
Approach Number 1:
For CMAN to forward incoming connections to databases, CMAN must know of these databases.
On the target database machine, as the user oracle, add the following TNS alias to the tnsnames.ora
vi $ORACLE_HOME/network/admin/tnsnames.ora
listener_cman=
 (DESCRIPTION=
  (ADDRESS_LIST=
   (ADDRESS=(PROTOCOL=tcp)(HOST=10.0.0.8)(PORT=1999))))

And change the database parameter REMOTE_LISTENER
alter system set REMOTE_LISTENER='listener_cman' scope=both sid='*';

You also could set the CMAN IP and port directly without using tnsnames.ora
alter system set REMOTE_LISTENER='10.0.0.8:1999' scope=both sid='*';
Now on the cman VM, you should see messages like this in the trace file
tail -f /home/oracle/base/diag/netcman/cman/cman/trace/cman.log

To test the registration manually, register the database with the following command
alter system register;

Now, the database is registered with the CMAN listener.
Connect to the database from the client VM using the CMAN IP and Port.
Create a new TNS alias in the tnsnames.ora on the client VM
pdb1811 =
 (DESCRIPTION =
	 (ADDRESS =
		(PROTOCOL = TCP)(HOST = 10.0.0.8)(PORT = 1999)
	 )
		(CONNECT_DATA = (SERVICE_NAME=pdb1811.publicsubnet.vcnfra.oraclevcn.com)
	 )
 )
And connect
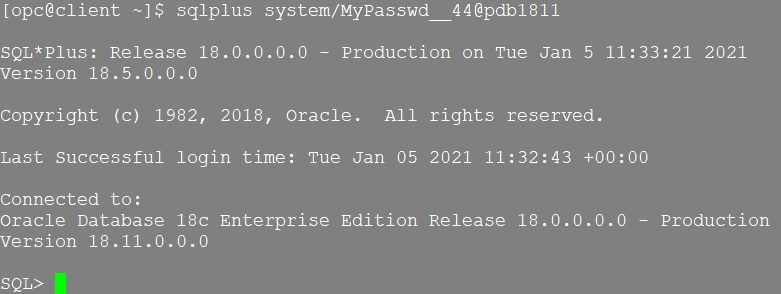
sqlplus system/MyPasswd__44@pdb1811
Check the CMAN trace file: /home/oracle/base/diag/netcman/cman/cman/trace/cman.log

Approach Number 2:
In case changing REMOTE_LISTENER database parameter is not possible, use the following entry in your tnsnames.ora on the client machine.
pdb199 =
 (DESCRIPTION =
	 (SOURCE_ROUTE = YES)
	 (ADDRESS =
		(PROTOCOL = TCP)(HOST = 10.0.0.8)(PORT = 1999) #CMAN IP address and Port
	 )
	 (ADDRESS =
		(PROTOCOL = TCP)(HOST = 10.0.0.5)(PORT = 1521) #DB IP address and Port
	 )
		(CONNECT_DATA = (SERVICE_NAME=pdb1811.publicsubnet.vcnfra.oraclevcn.com)
	 )
 )
Autonomous Database Connections
As REMOTE_LISTENER cannot be changed on Autonomous Databases

we have to use the second approach from the previous step. Download the Autonomous Database Client Credentials zip file, unzip it, copy the TNS entry to your local tnsnames.ora on the client machine, and add the following two lines to it:
atp19c_cman =
(description= (retry_count=20)(retry_delay=3)
	(SOURCE_ROUTE = YES)	#line added
	(ADDRESS = (PROTOCOL = TCP)(HOST = 10.0.0.8)(PORT = 1999)) #line added
	(address=(protocol=tcps)(port=1522)(host=adb.eu-frankfurt-1.oraclecloud.com))
	(connect_data=(service_name=n7pmwsc8te8fjty_atp19c_tp.atp.oraclecloud.com))
	(security=(ssl_server_cert_dn="CN=adwc.eucom-central-1.oraclecloud.com,OU=Oracle BMCS FRANKFURT,O=Oracle Corporation,L=Redwood City,ST=California,C=US"))
)
On the cman VM, as user oracle, create a new directory, and copy the cwallet.sso file into it.
mkdir -p /home/oracle/wallet/ATP19C

Add the following section to the cman.ora file
vi /home/oracle/base/network/admin/cman.ora
wallet_location =
  (SOURCE=
    (METHOD=File)
    (METHOD_DATA=
      (DIRECTORY=/home/oracle/wallet/ATP19C)
    )
  )
Now connect from your client machine:
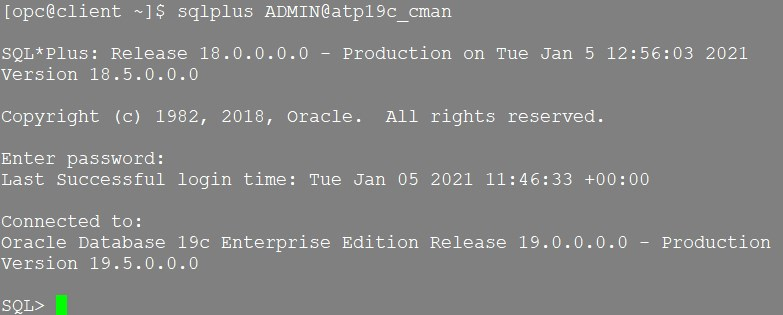
sqlplus ADMIN@atp19c_cman
Look at the CMAN log
view /home/oracle/base/diag/netcman/cman/cman/trace/cman.log

Rule Based Configuration
If you go back and check the rule in the cman.ora file, you’ll find the following
(src=*)(dst=*)(srv=*)(act=accept)
So we are allowing connections from any source, to any target, and to any service. Using the rule list, it is possible to define your own rules to allow or reject connections from specific clients, to specific targets, or to specific services, e.g.:
(RULE_LIST=
  (RULE=
    (SRC=10.0.0.11)
    (DST=10.0.0.5)
    (SRV=pdb1811.publicsubnet.vcnfra.oraclevcn.com)
    (ACT=reject))
  (RULE=
    (SRC=10.0.0.6)
    (DST=10.0.0.5)
    (SRV=pdb1811.publicsubnet.vcnfra.oraclevcn.com)
    (ACT=accept))
)
Conclusion
Installing and configuring CMAN is very easy and straightforward. It enables you to define rules for accepting or rejecting client connections based on their IP addresses. Furthermore, it allows to overcome challenges when clients do not have direct access to the database machine.
Further Reading
- Configuring Oracle Connection Manager
- Connecting CMAN – Traffic Director Mode to an Oracle Cloud Autonomous Database
- Integrating Connection Manager (CMAN) into a RAC+SCAN Environment (Doc ID 1556300.1)
